


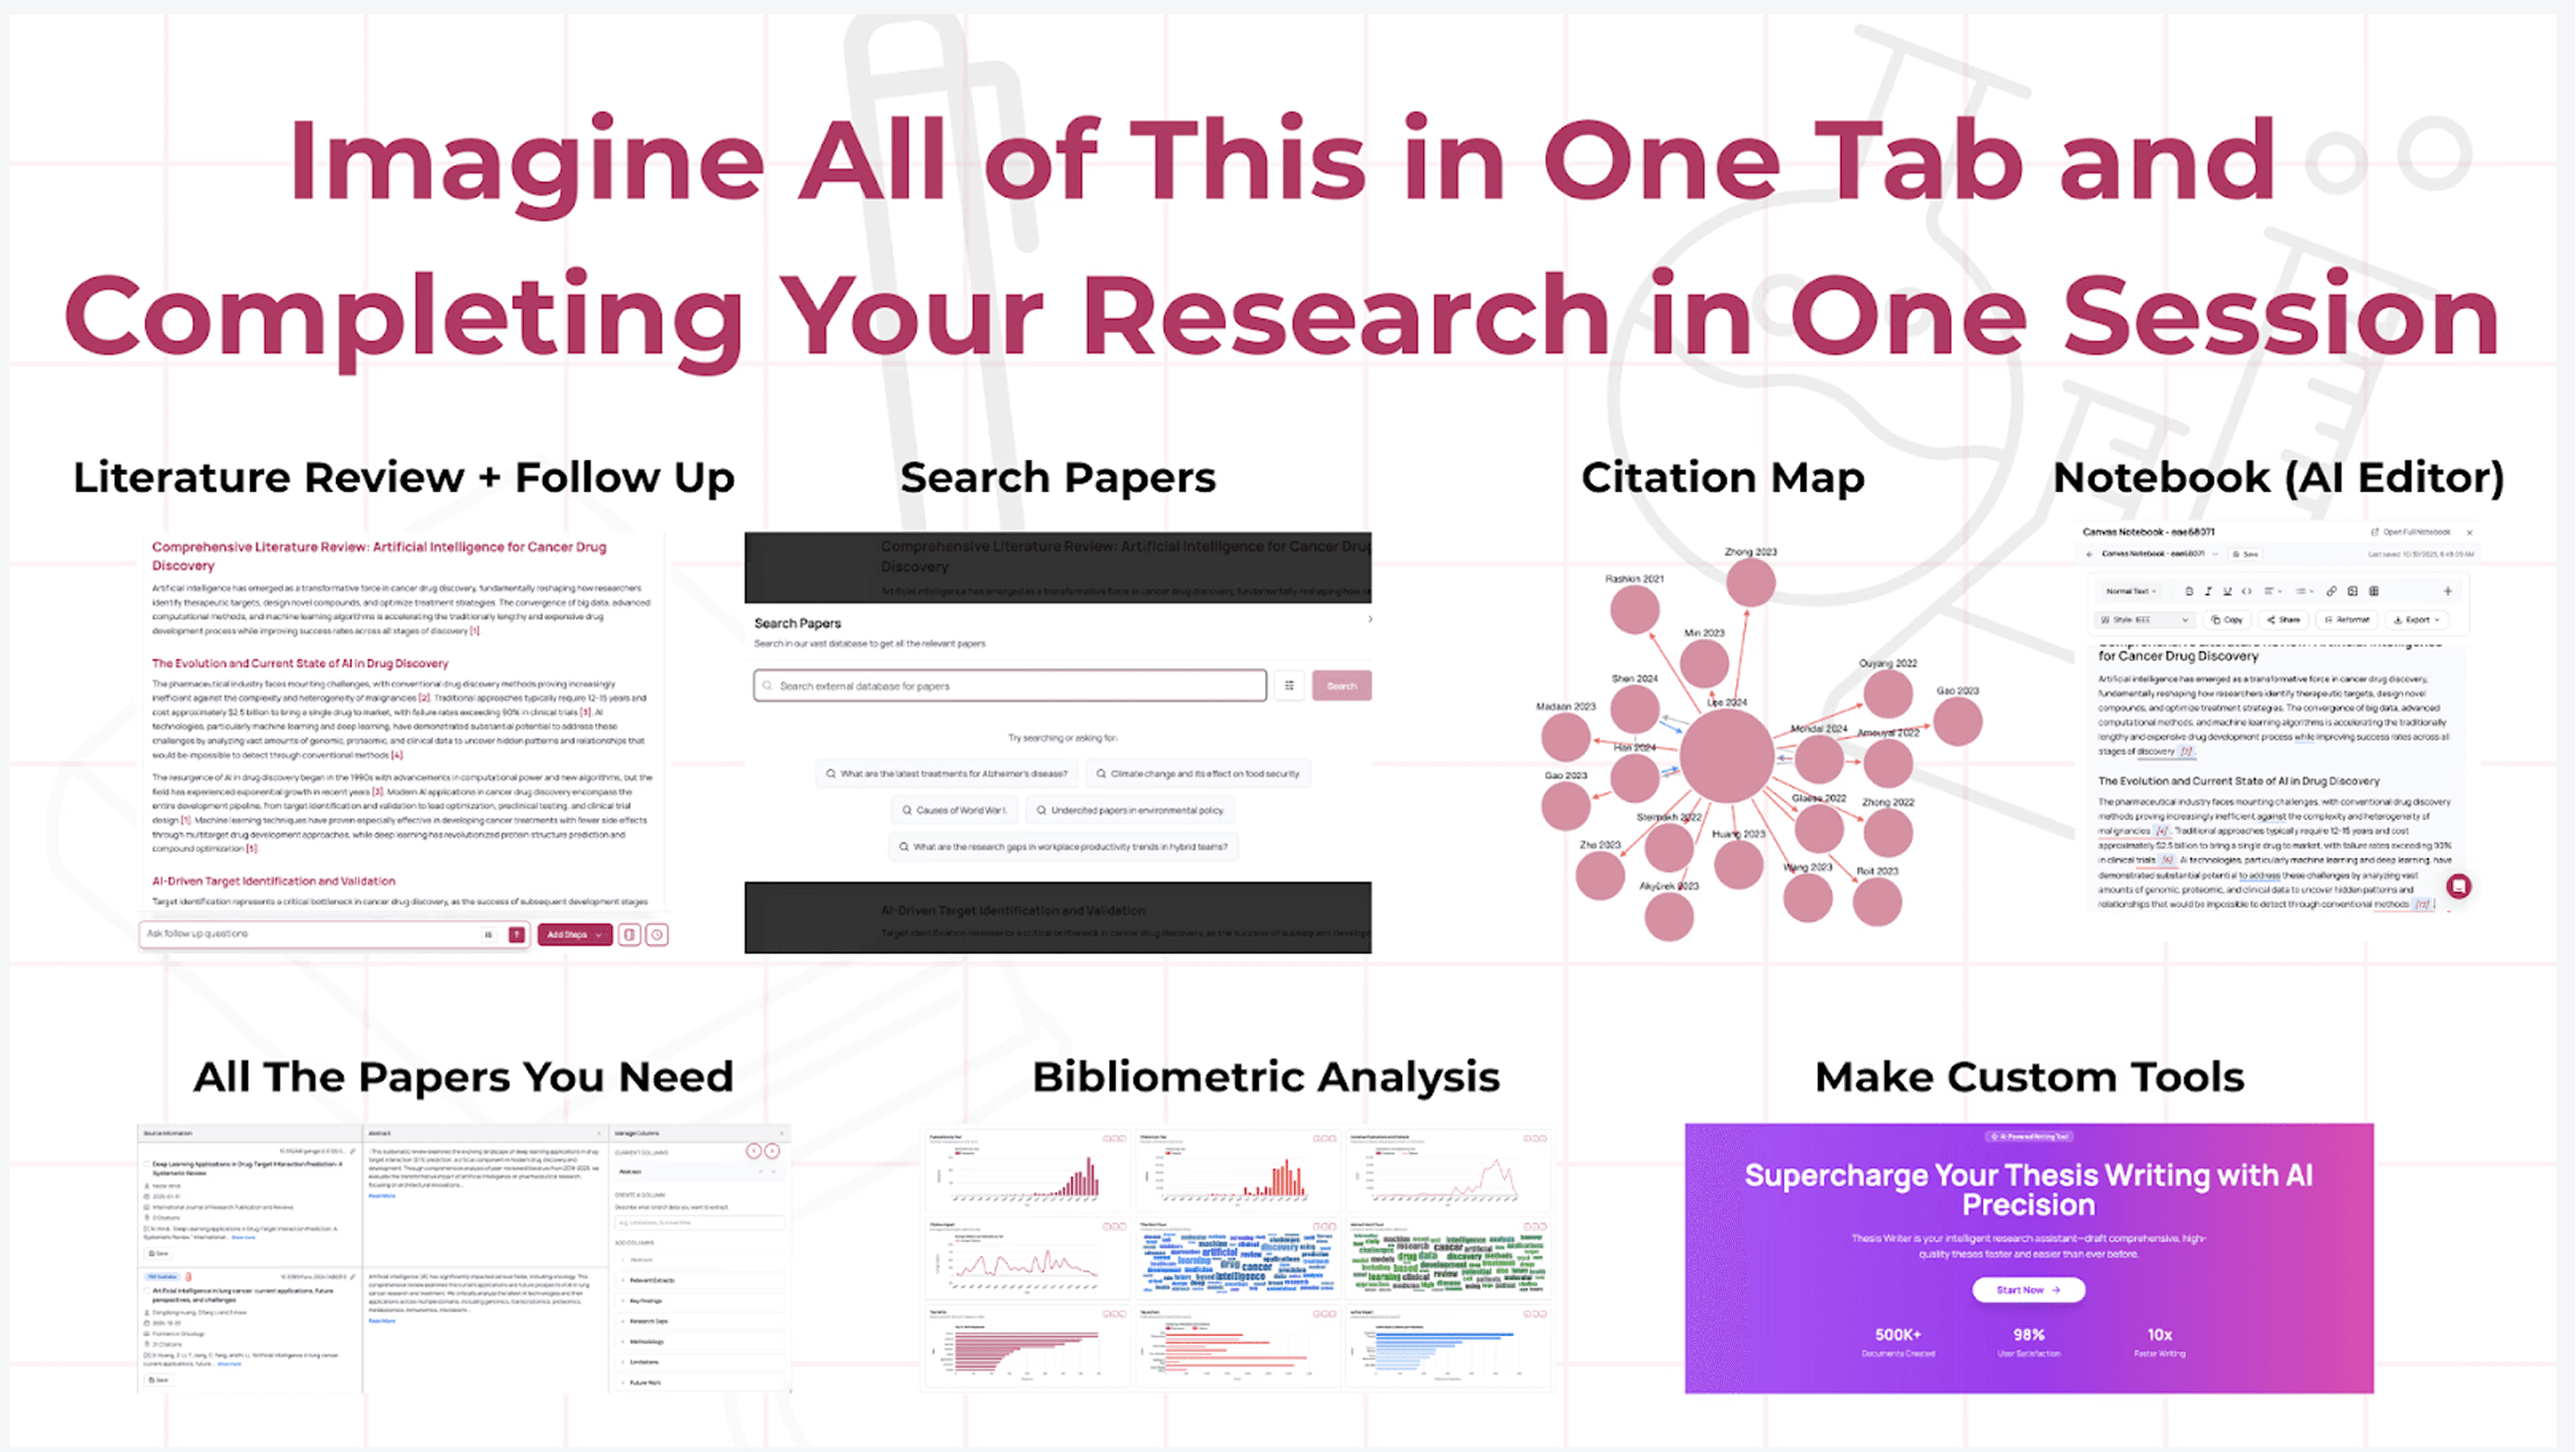
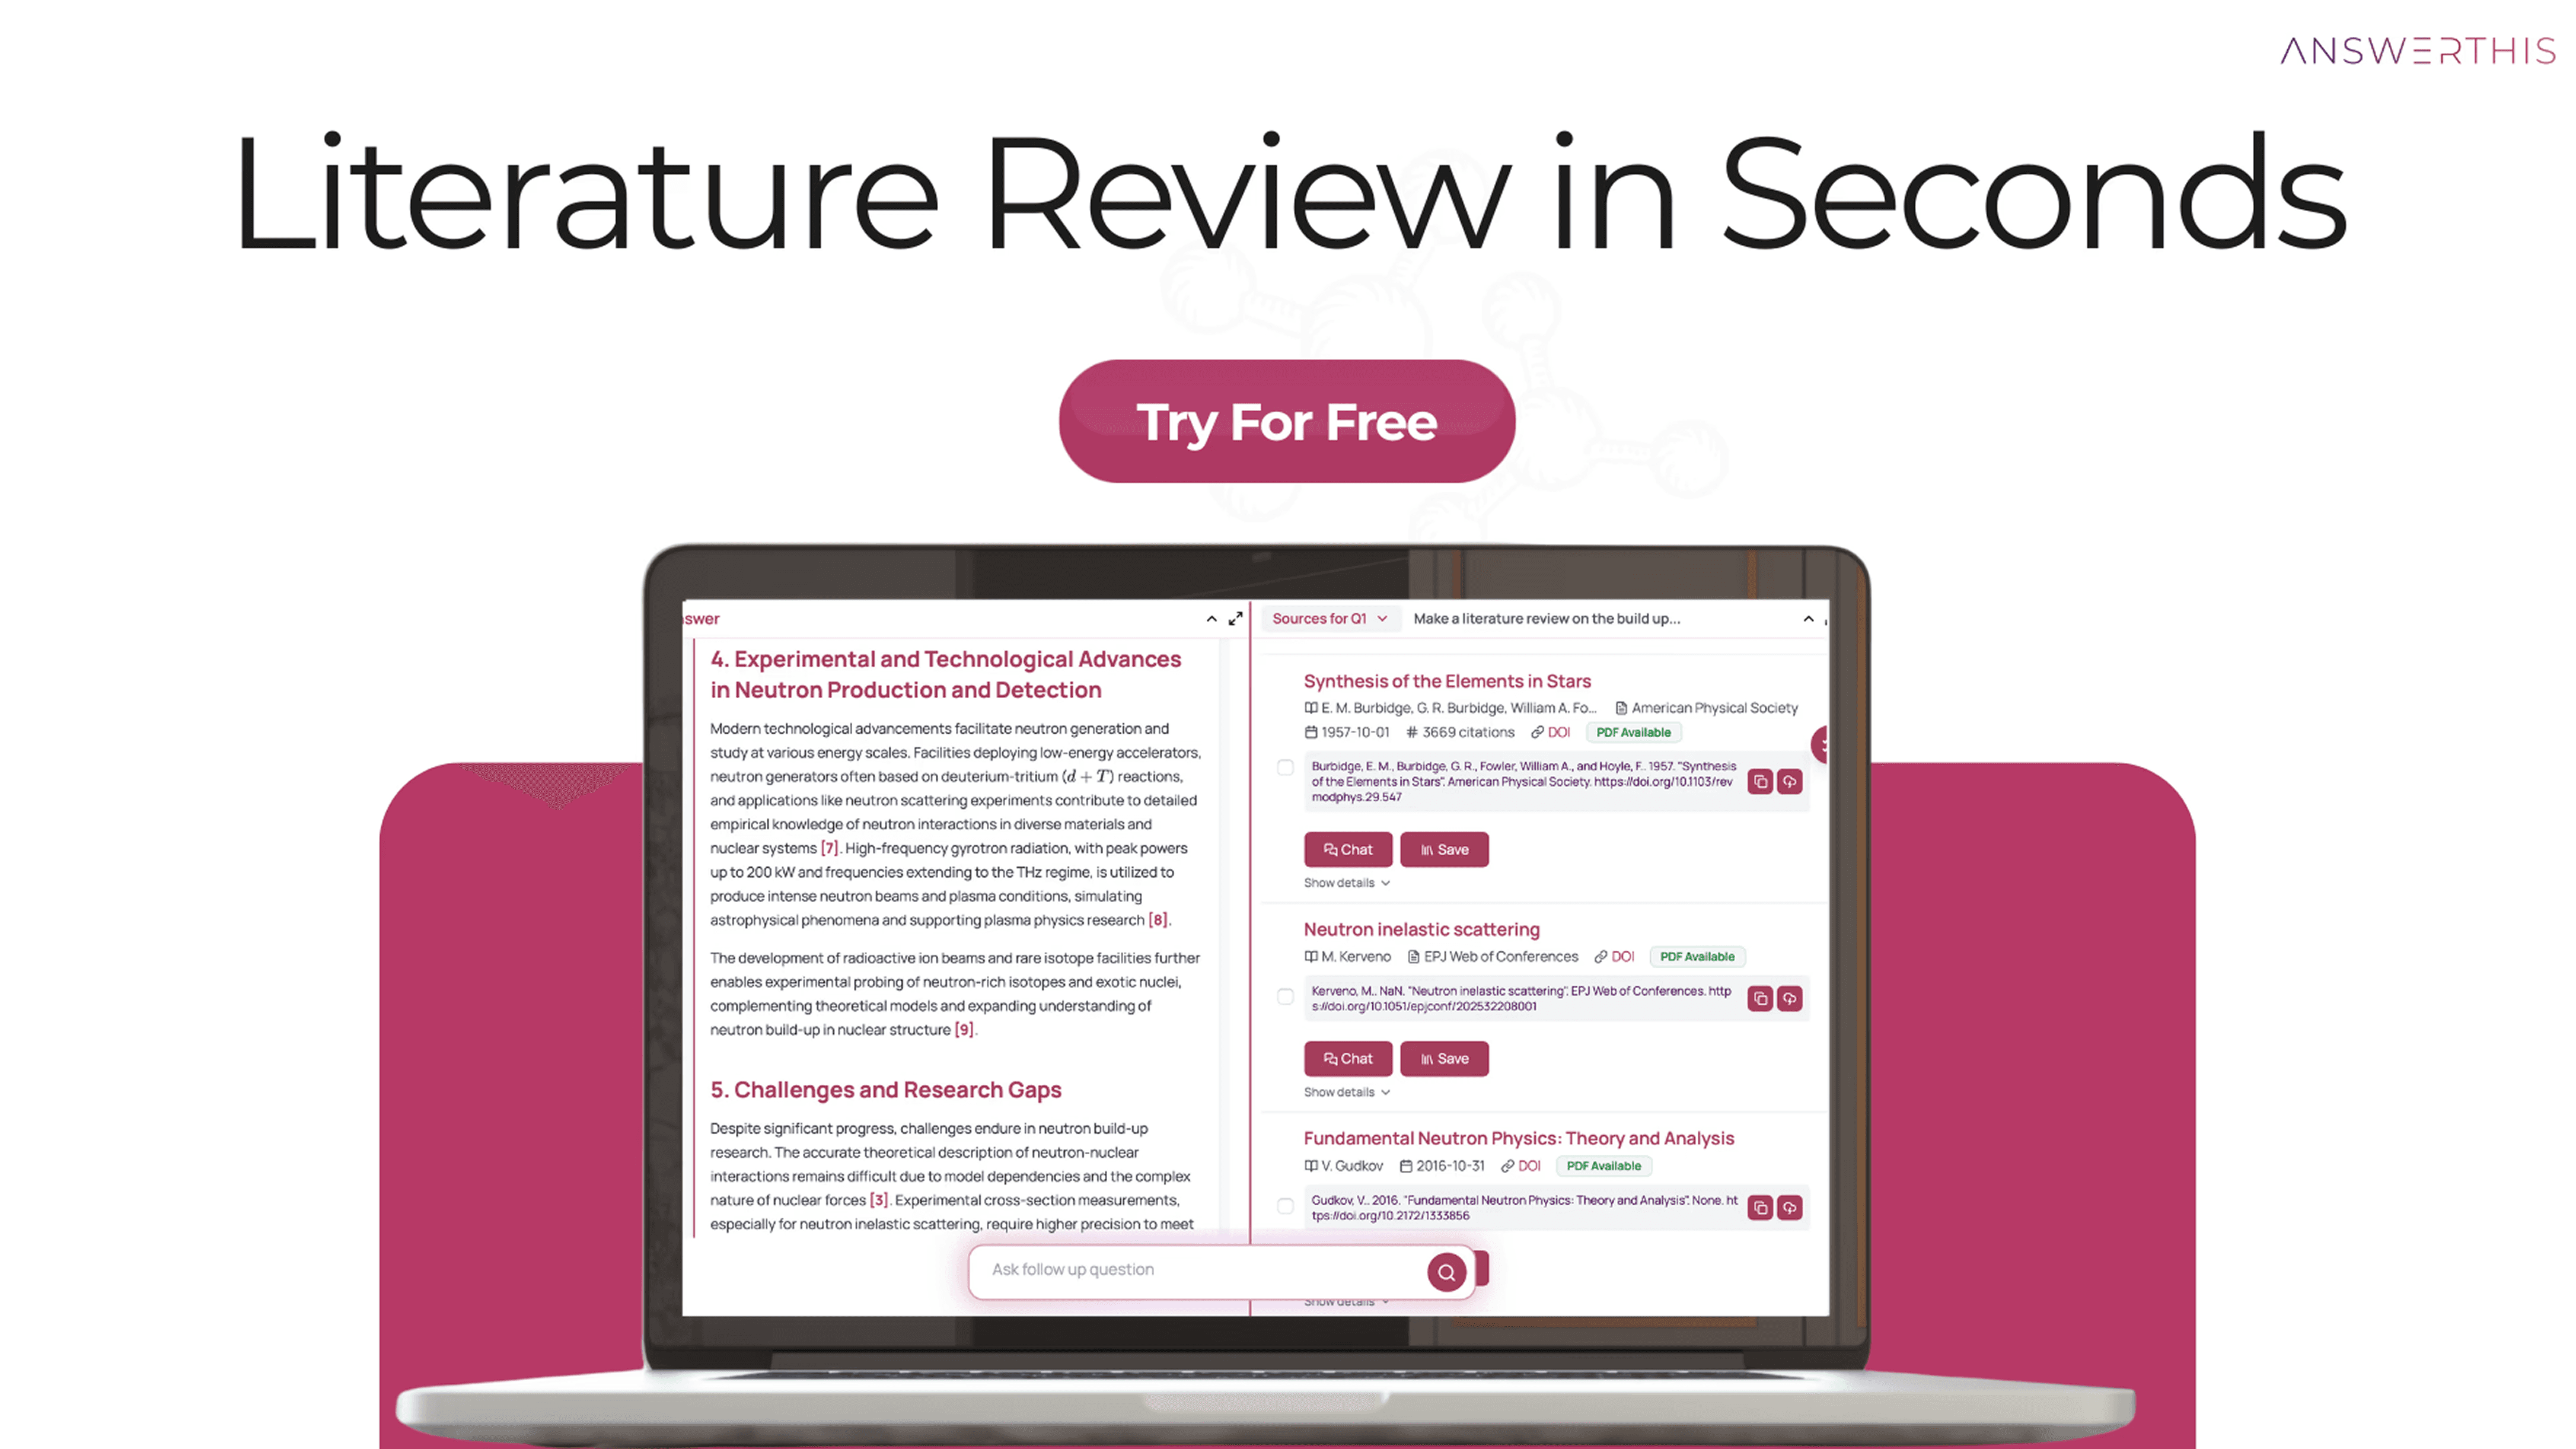
AnswerThis Just Reshaped How Research Is Done.
You don’t need another GPT on top of X database. To stay competitive in today’s age, you need a reliable research assistant who genuinely helps and challenges you throughout your work. You need a reliable way to go from a research question to a clean, cited draft without bouncing between tabs or second-guessing your sources.
With AnswerThis's new canvas and notebook, this becomes a reality. Our AI will literally handhold you through finding your research gap, honing down on the exact papers you need, and walk with you every step of the way to a reputable, publishable paper, literature review or a project.
Let's see how researchers all over the globe are taking advantage of the new AnswerThis.
Index, Skip to a Section You Are Curious About:
As soon as you sign back into AnswerThis, you’ll see two options: Quick Q&A and Full Review.
Use the Full Review when you want a readable synthesis that is so comprehensive and filled with citations to the exact sources you need that you can hand it to a supervisor, and they’d say wow.
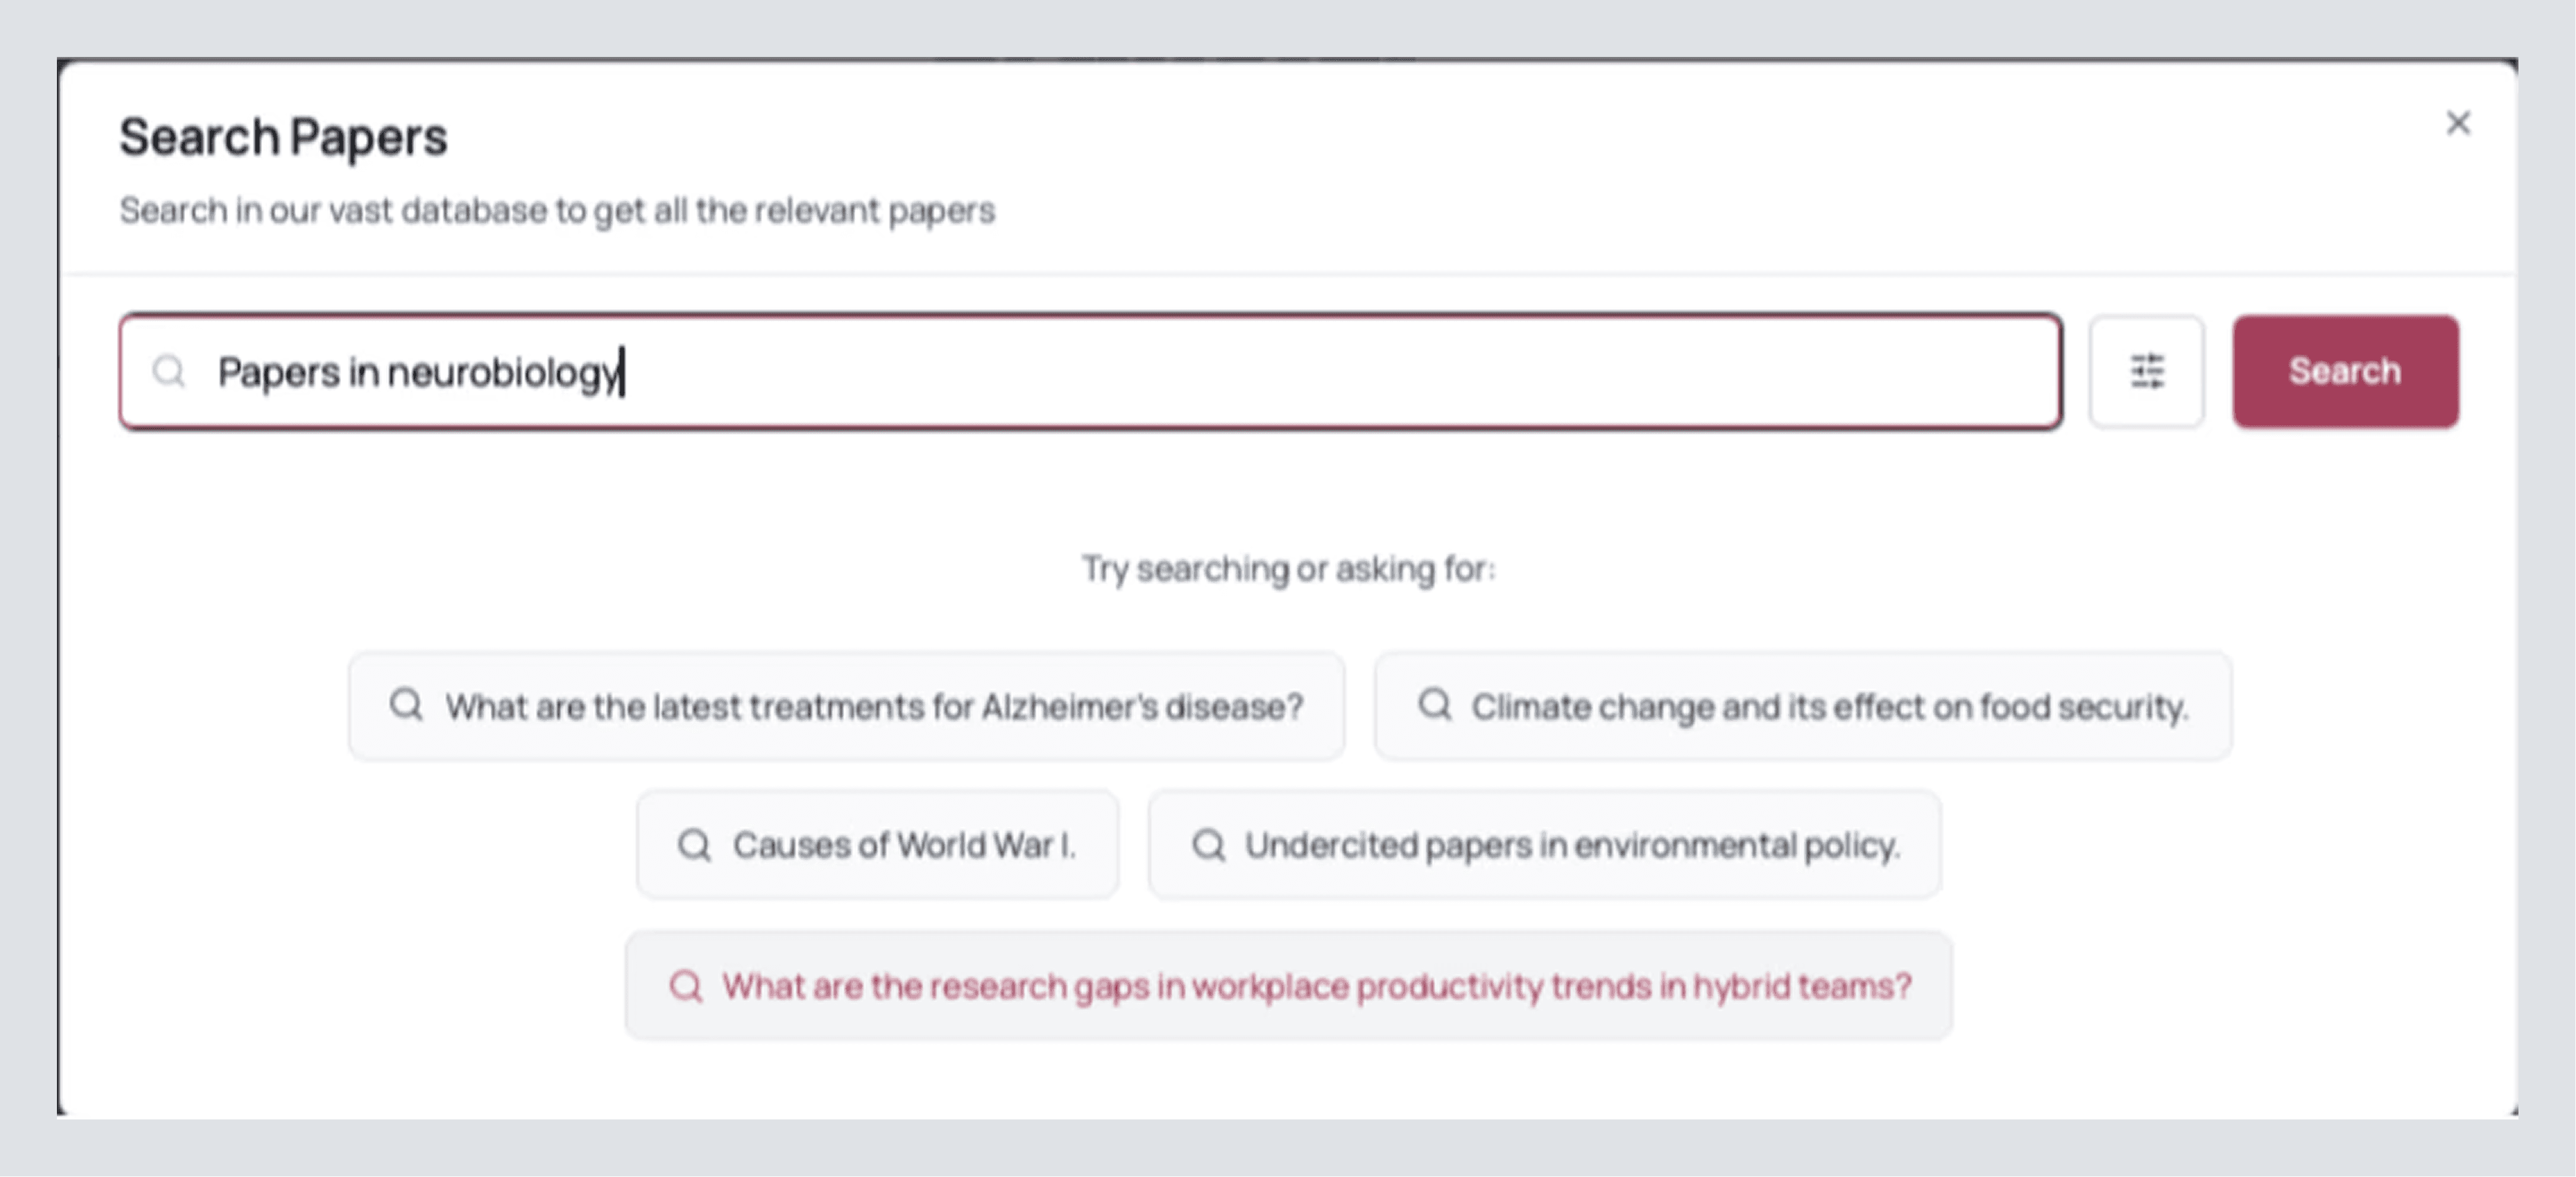
Use Search Papers when you’re curating the evidence first and prefer to build the synthesis later. Quick Q&A is for tight questions, policy definitions, guidelines, and inclusion criteria where you want a fast, source-aware answer. Any research question or query will be answered with unparalleled accuracy.
Use the prompt helper to curate a question that will get you exactly what you want (you can also explore some of AnswerThis’s capabilities here, too!) Or type a clear prompt to get exactly what you need.
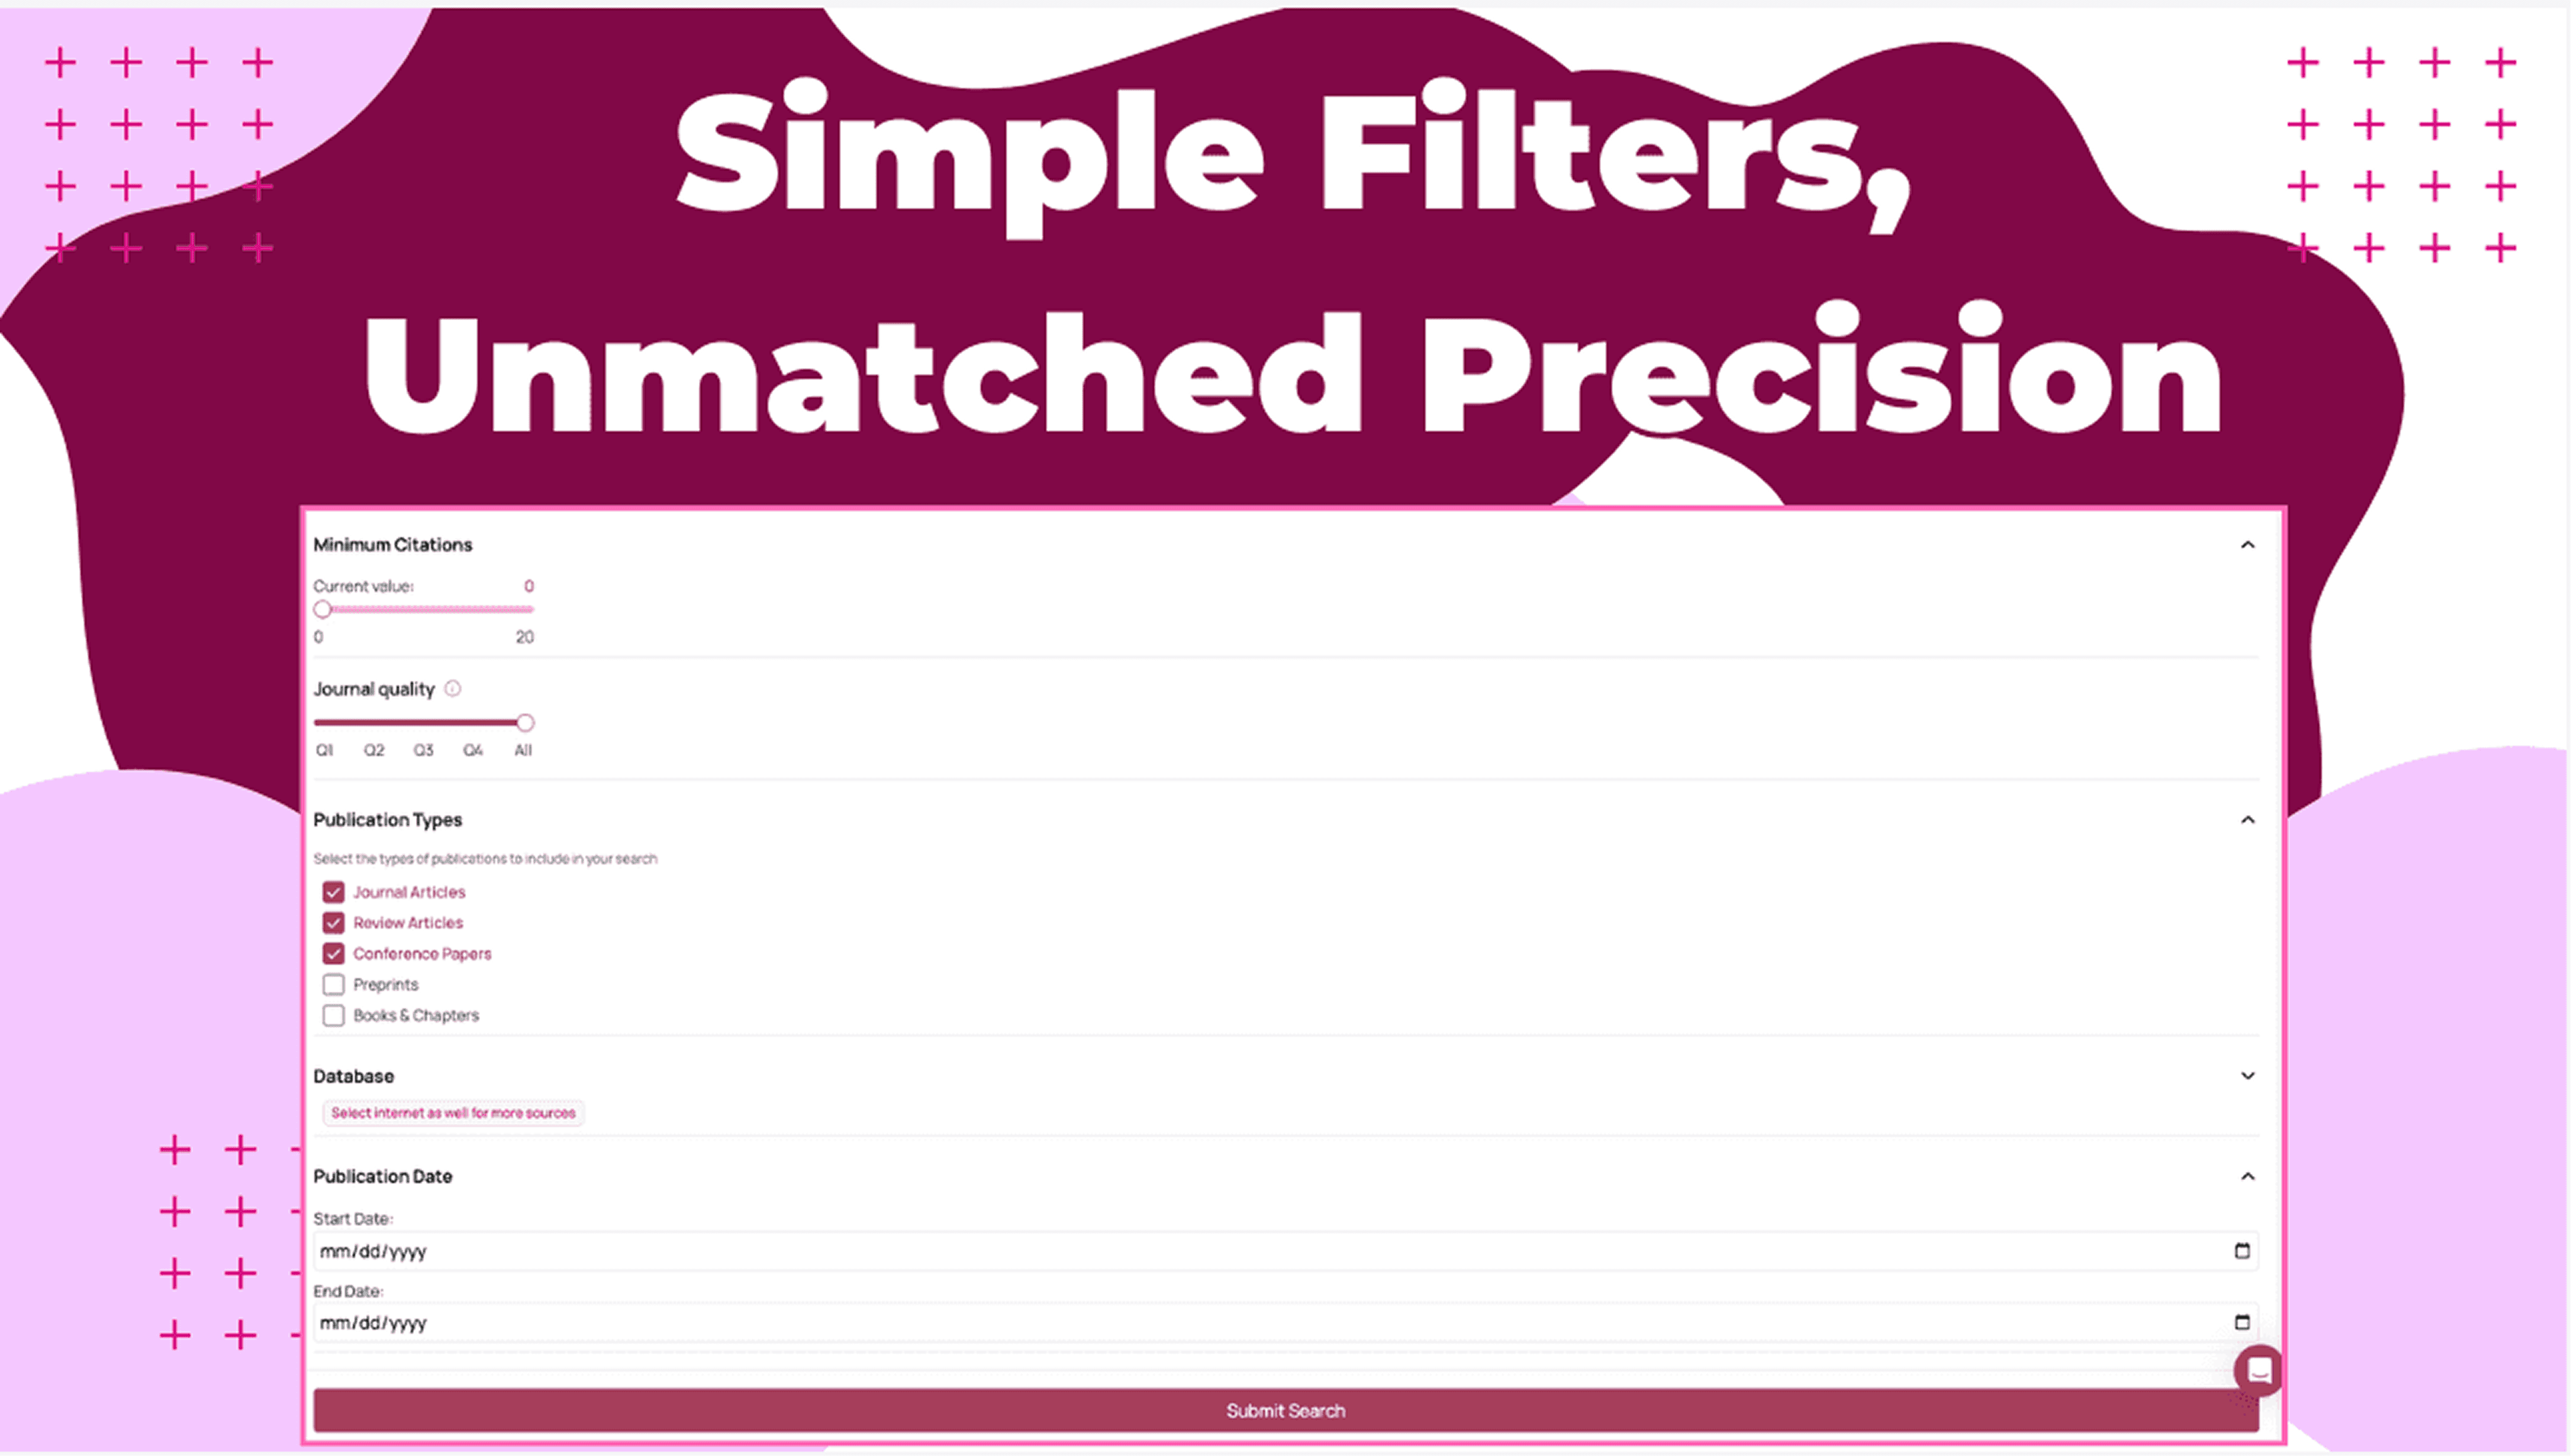
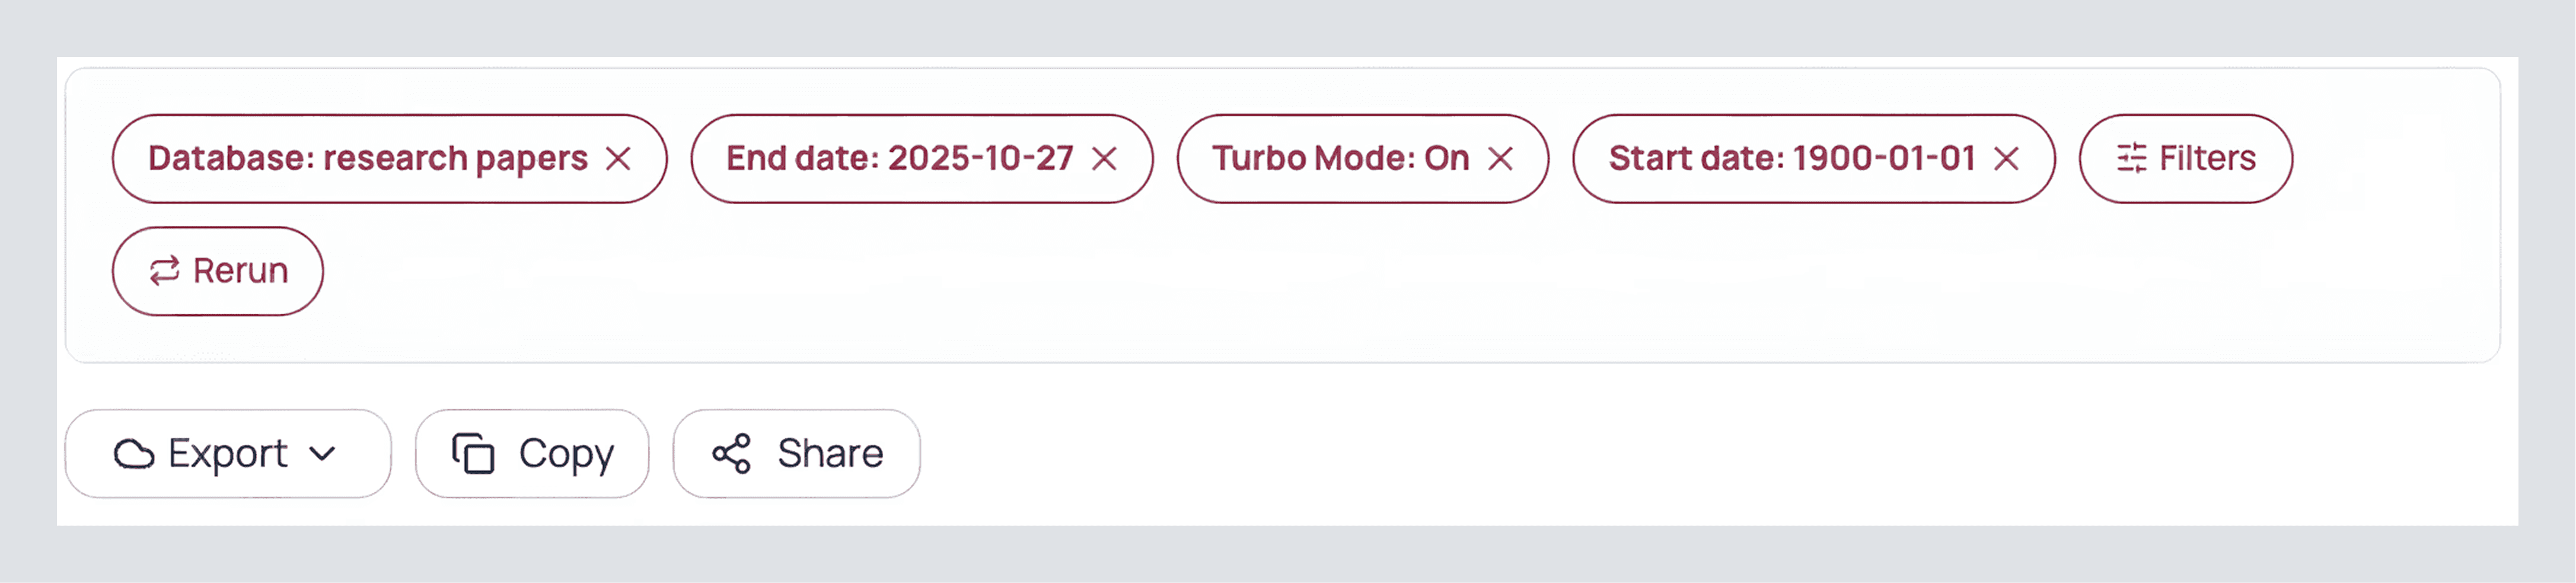
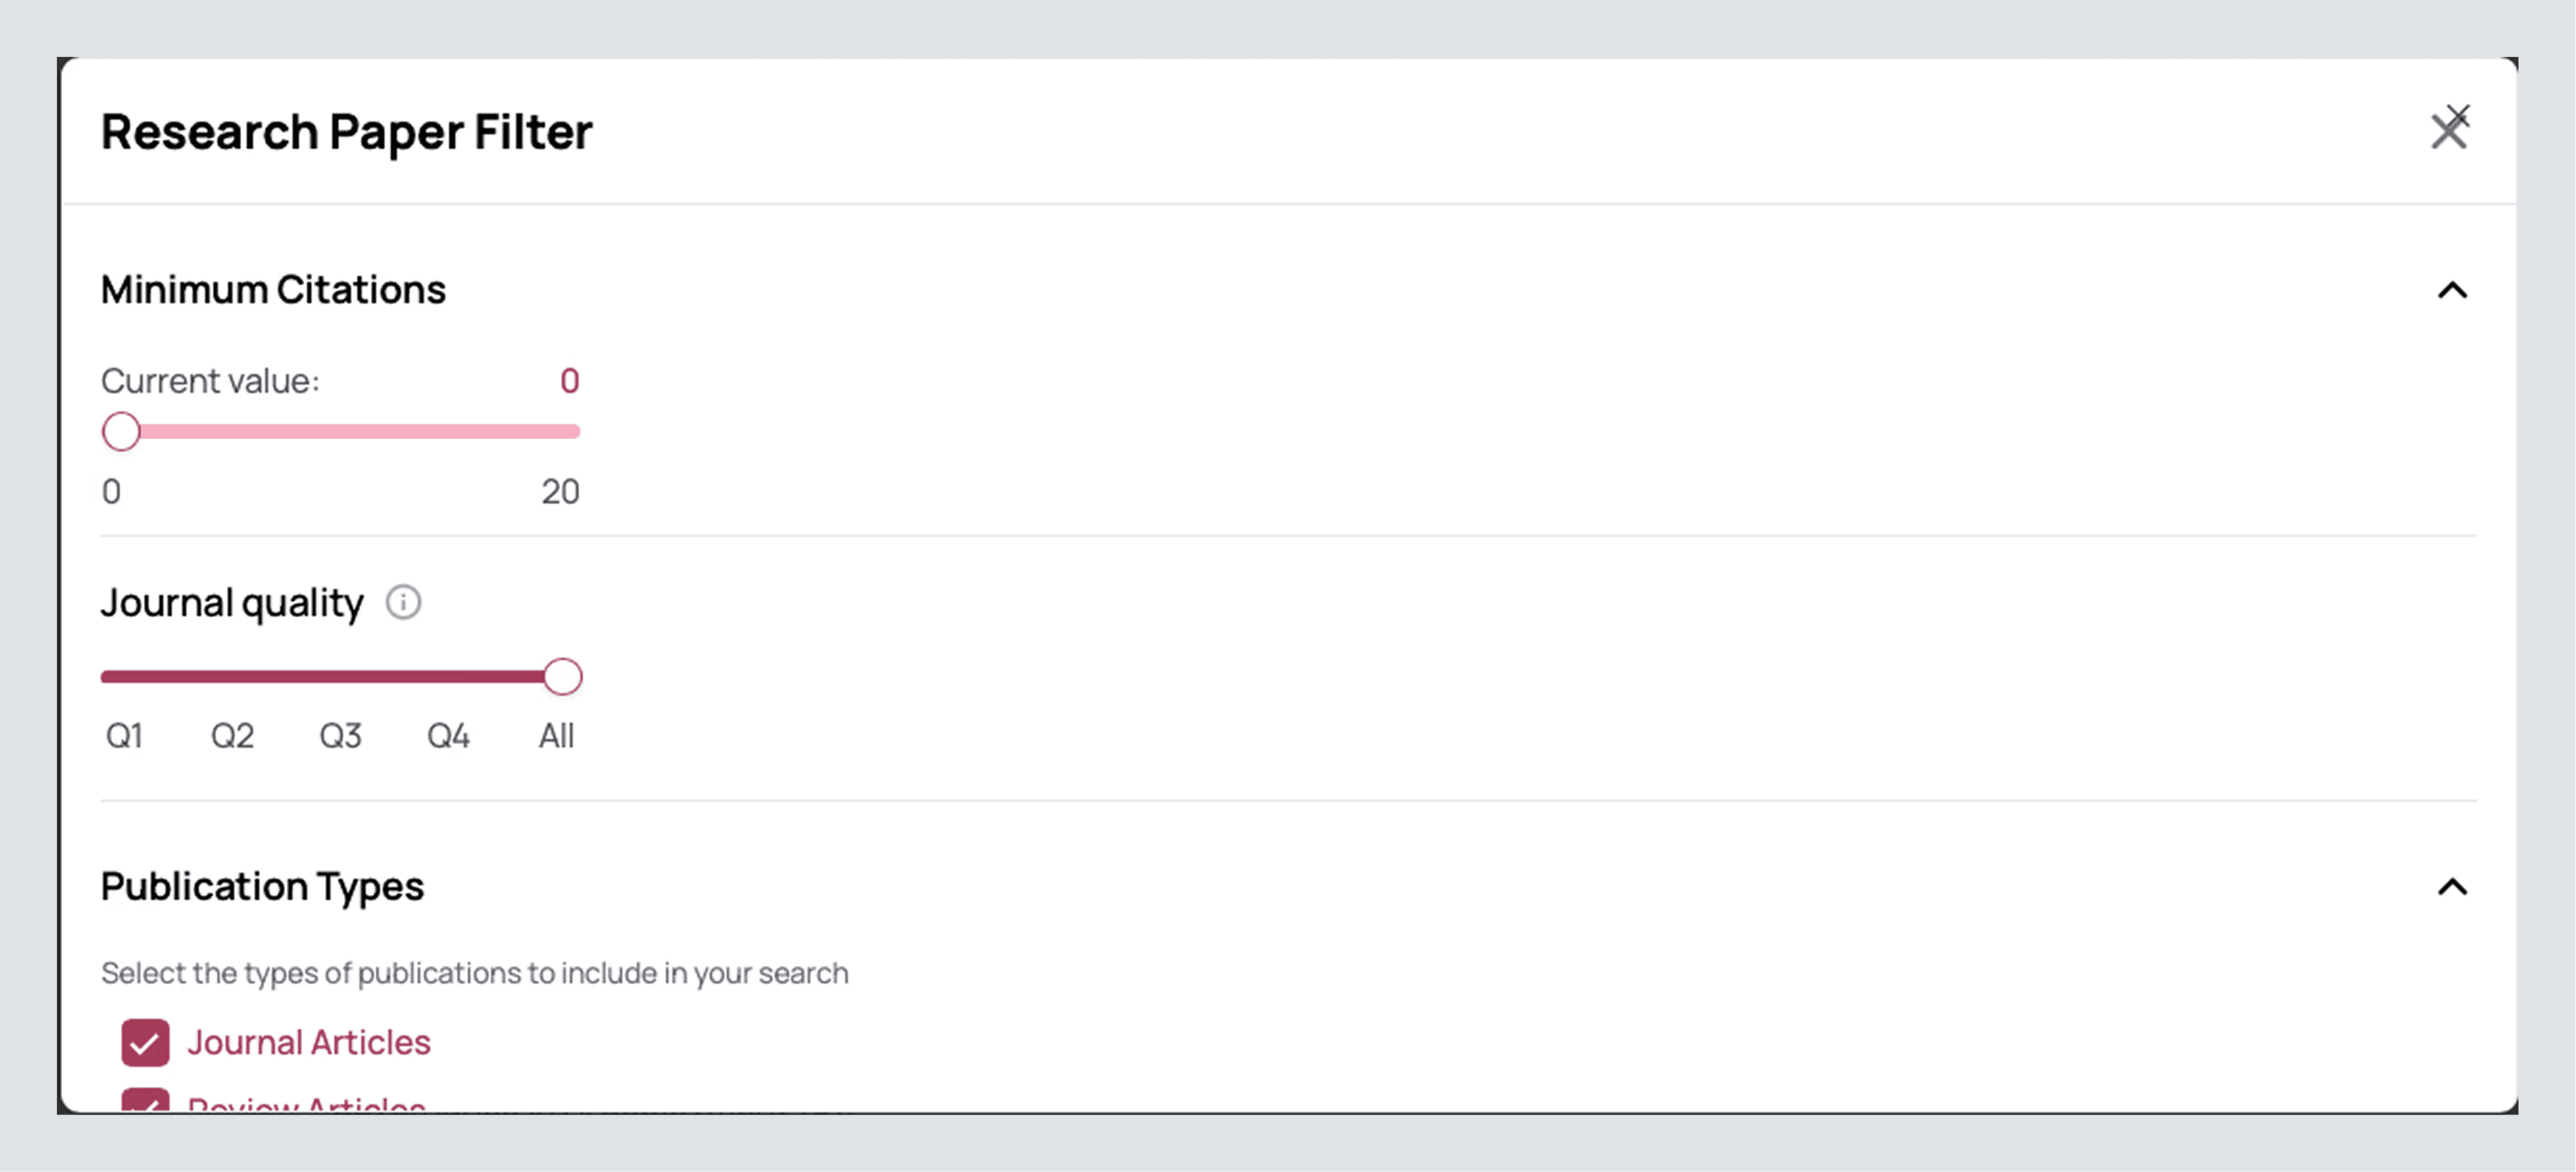
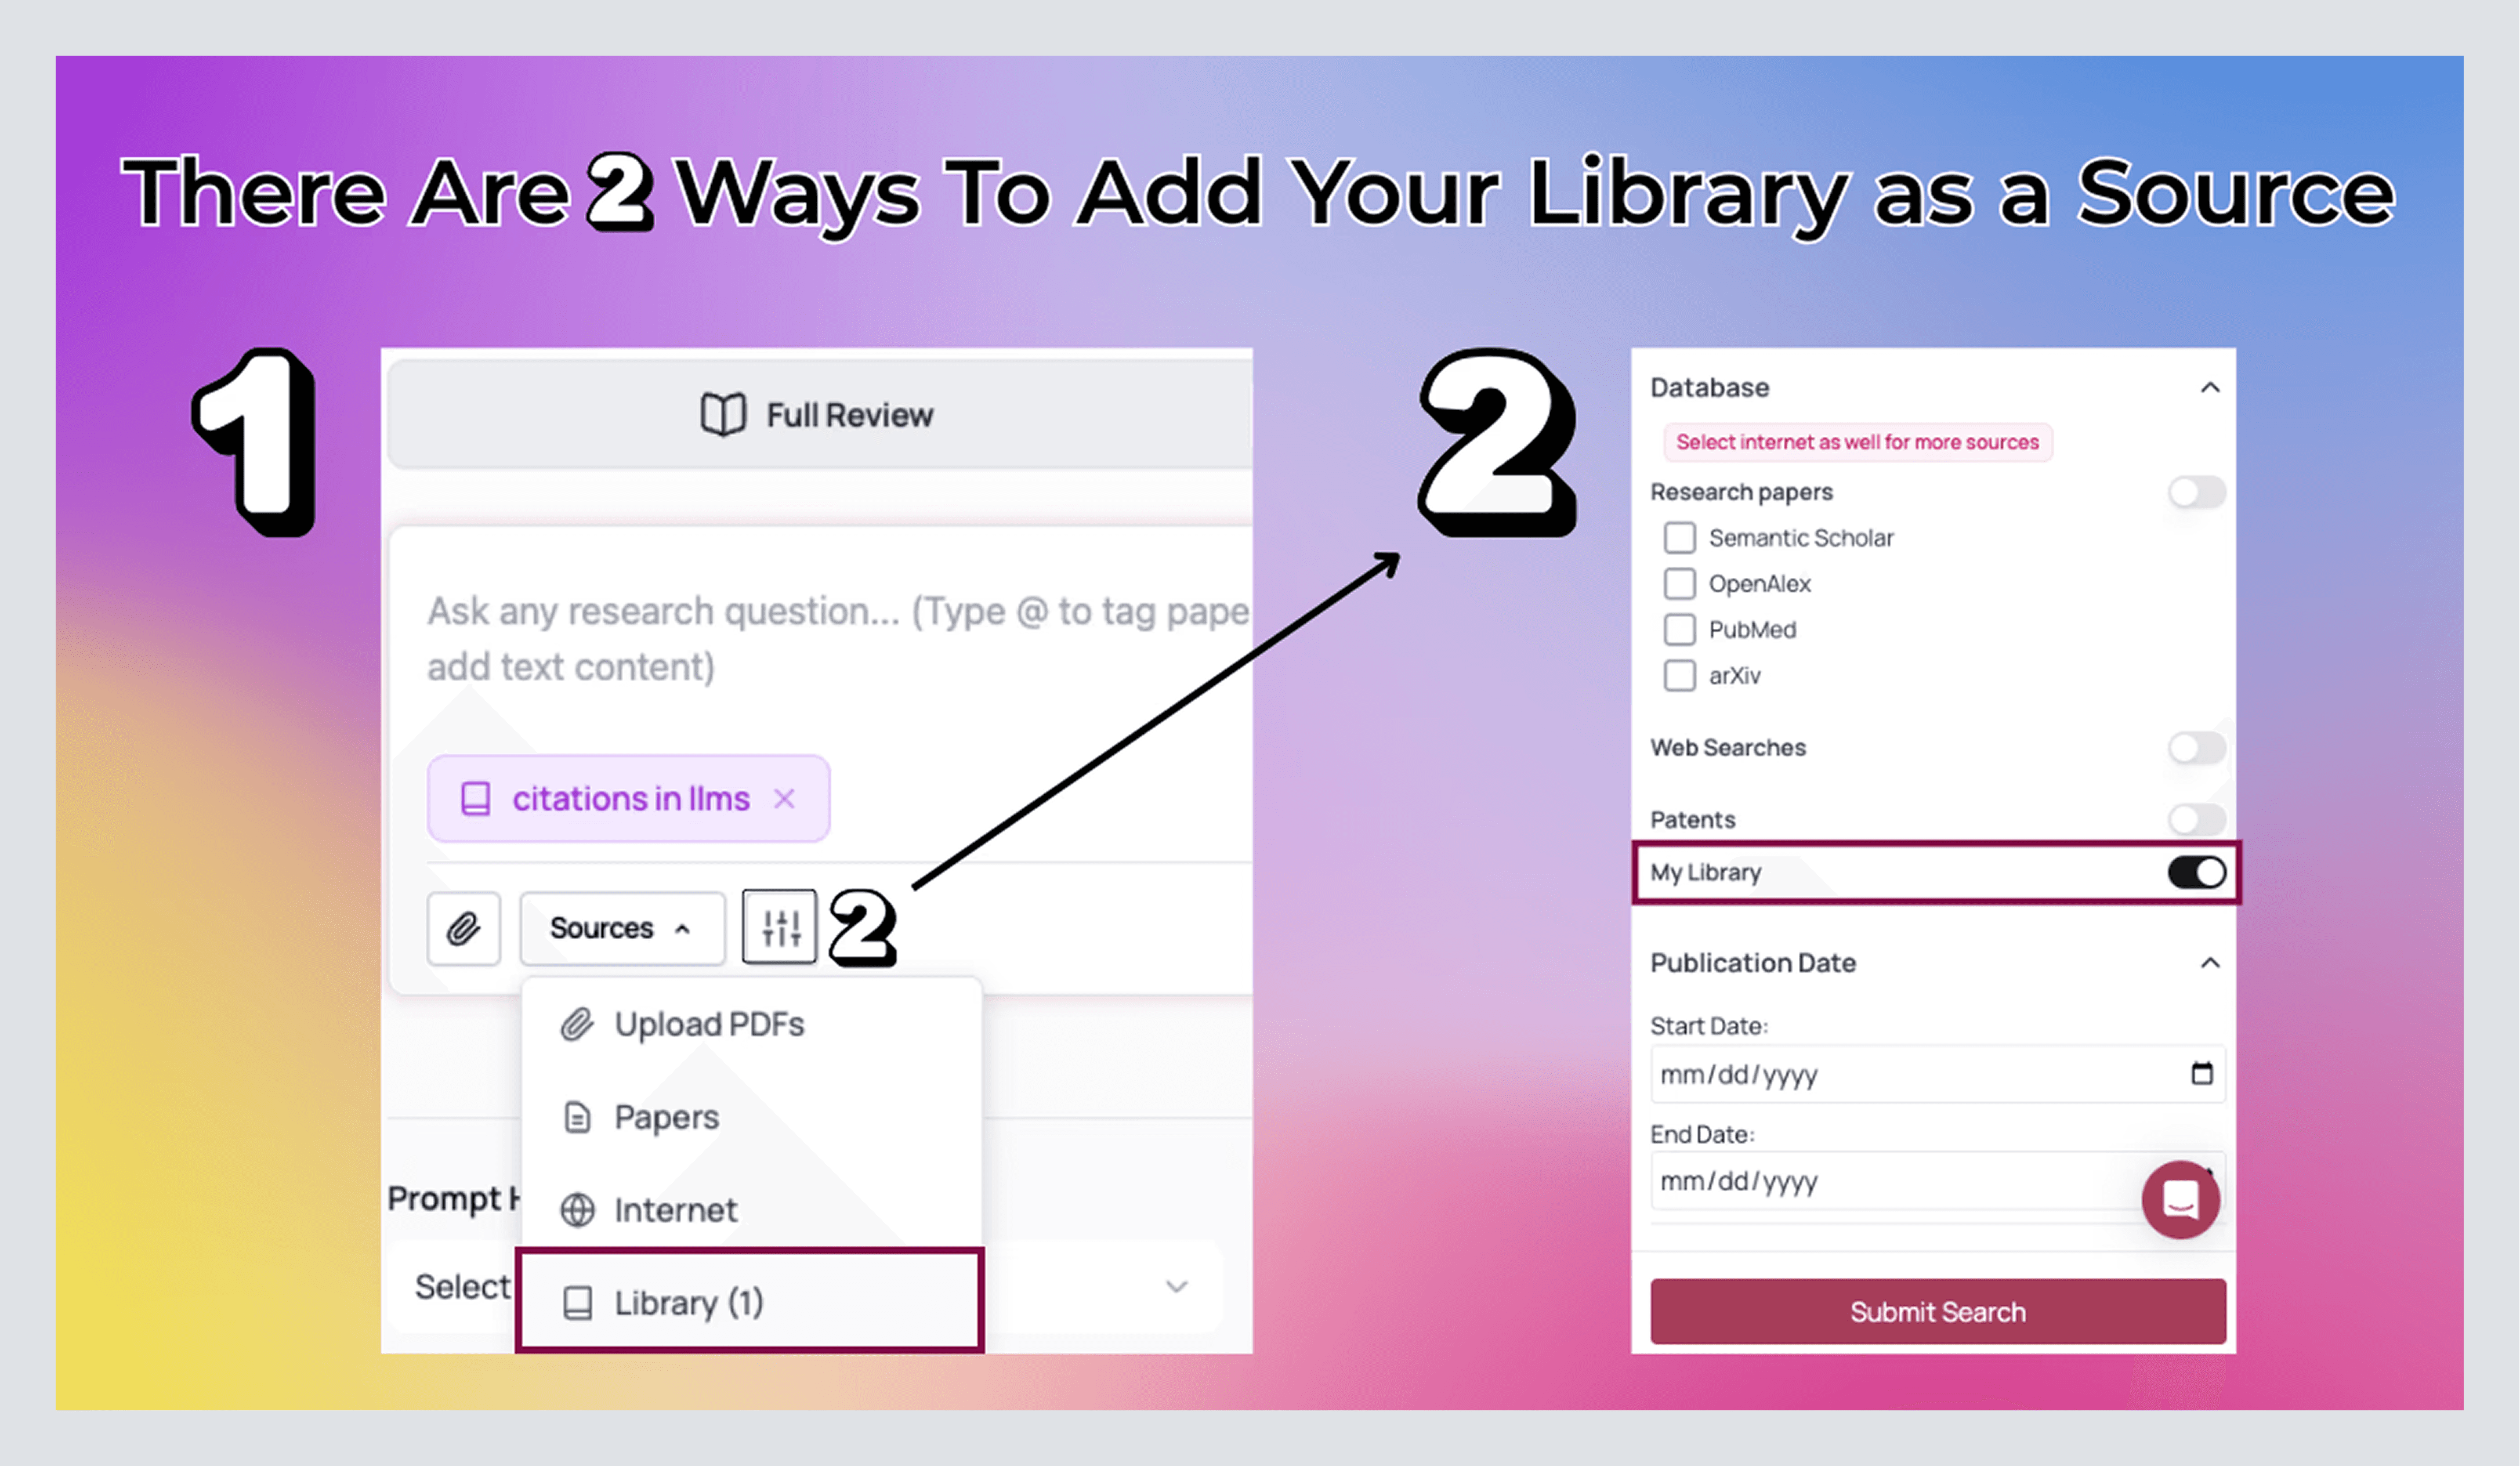
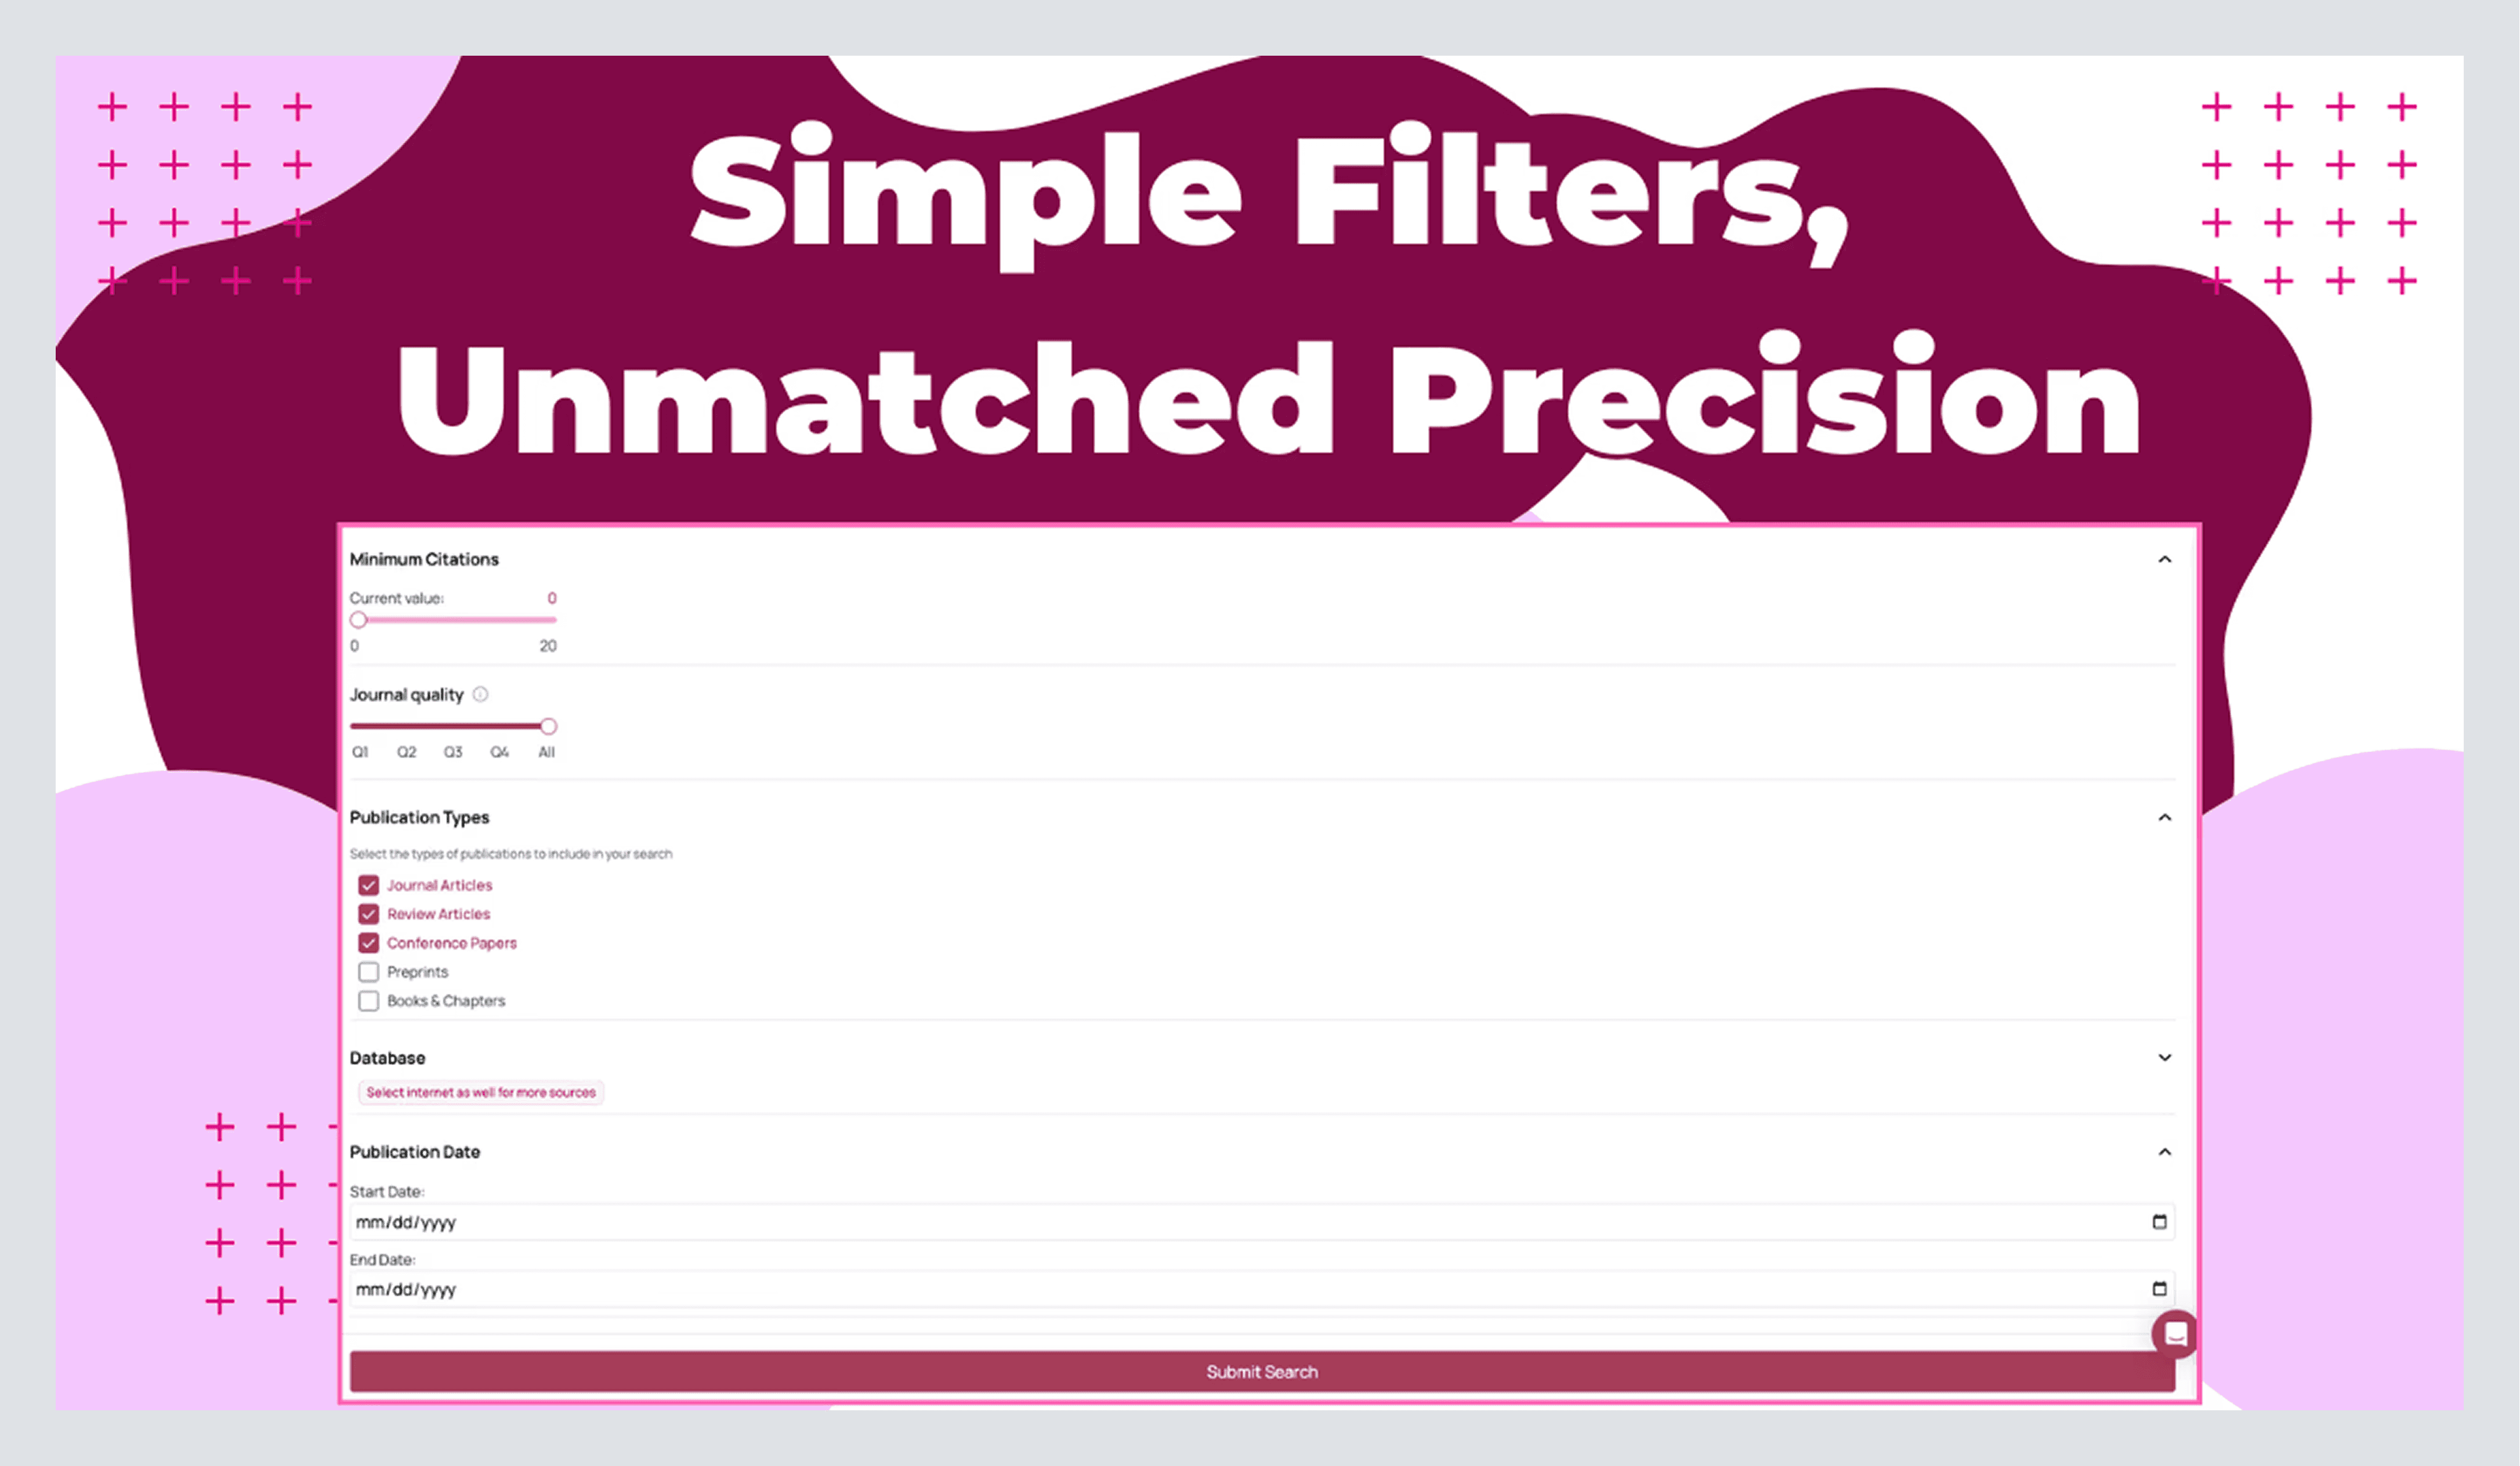
Before you run it, open More Filters. Pick the databases that match your field (Semantic Scholar and OpenAlex are good defaults; add PubMed for clinical work, arXiv for preprints). If rigor matters, set journal quality to Q1/Q2. If the topic is moving quickly, bound the date window to recent years. You can raise the minimum citations when you want maturity and lower it when you’re exploring new ground. The web toggle lets you include daily updated sources and even patents. Additionally, if you selected Full Review as your model, you can select the number of topics and subtopics you want in your literature, as well as tell AnswerThis what you would like the topics to be.
Now, press submit search!
Exploring Your Comprehensive Result
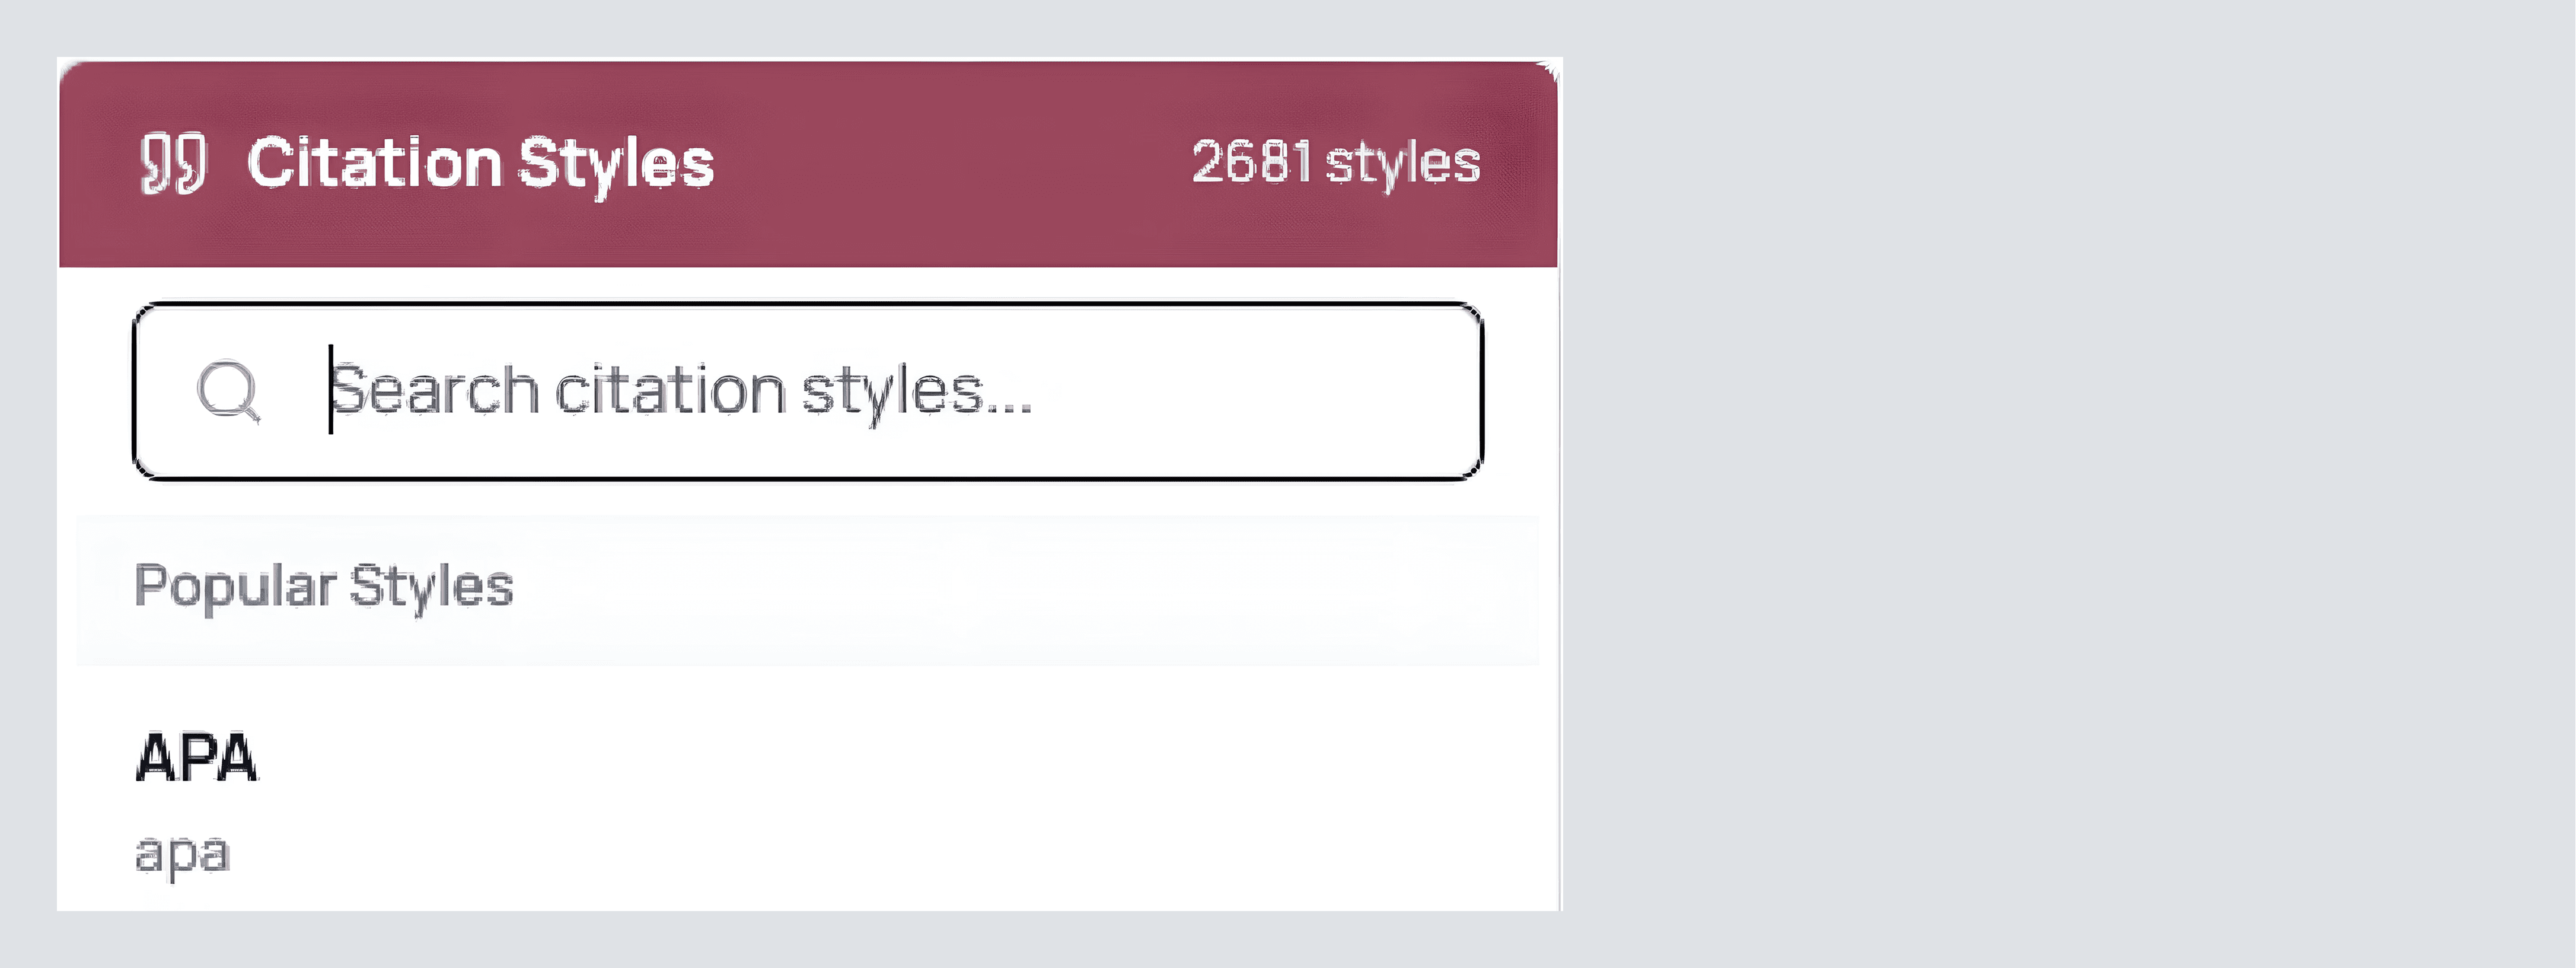
There's nothing like exploring AnswerThis's result for the first time. Well, it's time to get that feeling again. On the top of the review, you'll notice you can change the citation style (to over 6,000 different styles), as well as this ominous button, Notebook. This is our new AI editor, integrated right into your answer, but for now, let's explore the new literature review, unless you'd like to skip ahead by clicking here.
Skim or read through the result that AnswerThis gave, and feel free to click on any citations next to text that intrigues you or is relevant for your research. This will bring you right down to the sources section, where you can uncover an abundance of information at a button (skip ahead and see how).
Throughout our paper, we may come across tables as well, which can also be exported to the notebook
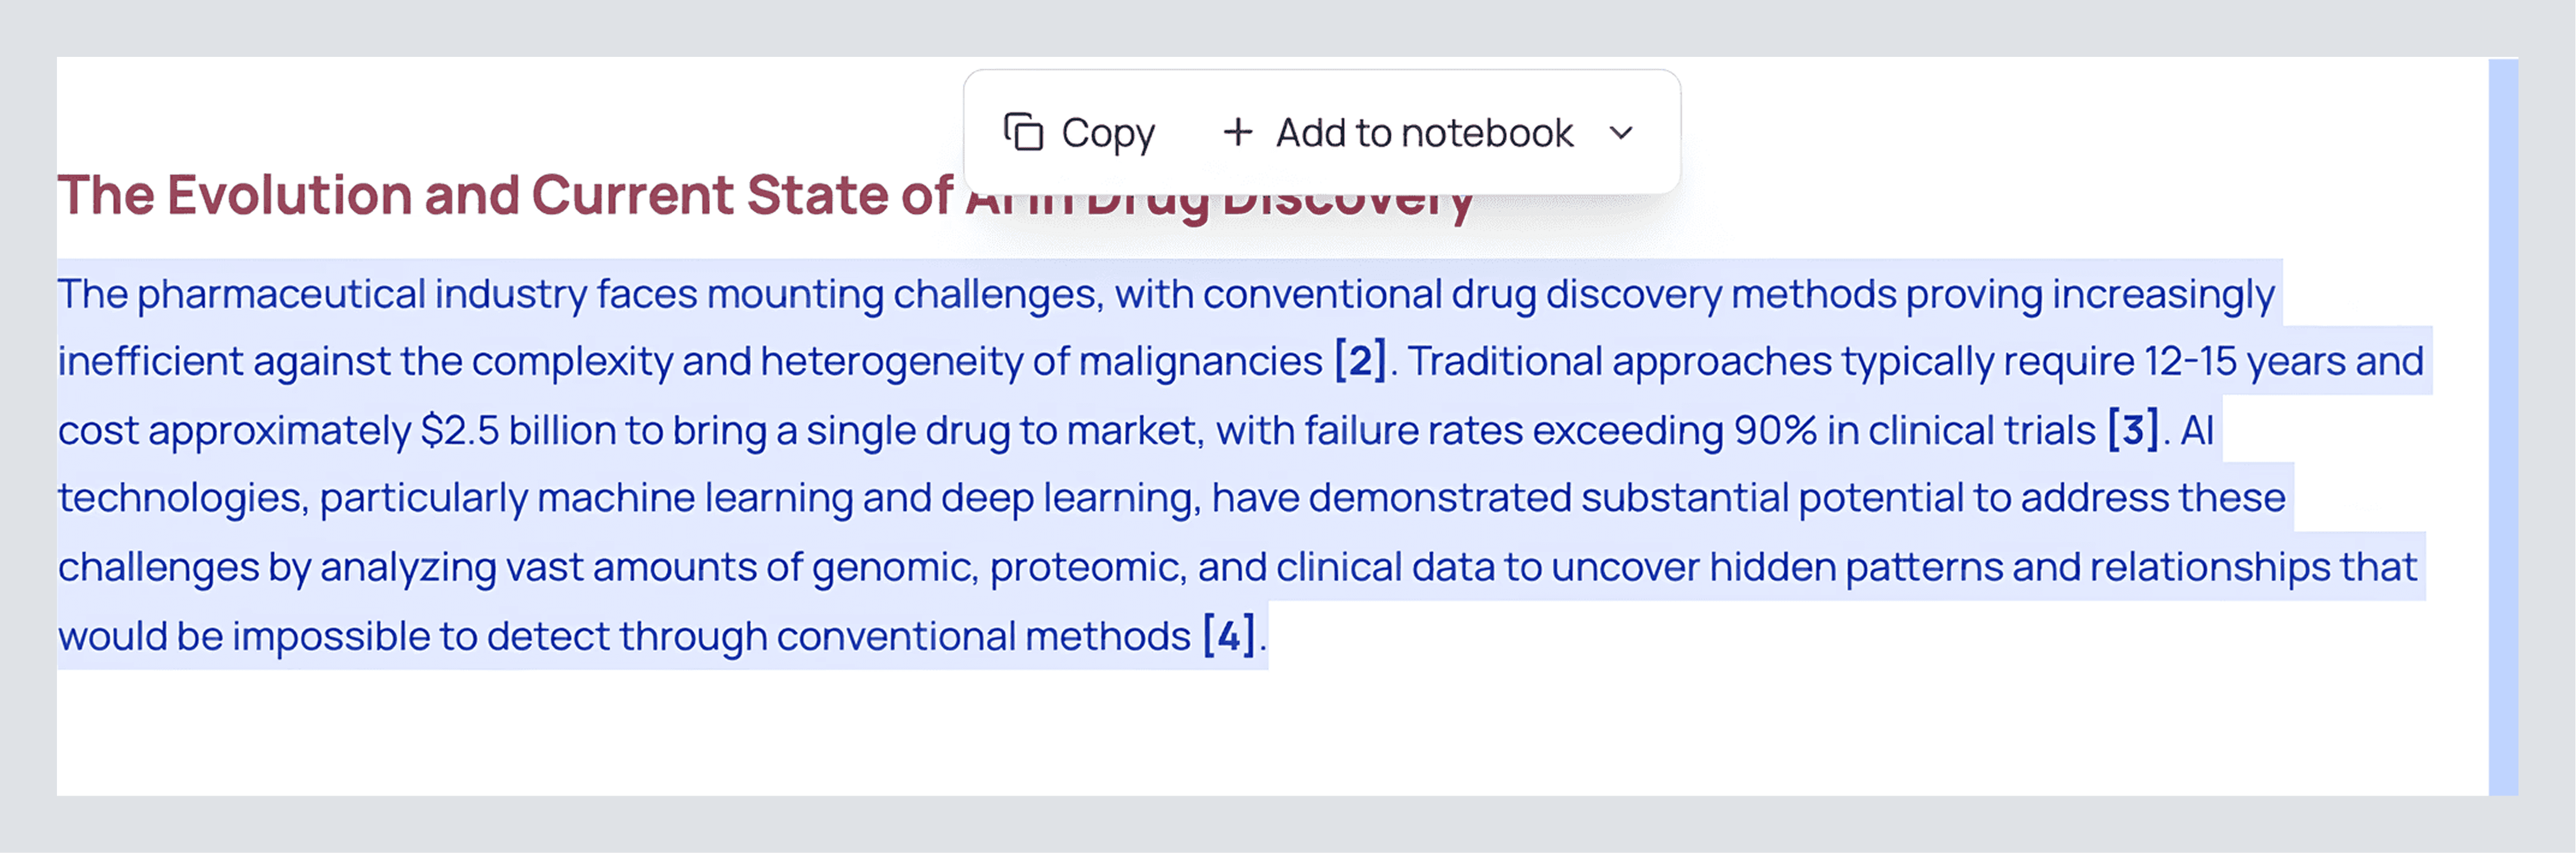
Assistant Tip: As you read through your result, highlight parts that you would use in your own writing and important information to add to your notebook, as you can see in the image below. This will allow you to revisit all the valuable parts easily later.
Once you've finished reading, you'll find a variety of buttons at the end of your review. Here's what they do:
Export
Hover over this option to export your answer into DOCX, PDF, Markdown, and LaTeX formats.
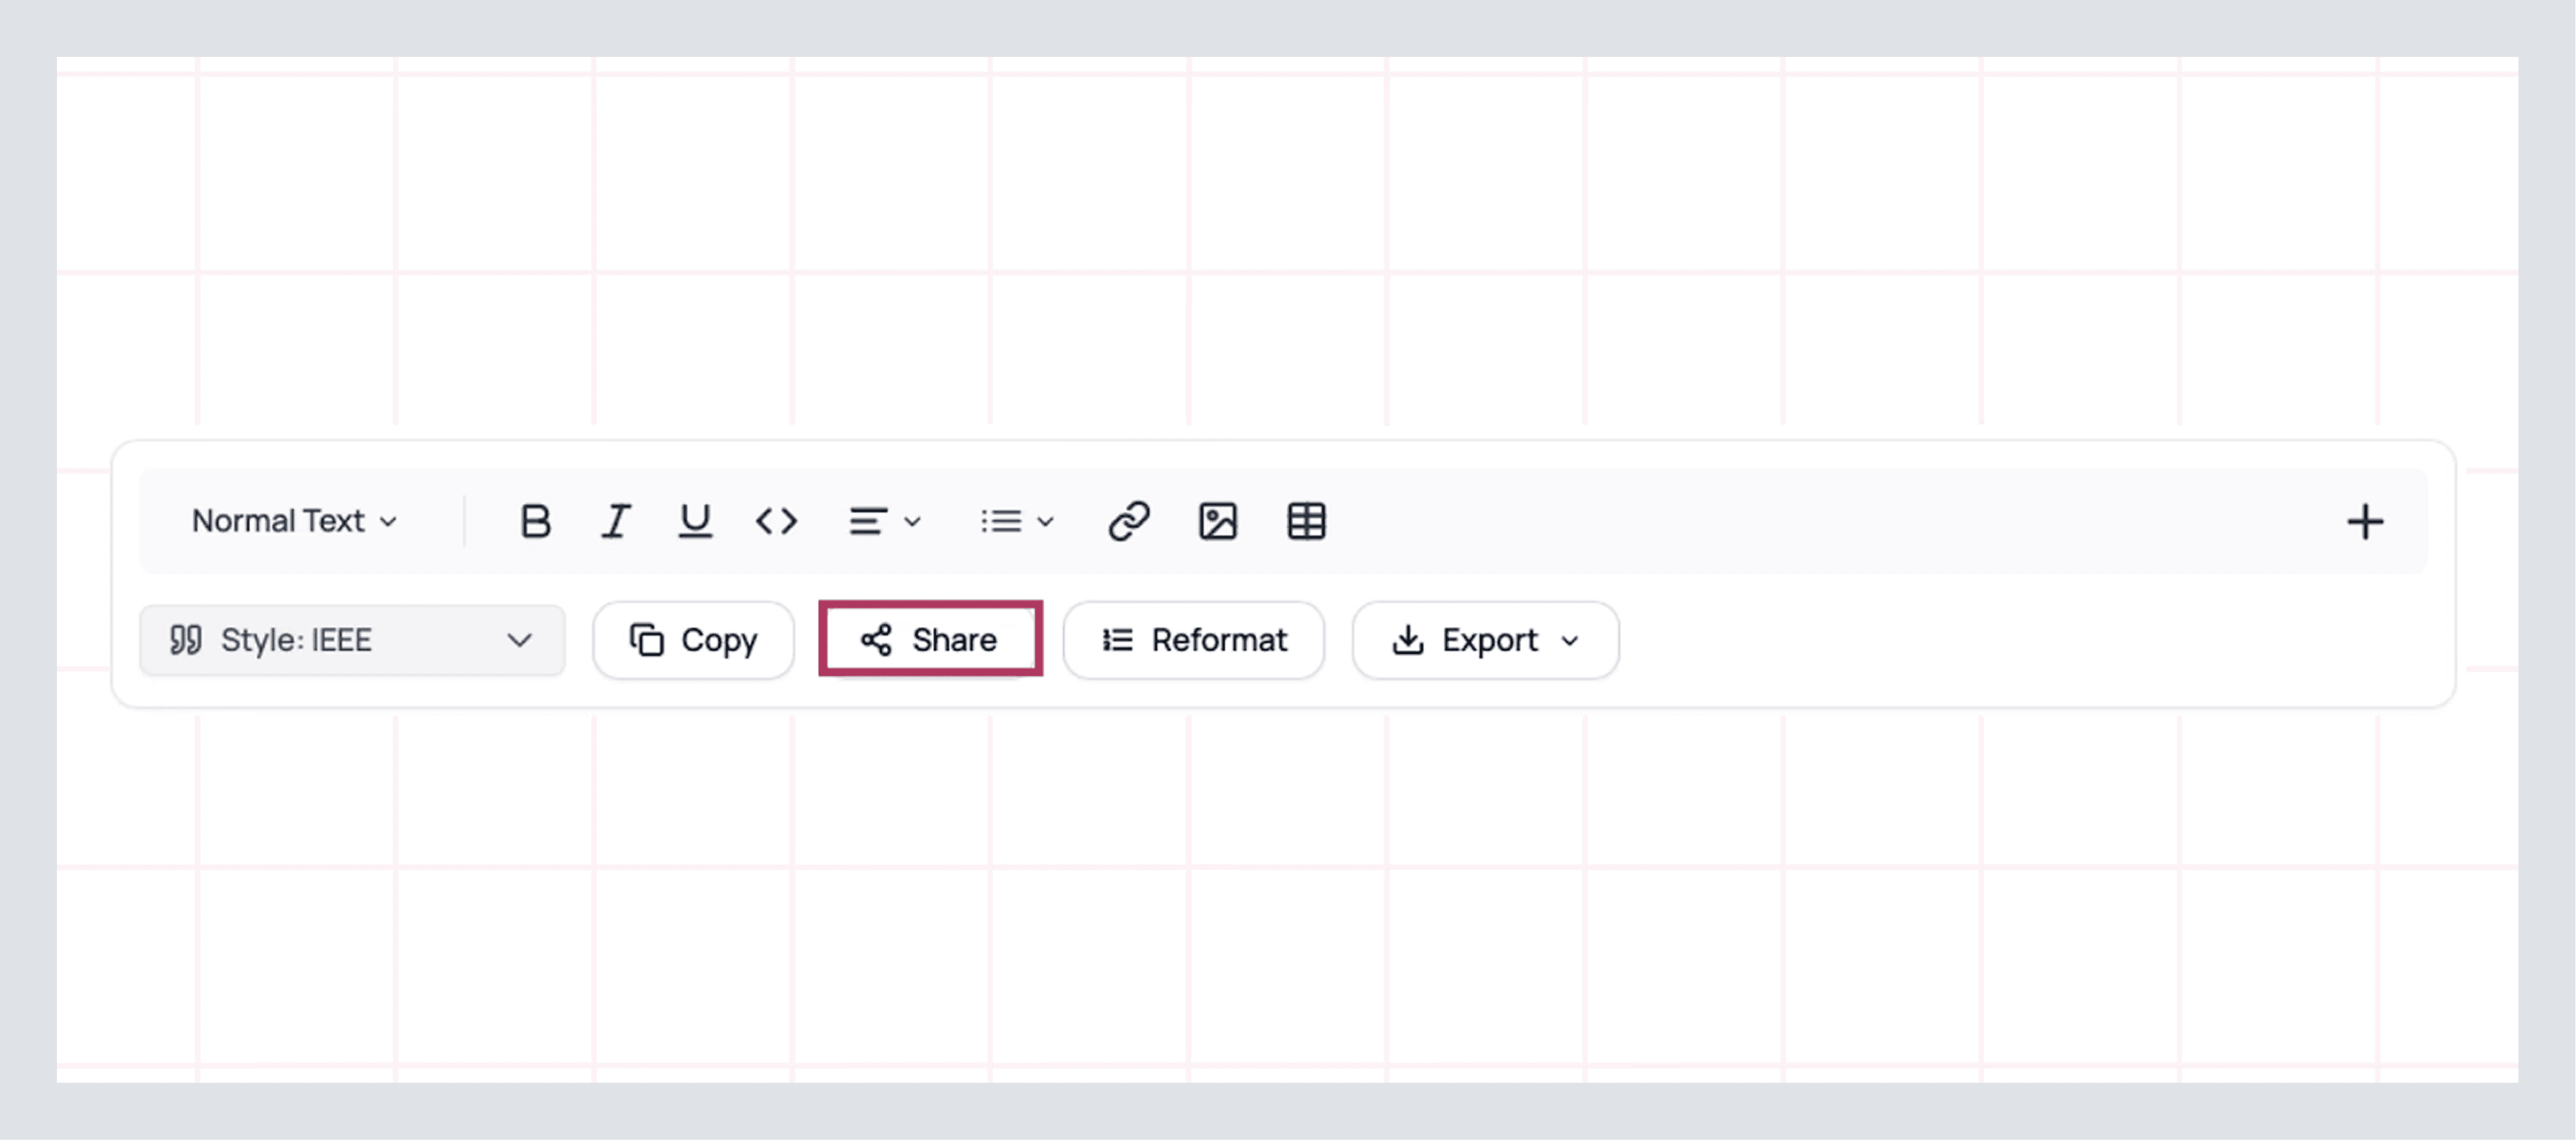
Share
If you want to collaborate with peers for a team project or have a professor to look at it. Click share and enter their email to share privately, or if you'd like to show your result to the world, you can press public and share.
See these options below.
You may have missed it, but on the top right, there are a few extra buttons you might have missed, such as these:
Invite Members: Similarly to the share feature, you can invite someone to your workspace. This means that they don't just see your result, but everything else that you have done inside of the canvas, which will eventually contain citation map, chatpdfs, and a fully complete workflow, but we're not quite there yet!
Recent Search: Here you can access all your recent queries and workflows. In the future, this will make navigation easy.
LibKey (The Oxford's hat): Here you can access papers that belong to certain libraries.
Profile logo: As you'd expect, it opens a menu where you can access your profile's settings as well as team settings
See these options below

Now that you've dug into and experienced the writing capabilities of AnswerThis, let's dive into the paper's precise citations that we received and how we can make the most out of them.
Make The Most Out of Your Research Papers
When you click a citation inside your literature review, you jump straight to the Sources section. Think of this as your evidence workspace. We can use these pieces of evidence and use them in some of AnswerThis's workflows to see the research puzzle come together.
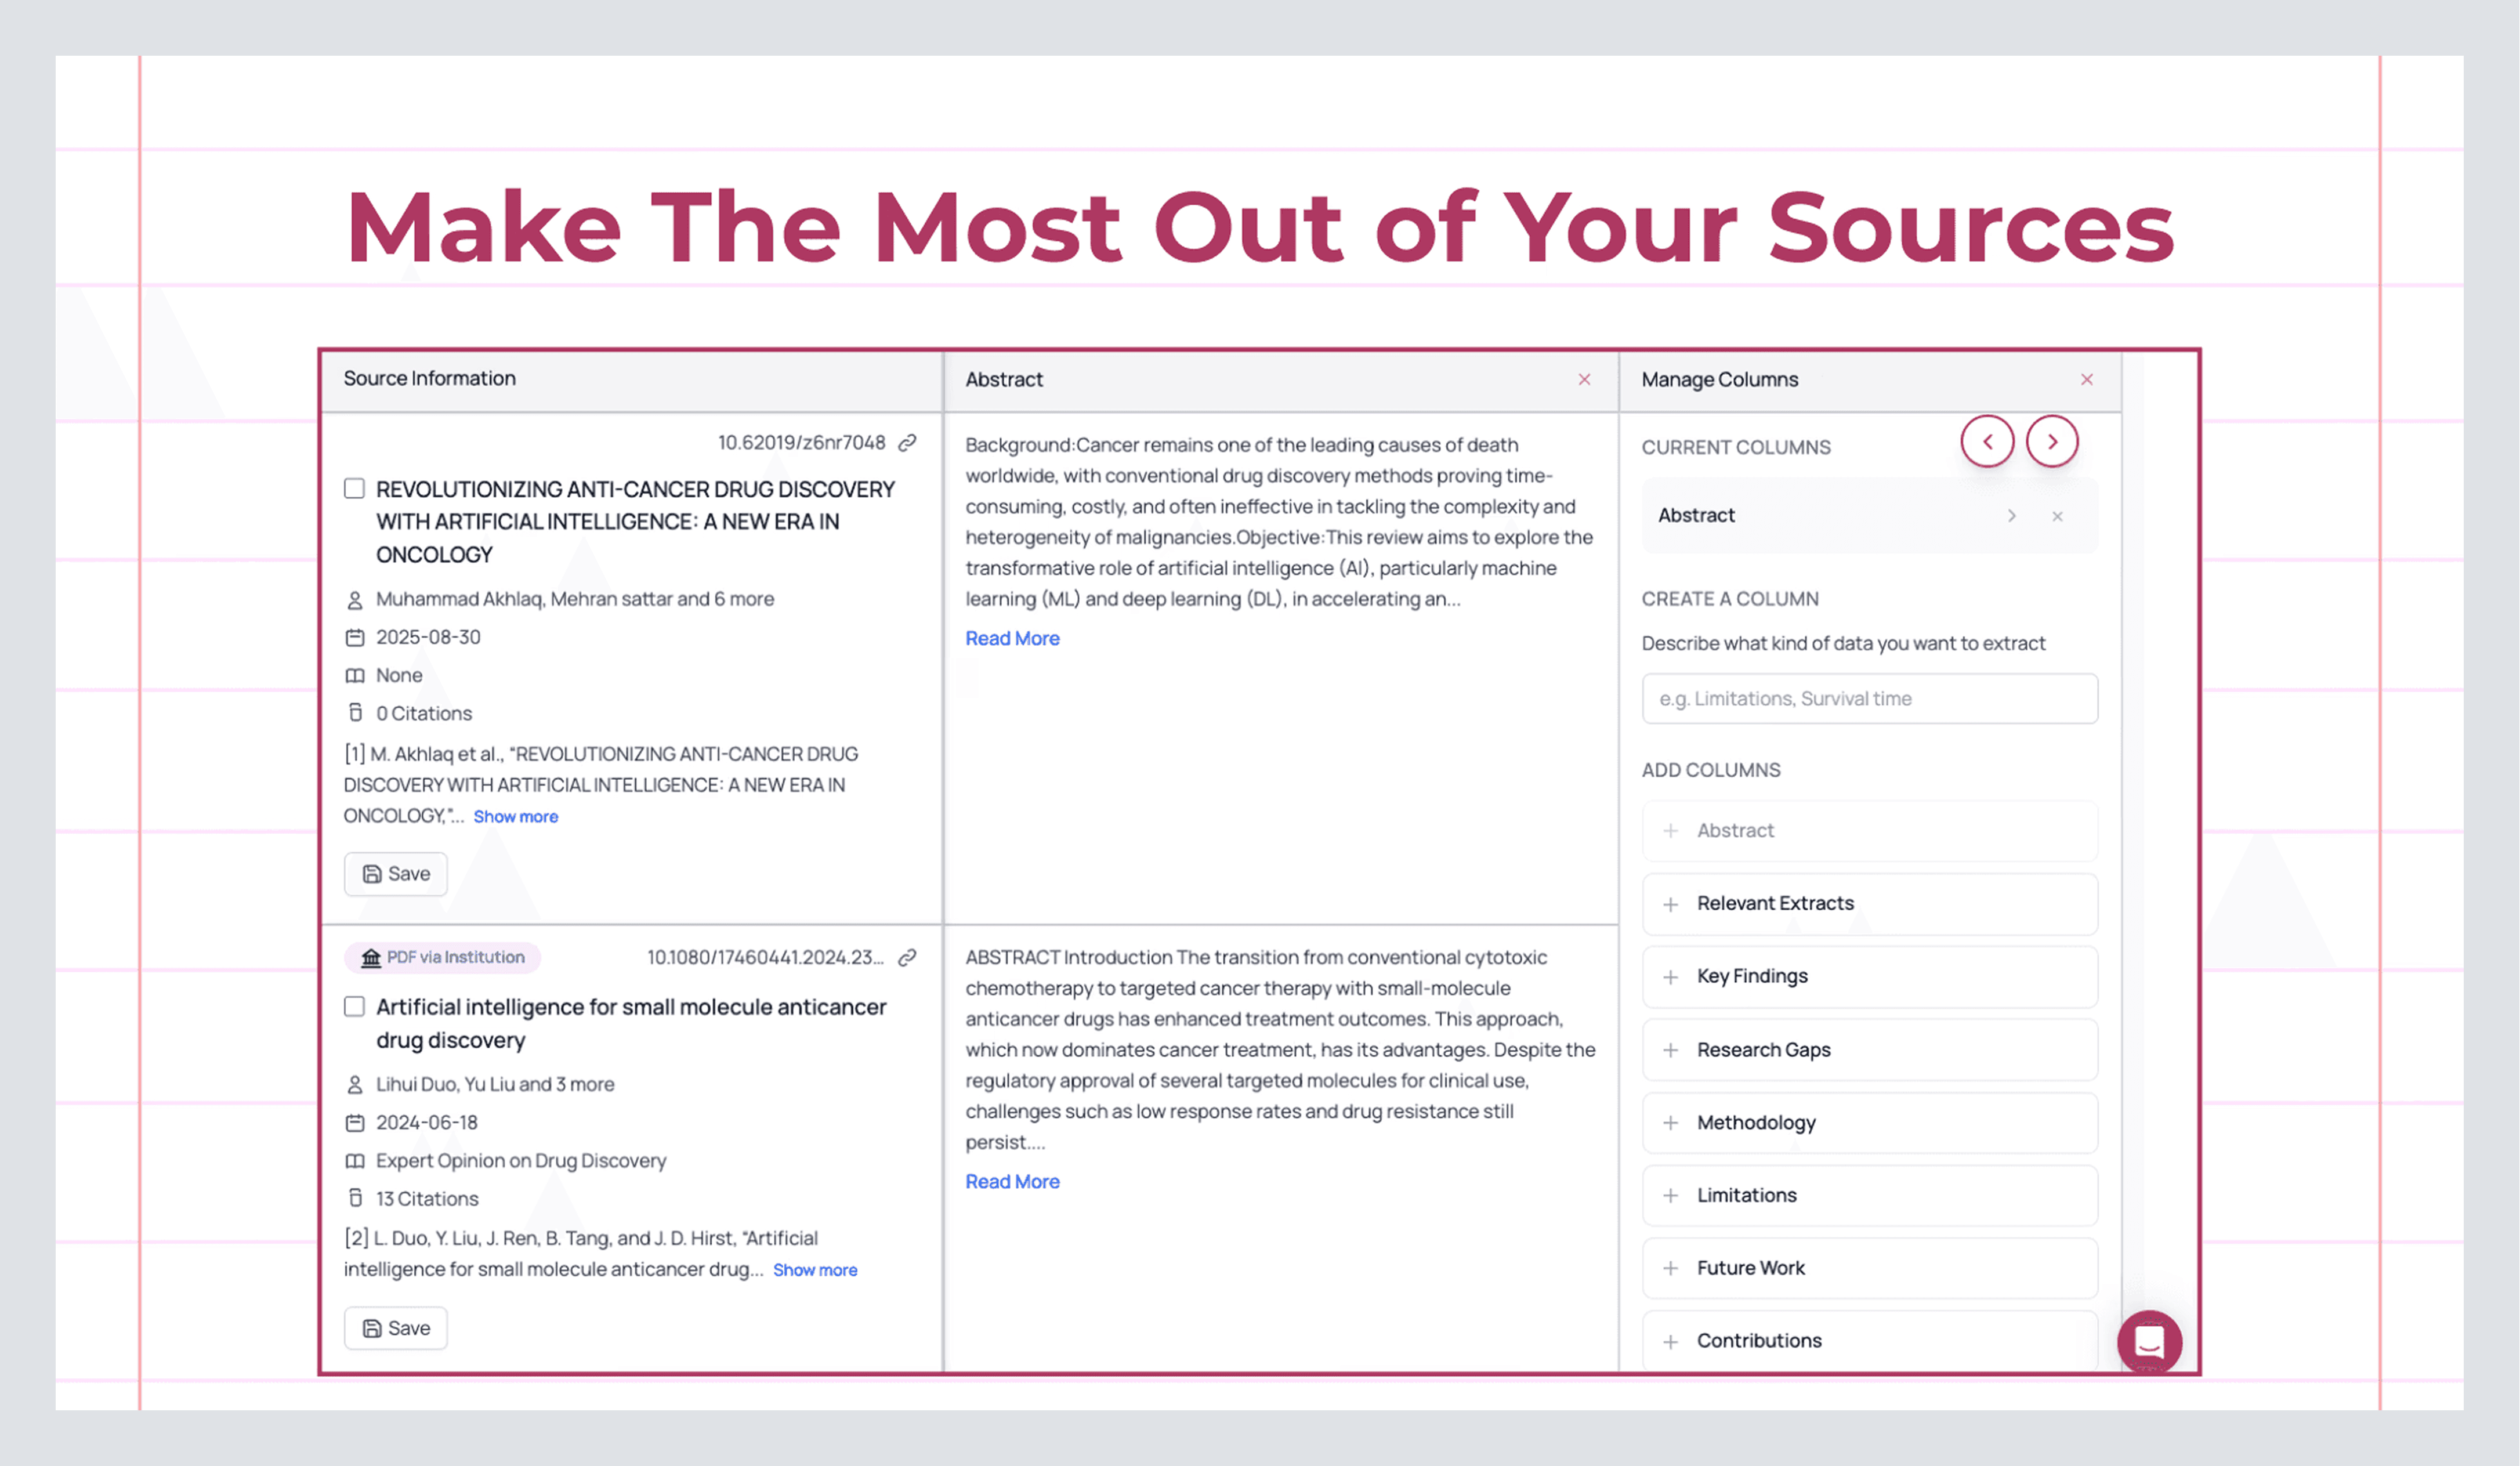
What you’re looking at
On the left, each row is a paper with author(s), year, venue/journal quality (Q1–Q4, where available), DOI, and citation counts. The center column provides the abstract, already highlighted against your query, so your eyes are drawn to the relevant text first. The right column contains a custom columns section where you can automatically add data like extracts. These are short, contextual snippets AnswerThis pulled because they directly connect to what you asked...
Shape the table to your questions
Click Manage Columns. This is where AnswerThis becomes a professional researcher who can read 1,000s of papers at once. You can extract data from papers such as:
Research Gaps adds a concise “what’s missing” note per paper. This is gold when you’re framing a contribution or writing “Future Work.”
Key Findings compresses the main result into one actionable line, handy for a quick scan and for tables in appendices.
Methodology surfaces designs, datasets, architectures, or analysis approaches.
Custom Extract is where you can prompt the column to extract anything you want! Ask for Evaluation metrics, Sample sizes, Inclusion criteria, Effect sizes, Benchmarks, or Risk of bias, whatever your reviewer (or supervisor) will ask you for later.
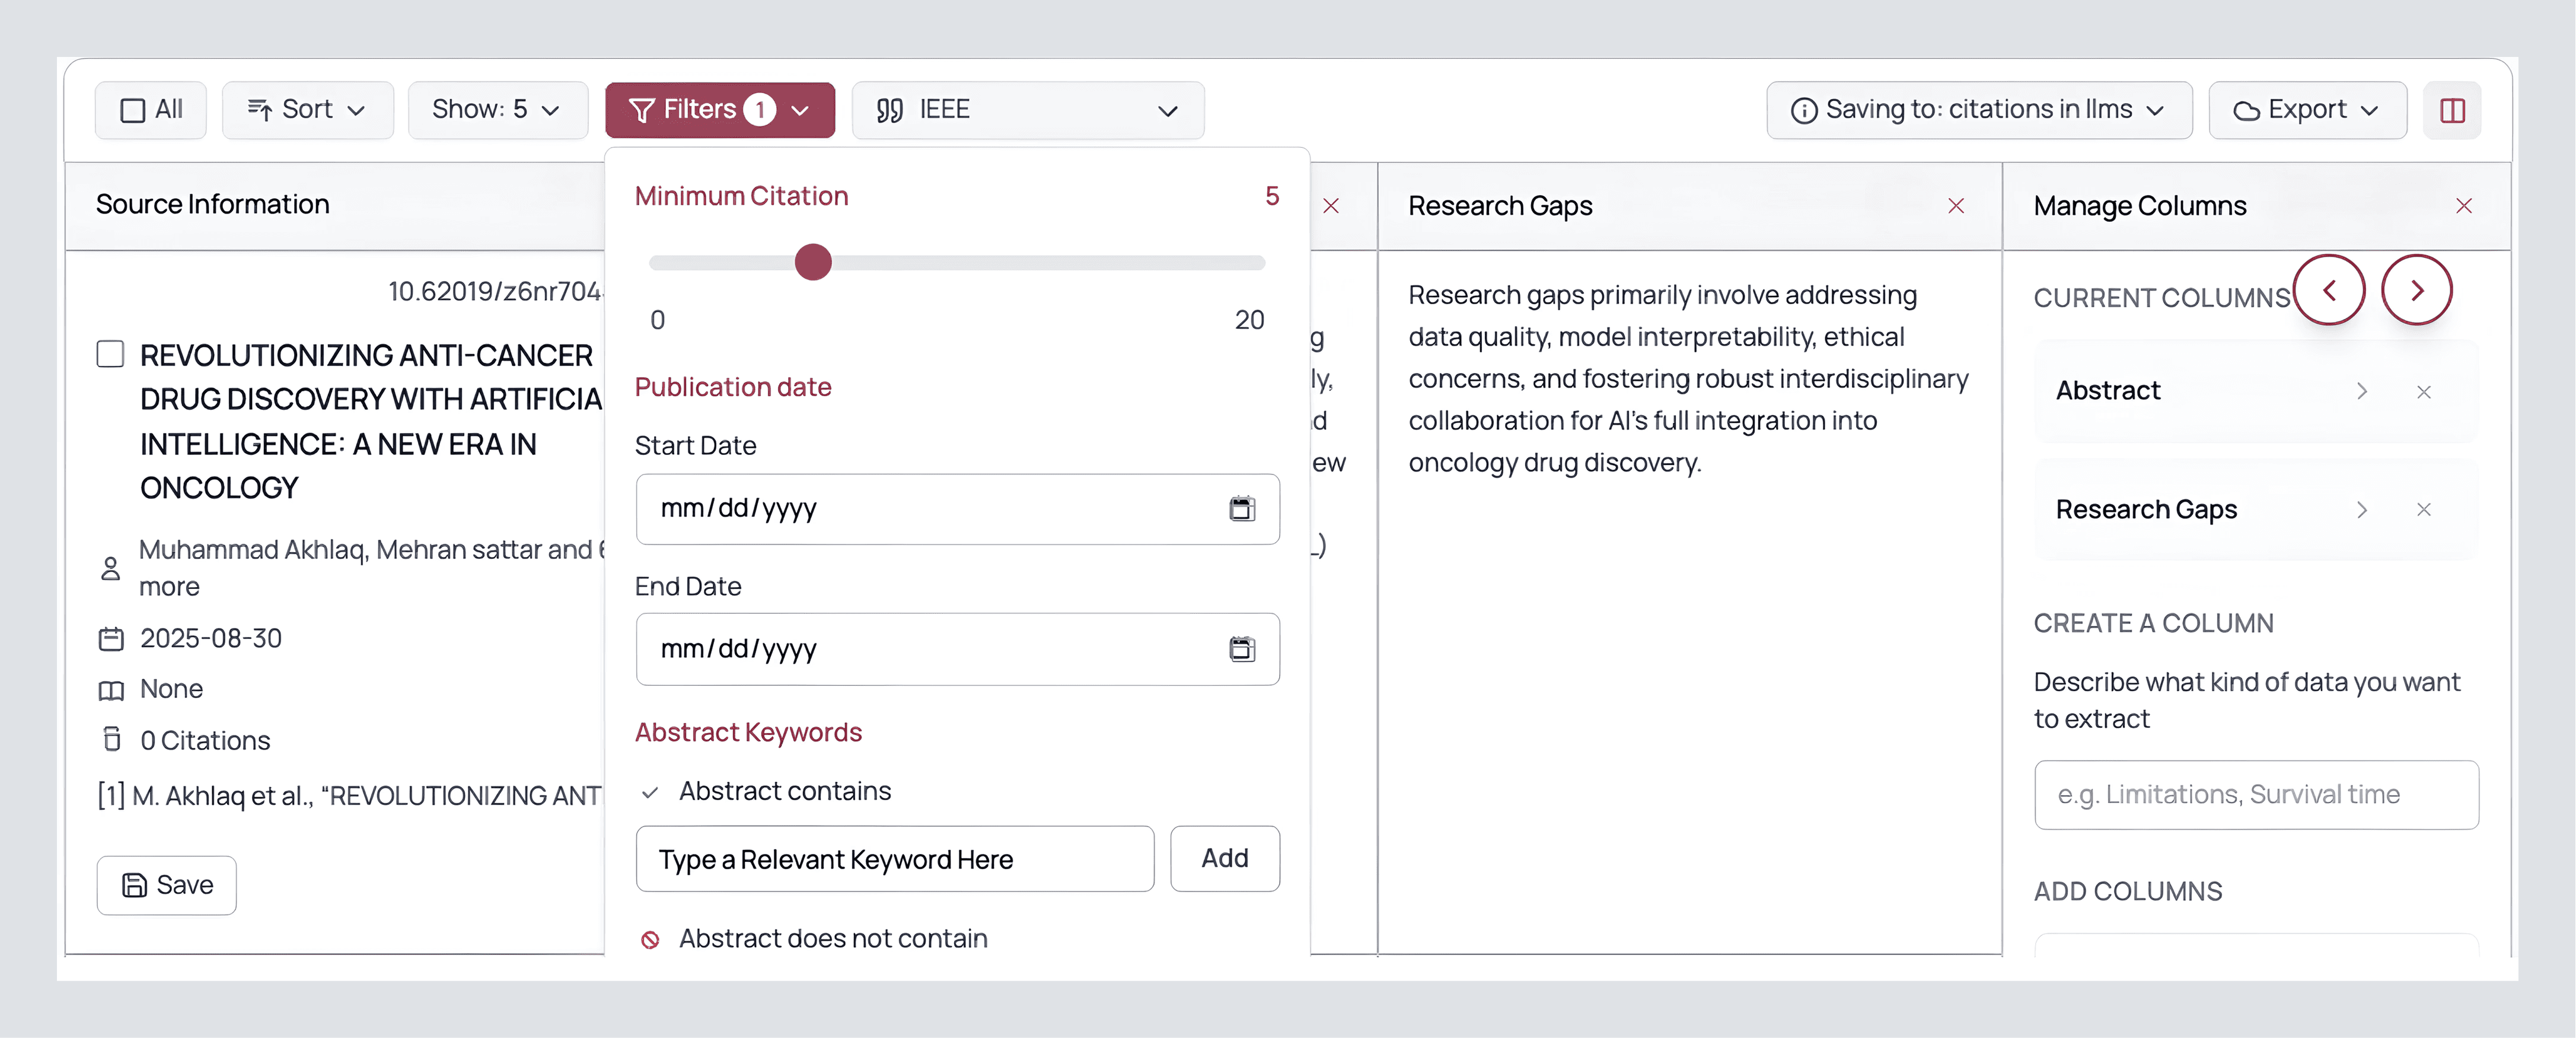
Once added, you can sort and filter on these columns like any spreadsheet. For example, filter to Q1 journals published from 2020 onwards (we can also filter by keywords if we wish). In seconds, you have a shortlist that actually matches your bar.
Assistant Tip: If a paper looks promising, don’t leave it to read it later. Use the table to decide why it’s promising, and extract that value right now.
Switch styles, keep consistency
At the top, set your citation style, APA/MLA/Chicago, or one of thousands of others. The review and the sources table update together. Lock this now so you don’t reformat late in the process.
Additionally, we can also sort by most citations, publication date, and alphabetically to organize our papers better if we need to.
Export cleanly
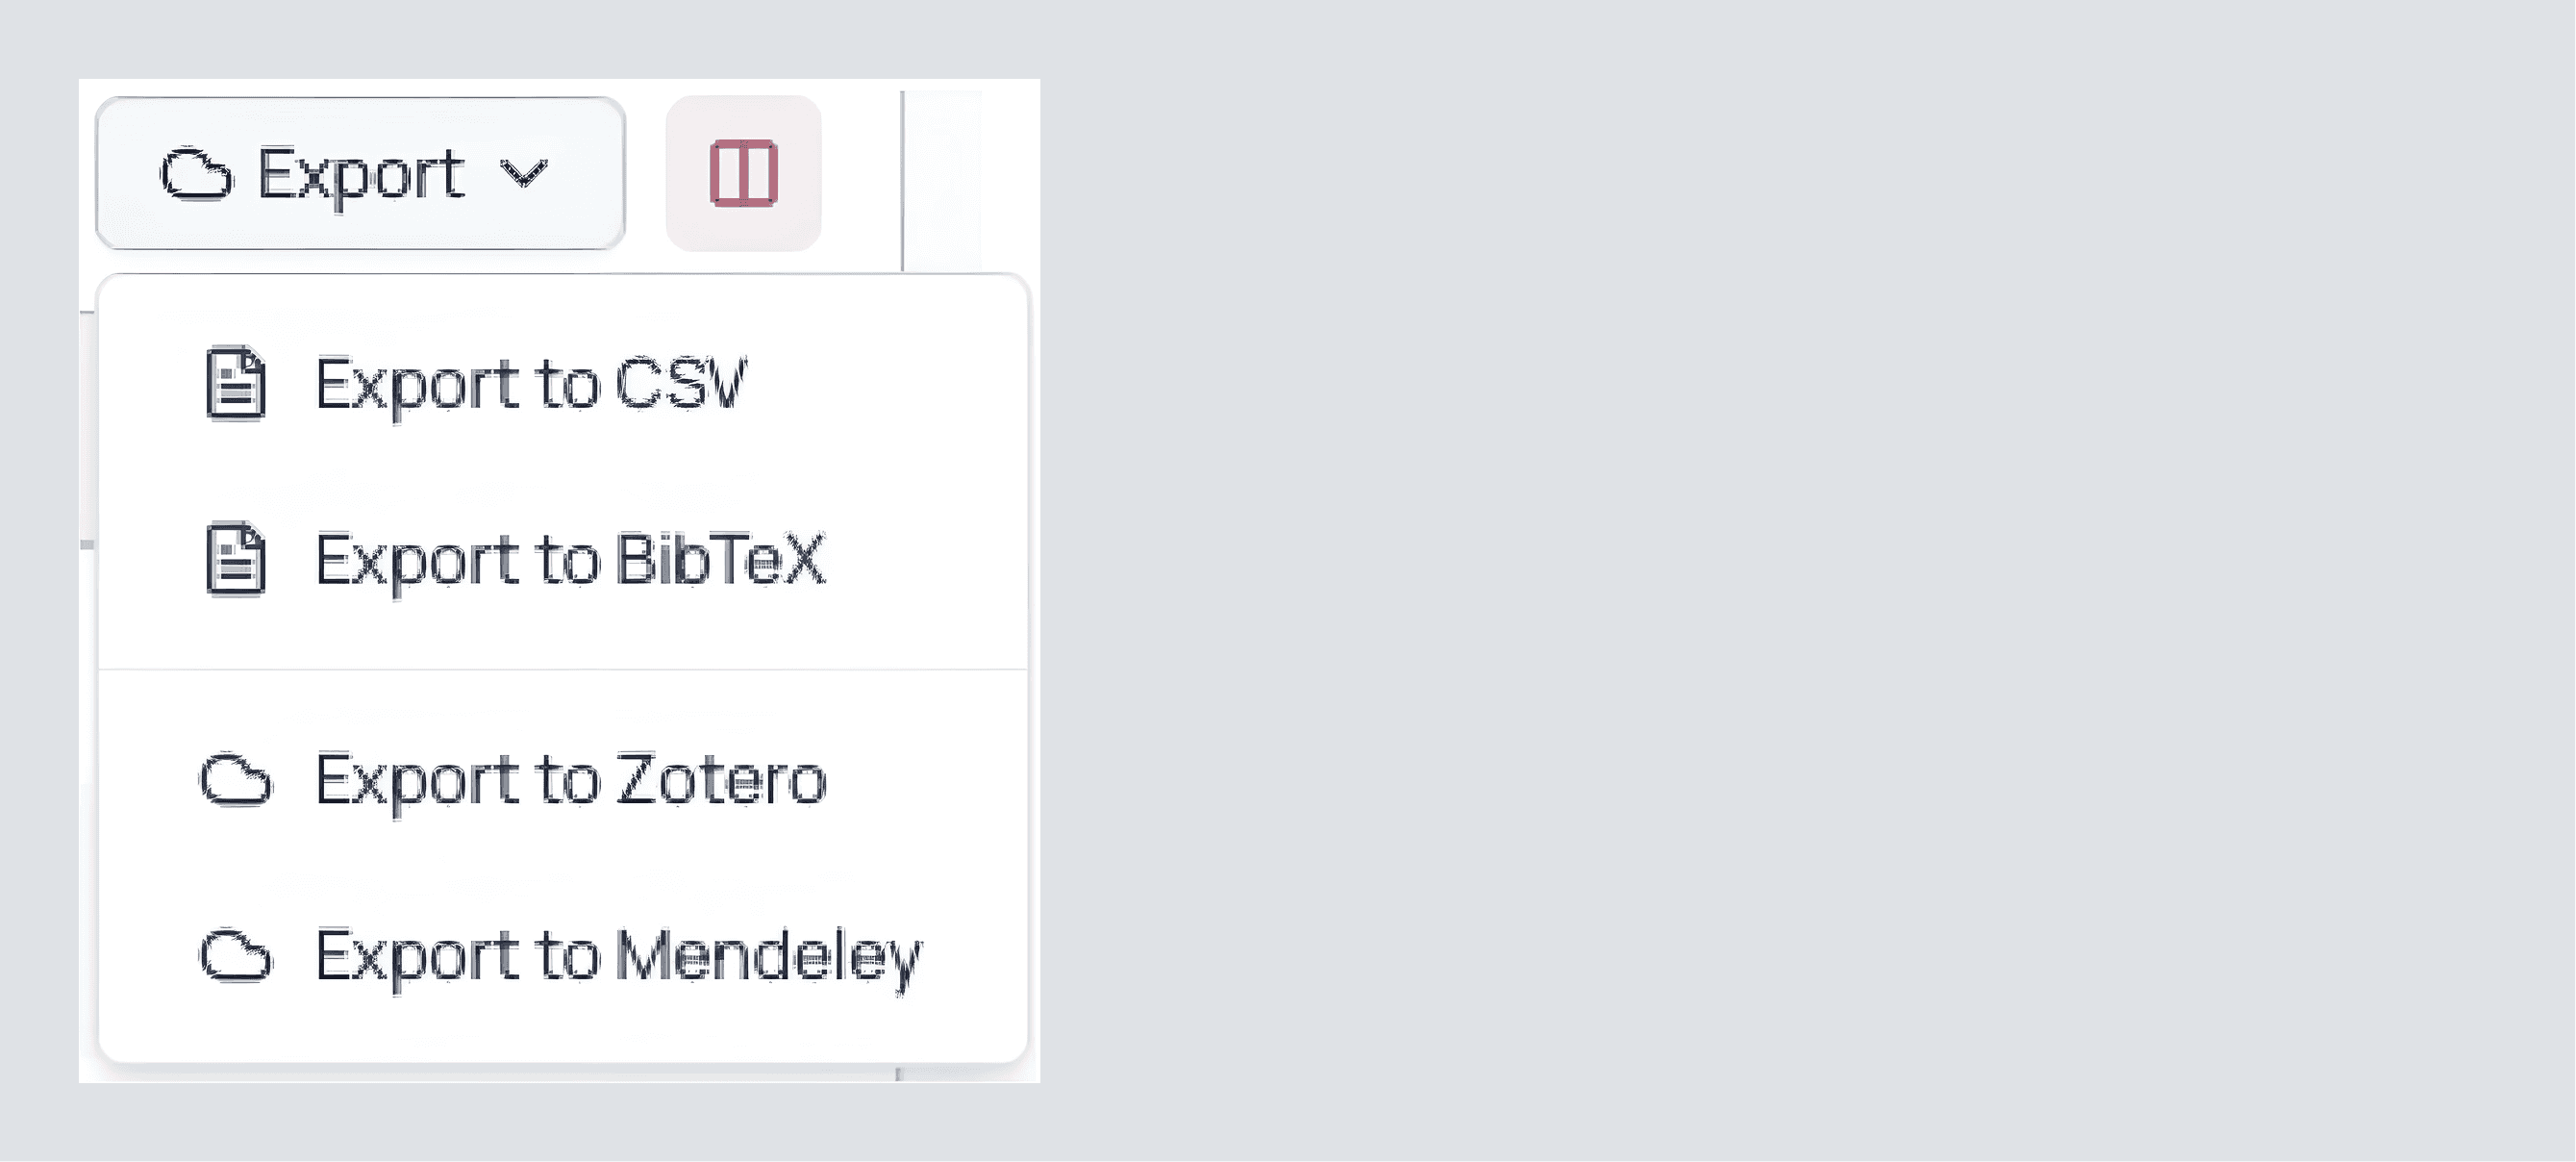
In the top right corner, we also see an export button. Click this to export to the following formats and libraries:
CSV if you want to analyze trends or share a structured view with teammates.
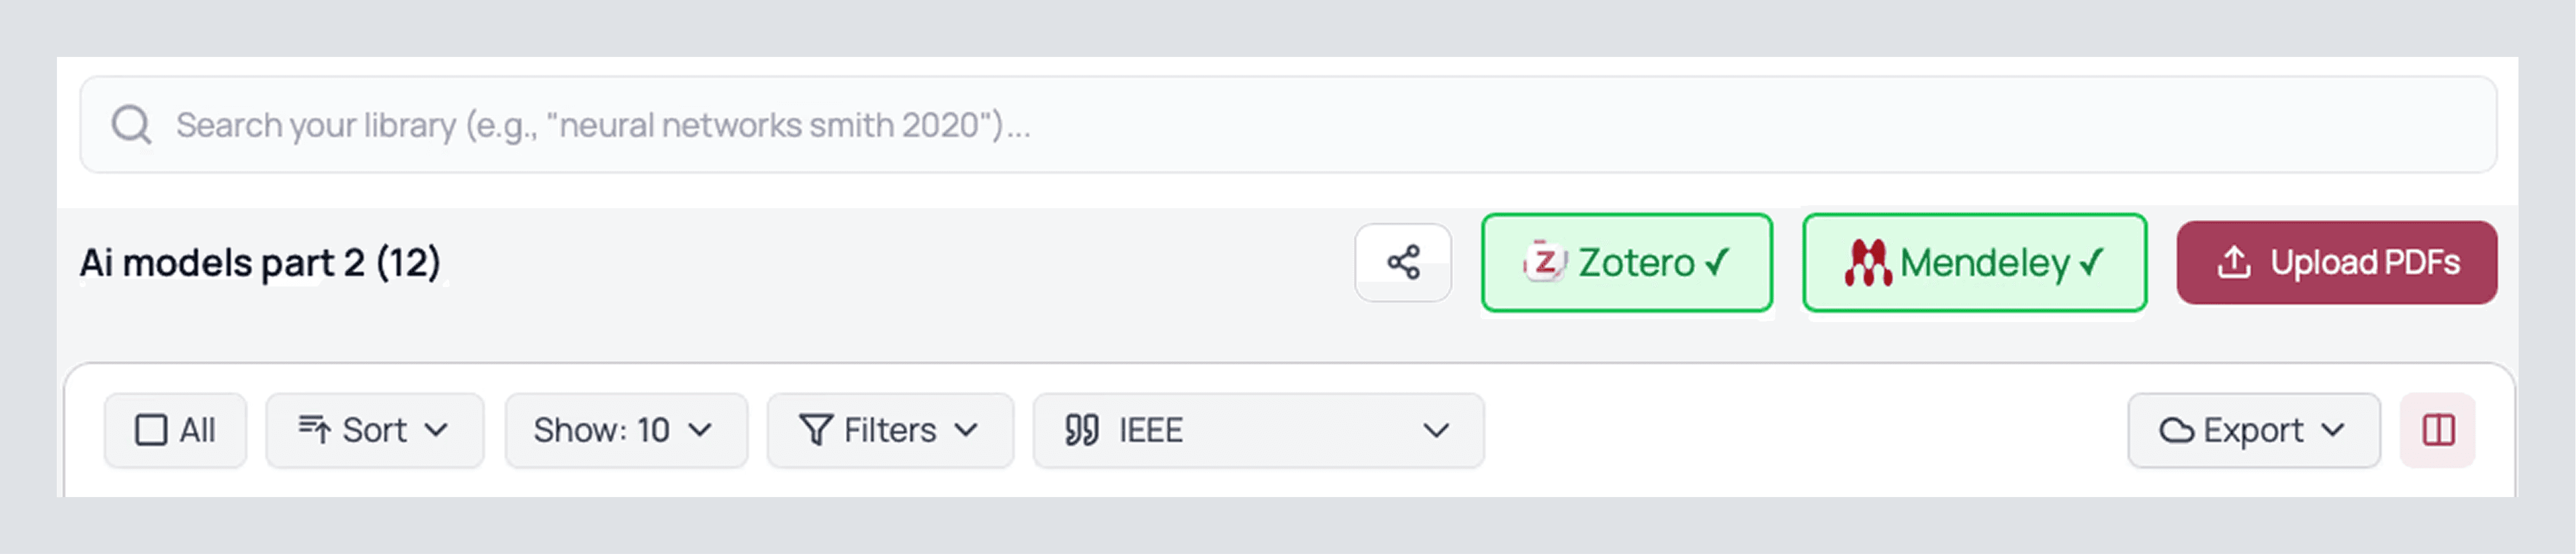
BibTeX if you’re in LaTeX (or send to Zotero/Mendeley directly).
Zotero
Mendeley
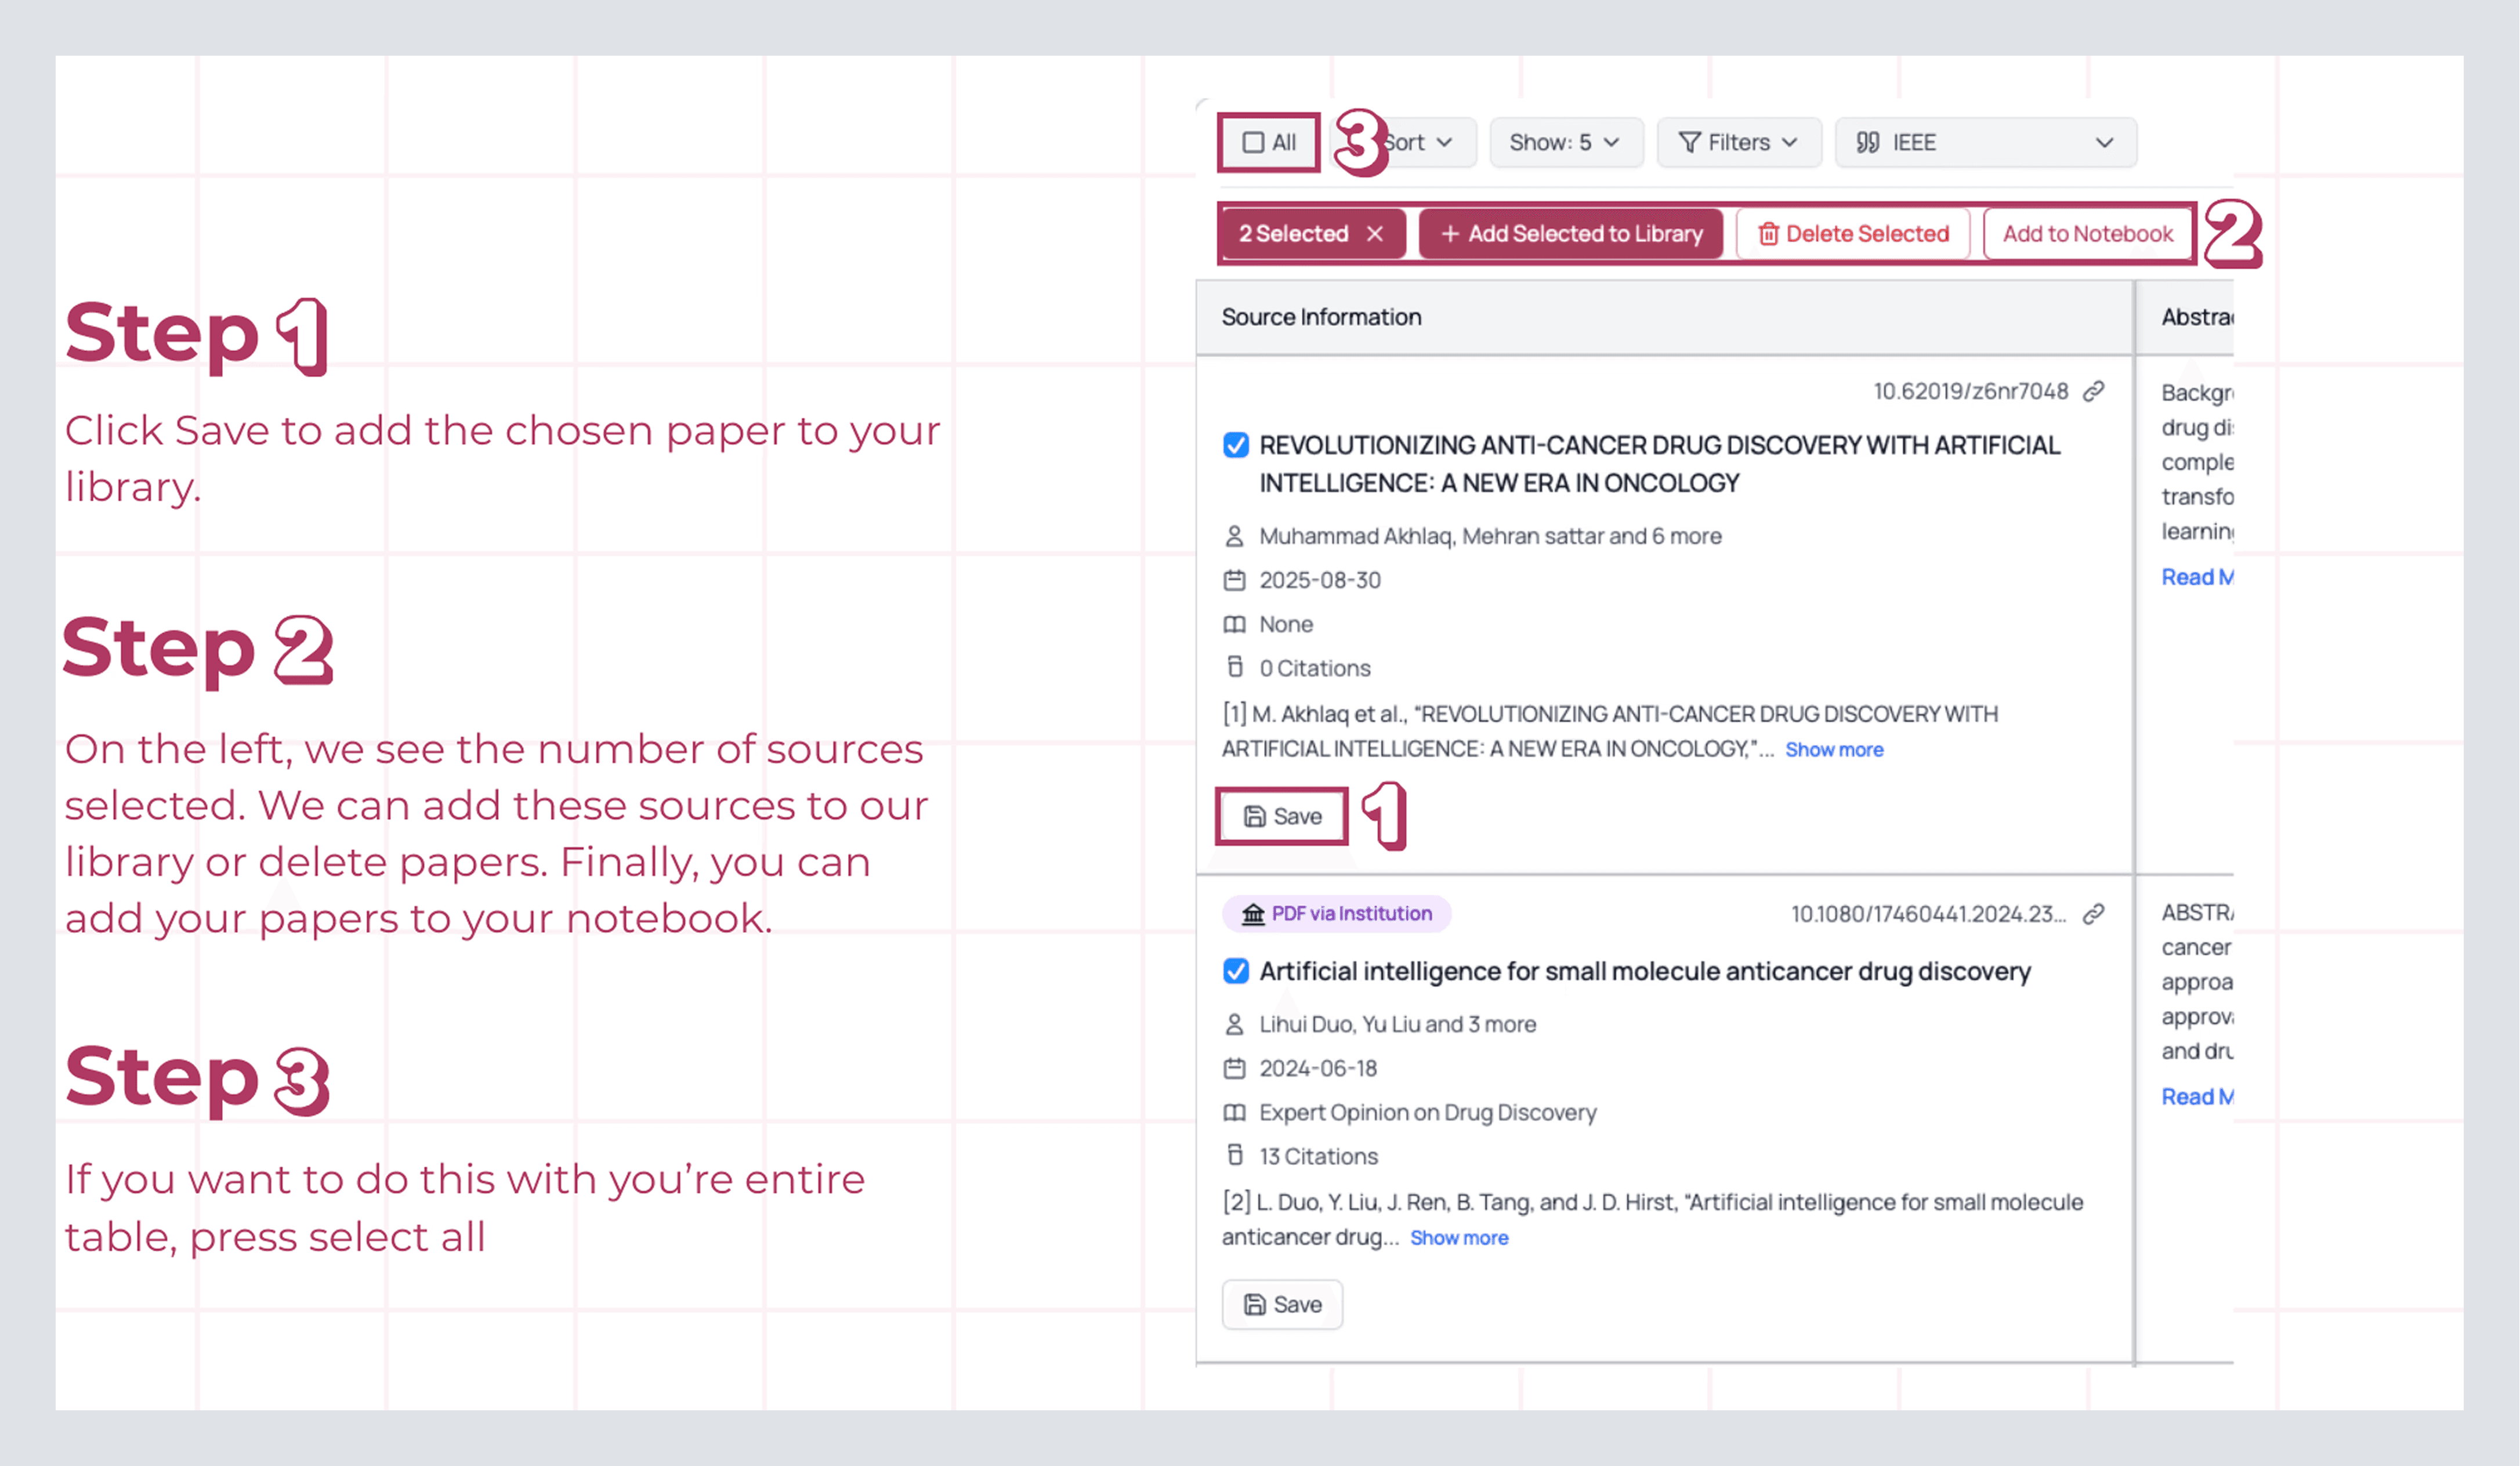
As you go through your research papers, you’ll notice a Save button on the left-hand side. Select multiple papers at once, or one at a time, and add them directly to your library for future research endeavors.
But wait, when you try to select a new paper, four more options appear, you may say. Great observation! Here, we can see the count of selected papers, the option to add them to the library, delete a paper, or add it to our notebook (a place where you can keep key notes as you work on your canvas, skip here to read more).
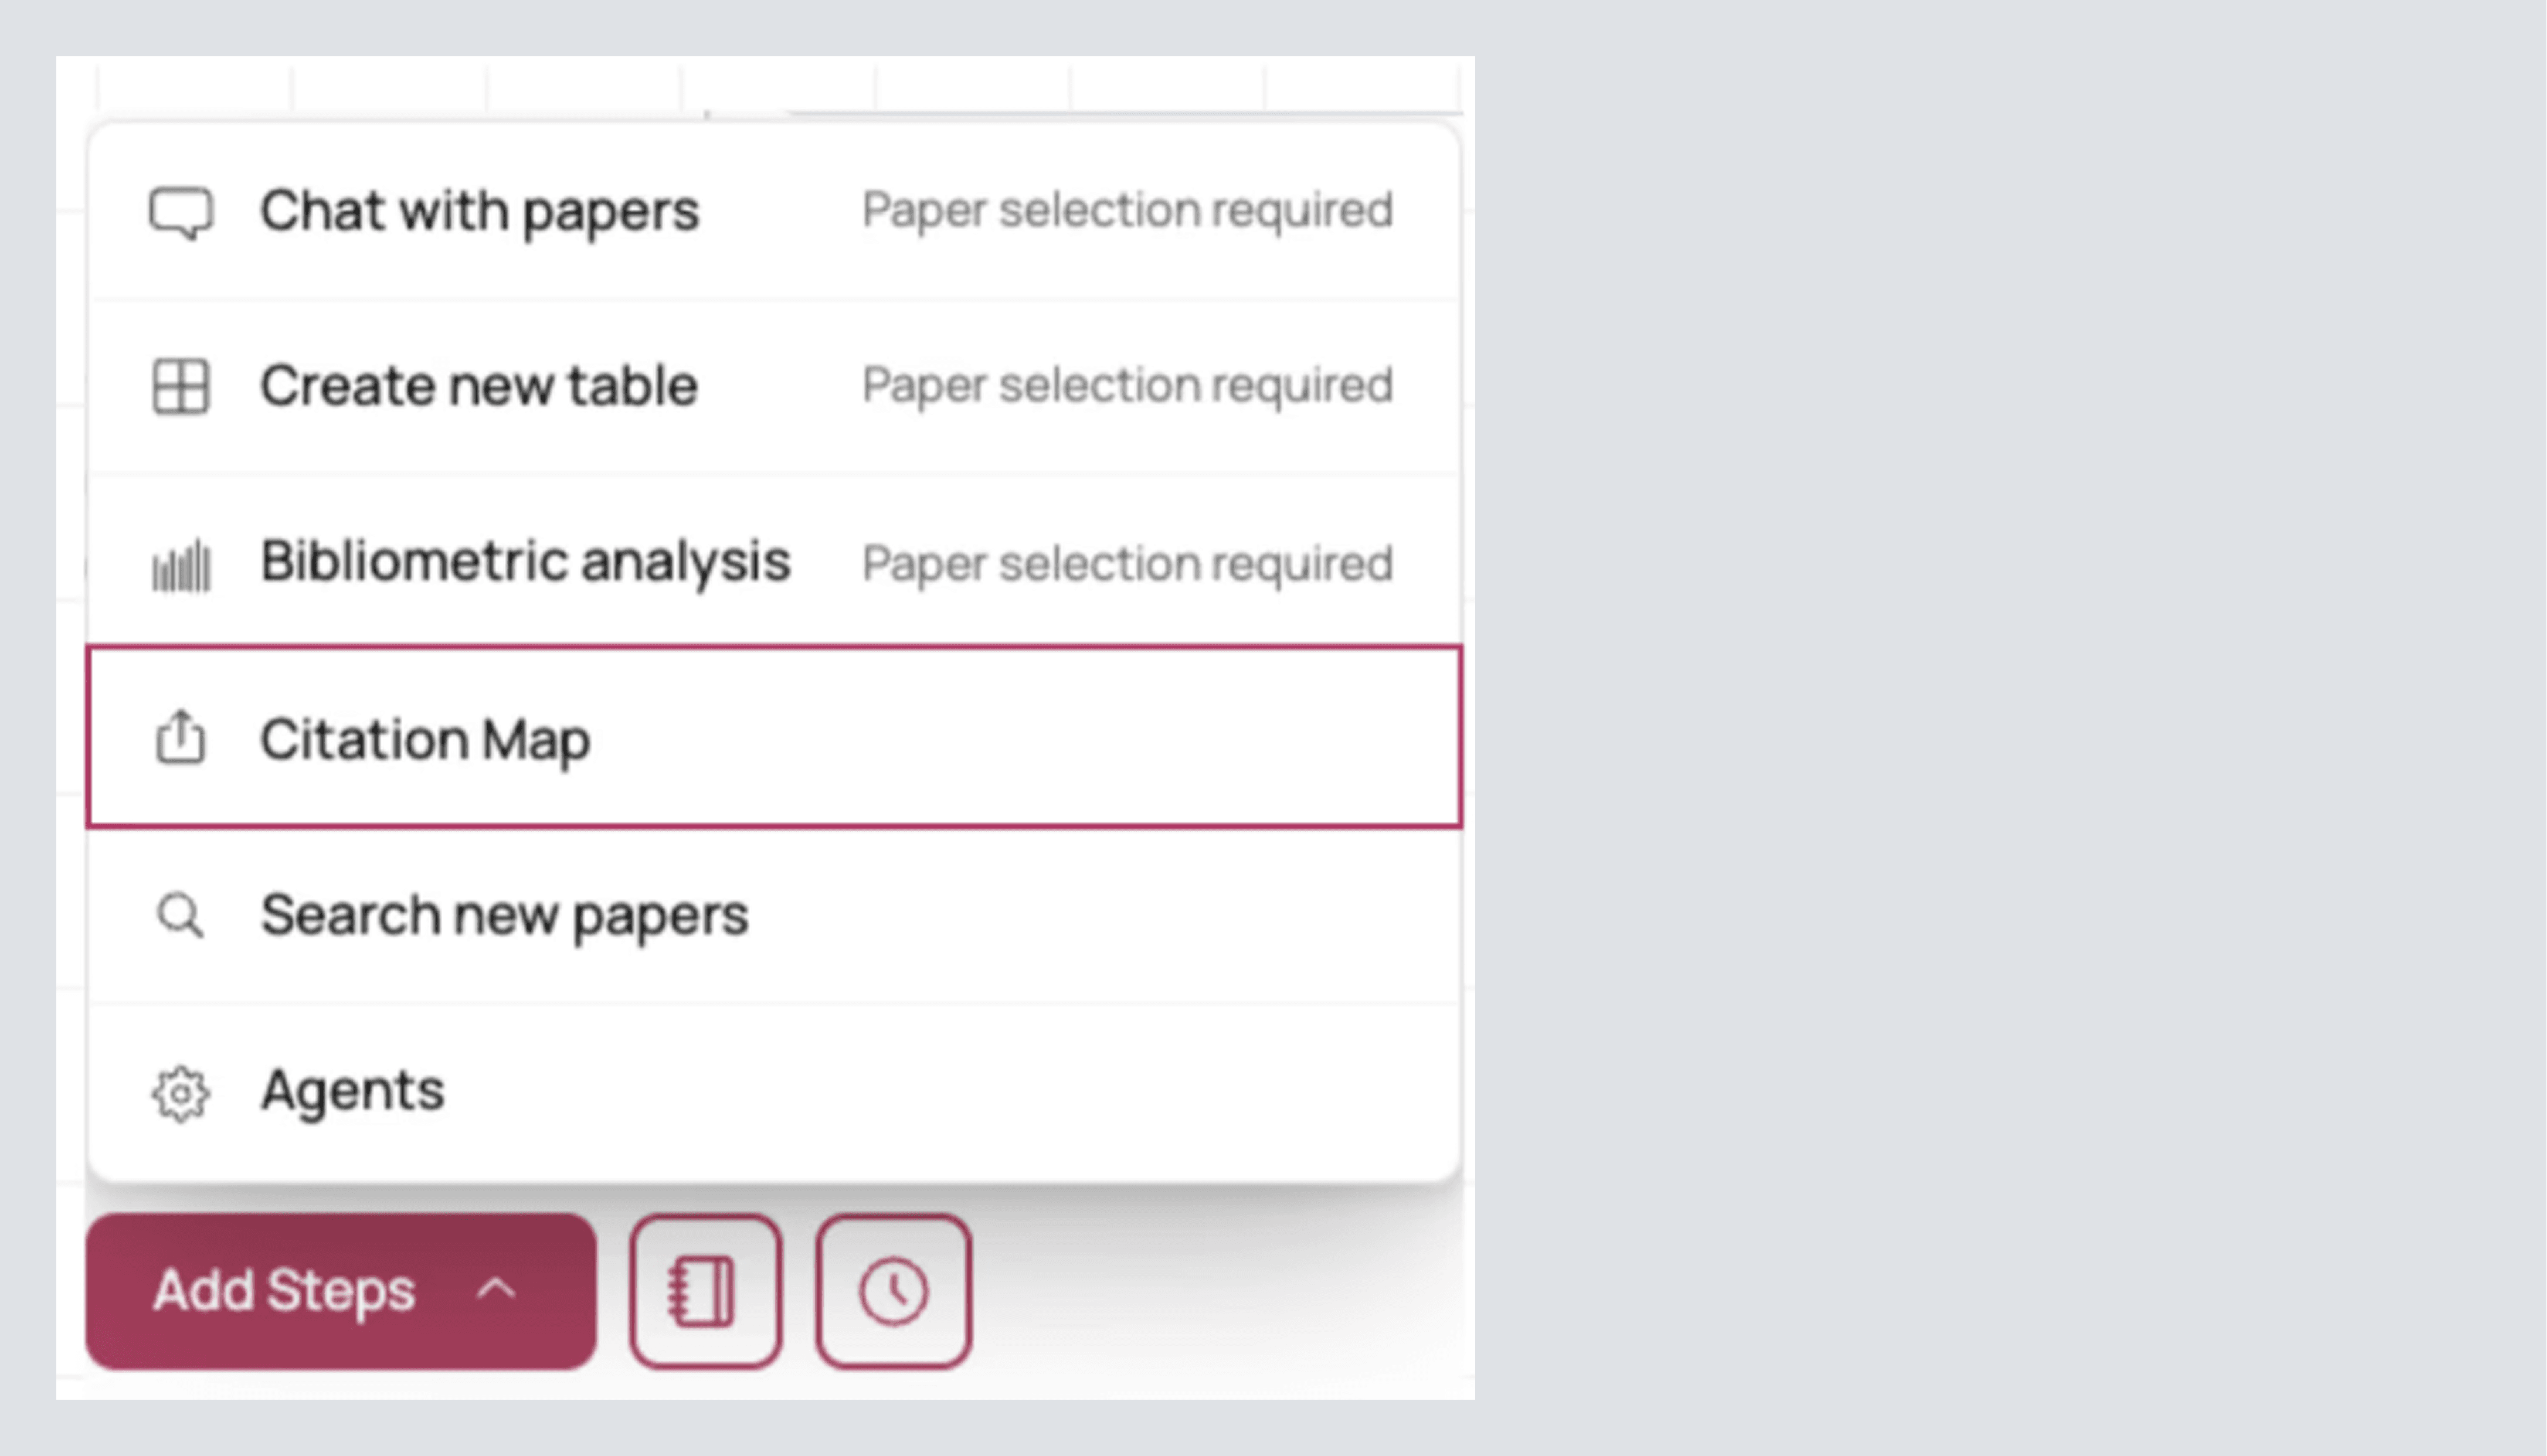
If we want to take it one step further, we can select all papers at once using the checkbox in the top left corner. Whether we select all or just a few, we’ll still see the four options mentioned earlier, plus the Next Step button, which lets us view more information about the sources and connect them together.
Create a New Table from What You’ve Filtered or Selected
If you’ve fine-tuned your filters (e.g., Q1/Q2, 2024+, keyword match) or hand-picked a subset of papers, press Create New Table. This creates a clean table you can work from without altering the larger list. Give it a clear name so you can find it later.
Now that we have a new table with similar traits, we can use it later to extract deeper insights, from identifying emerging trends to discovering microcosms of the bigger picture. You never know what you might uncover.
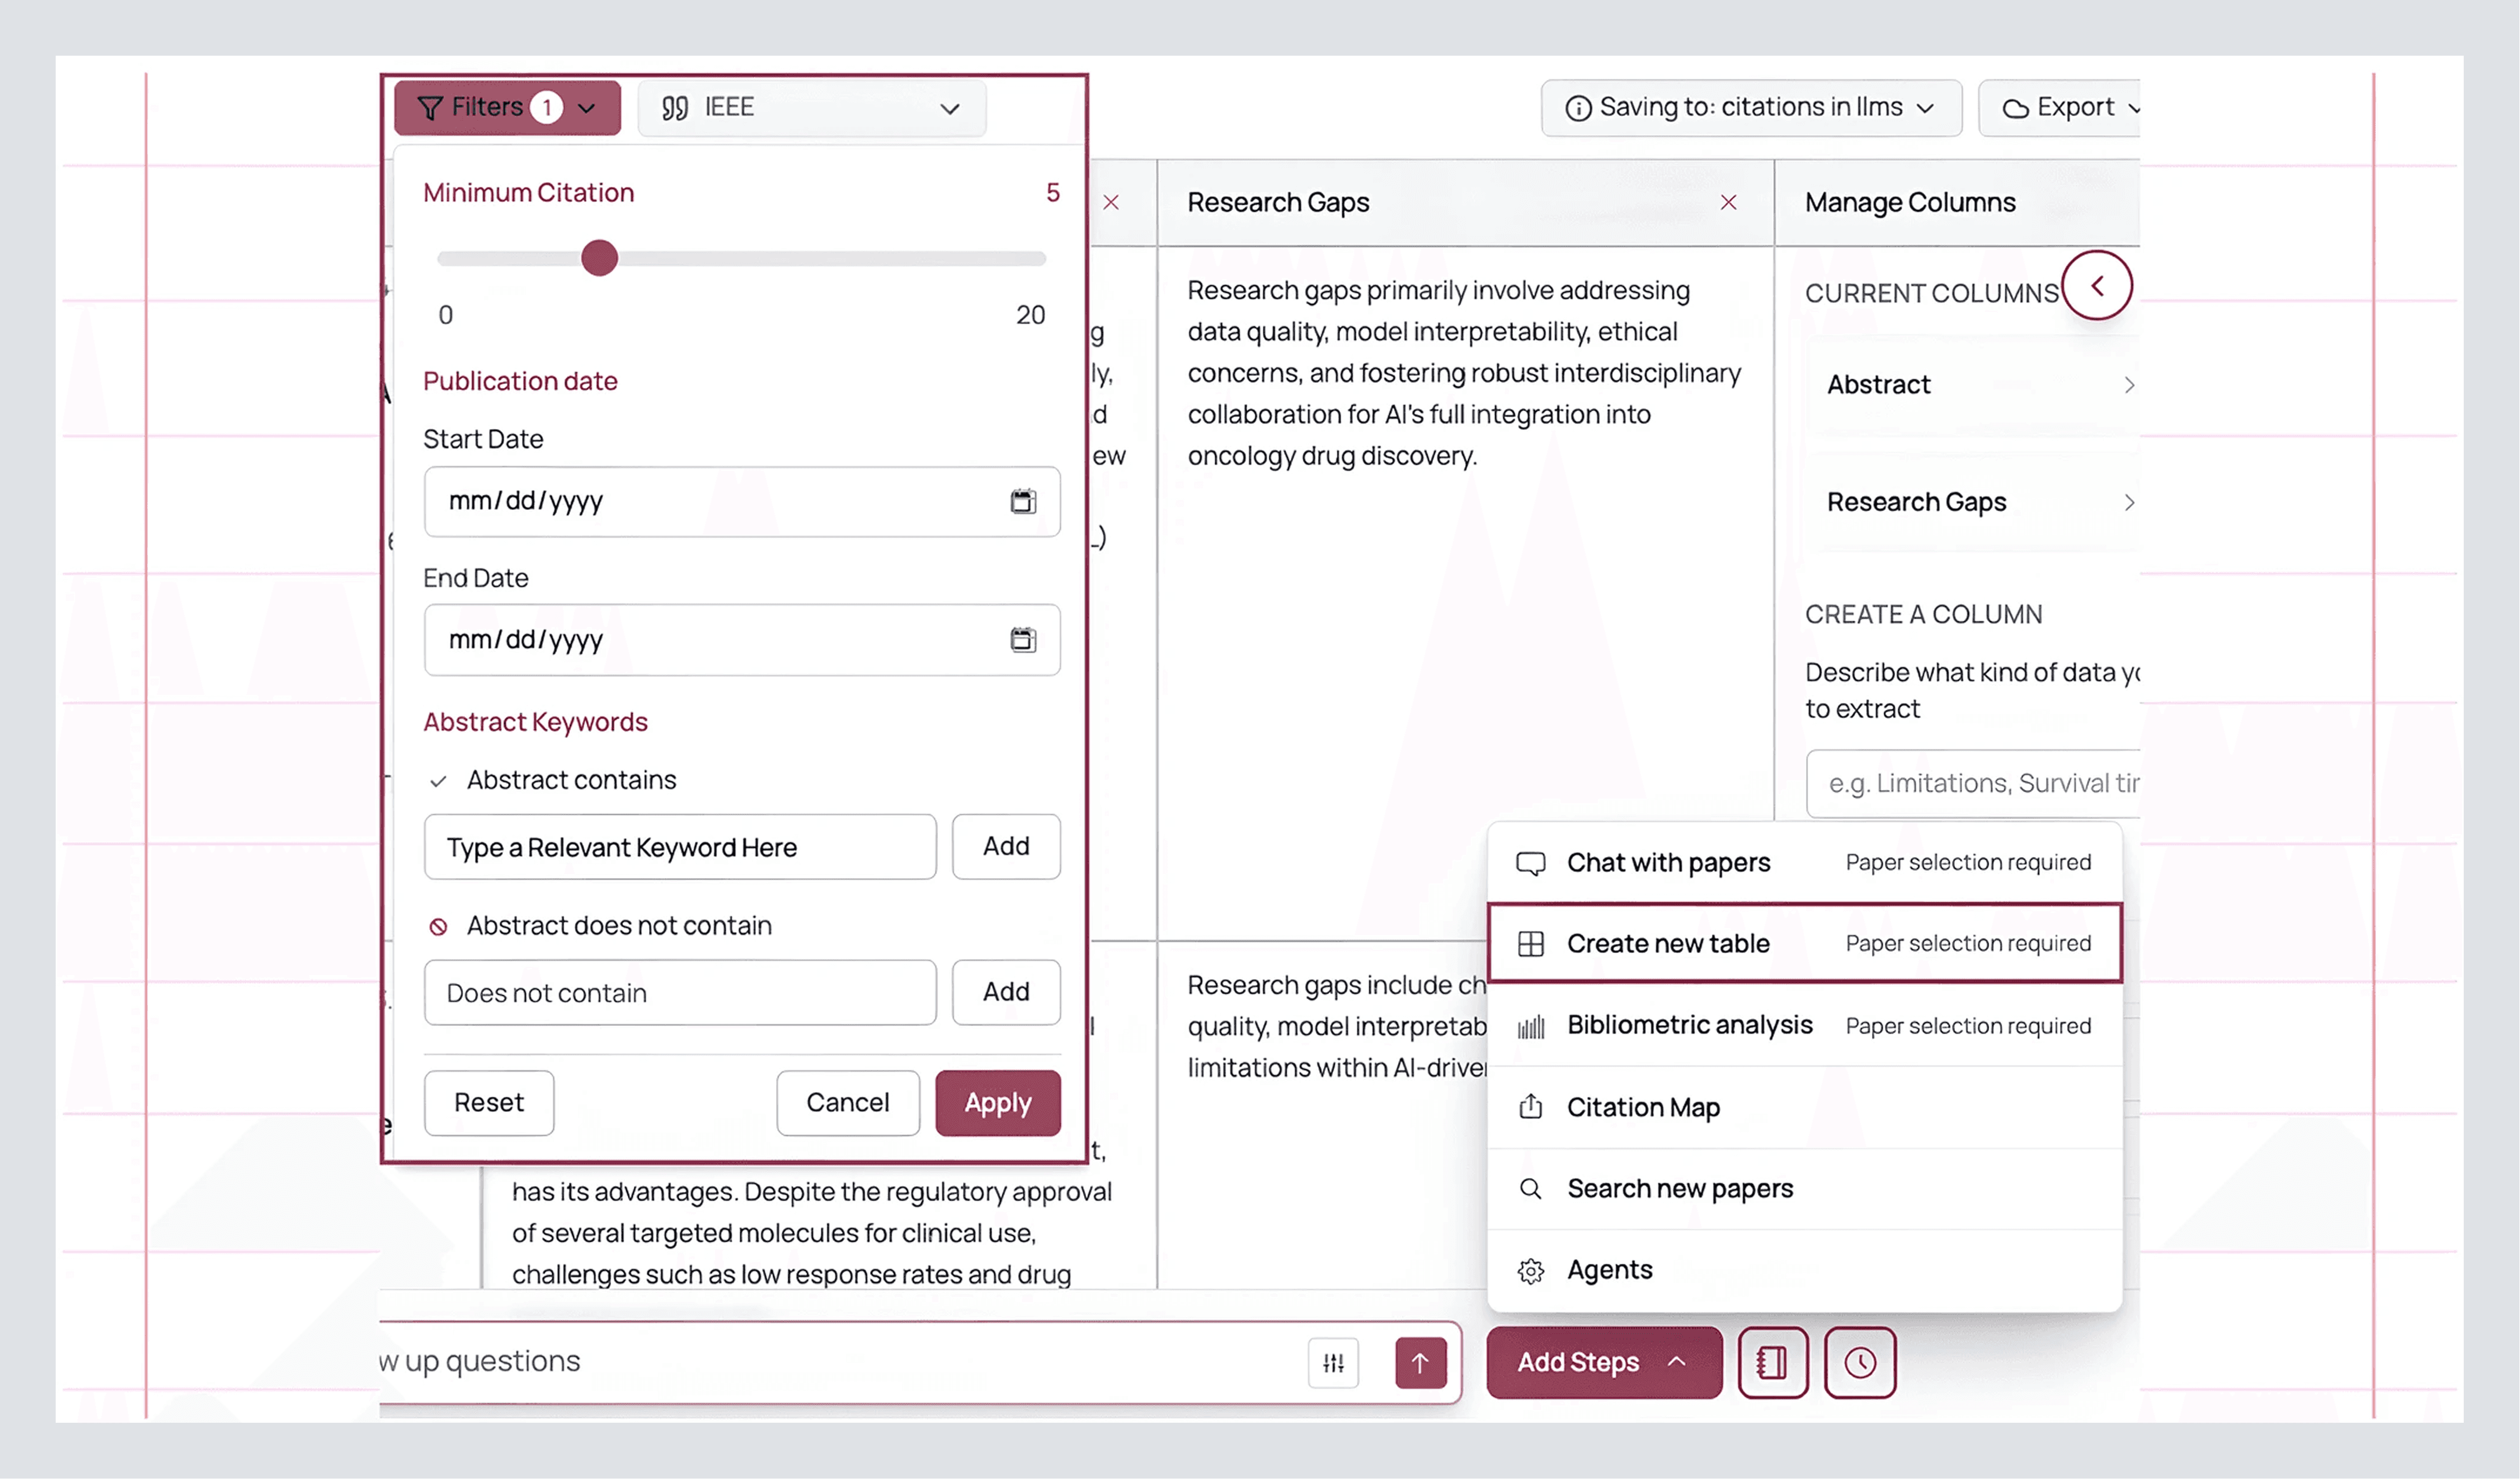
Bibliometric Analysis
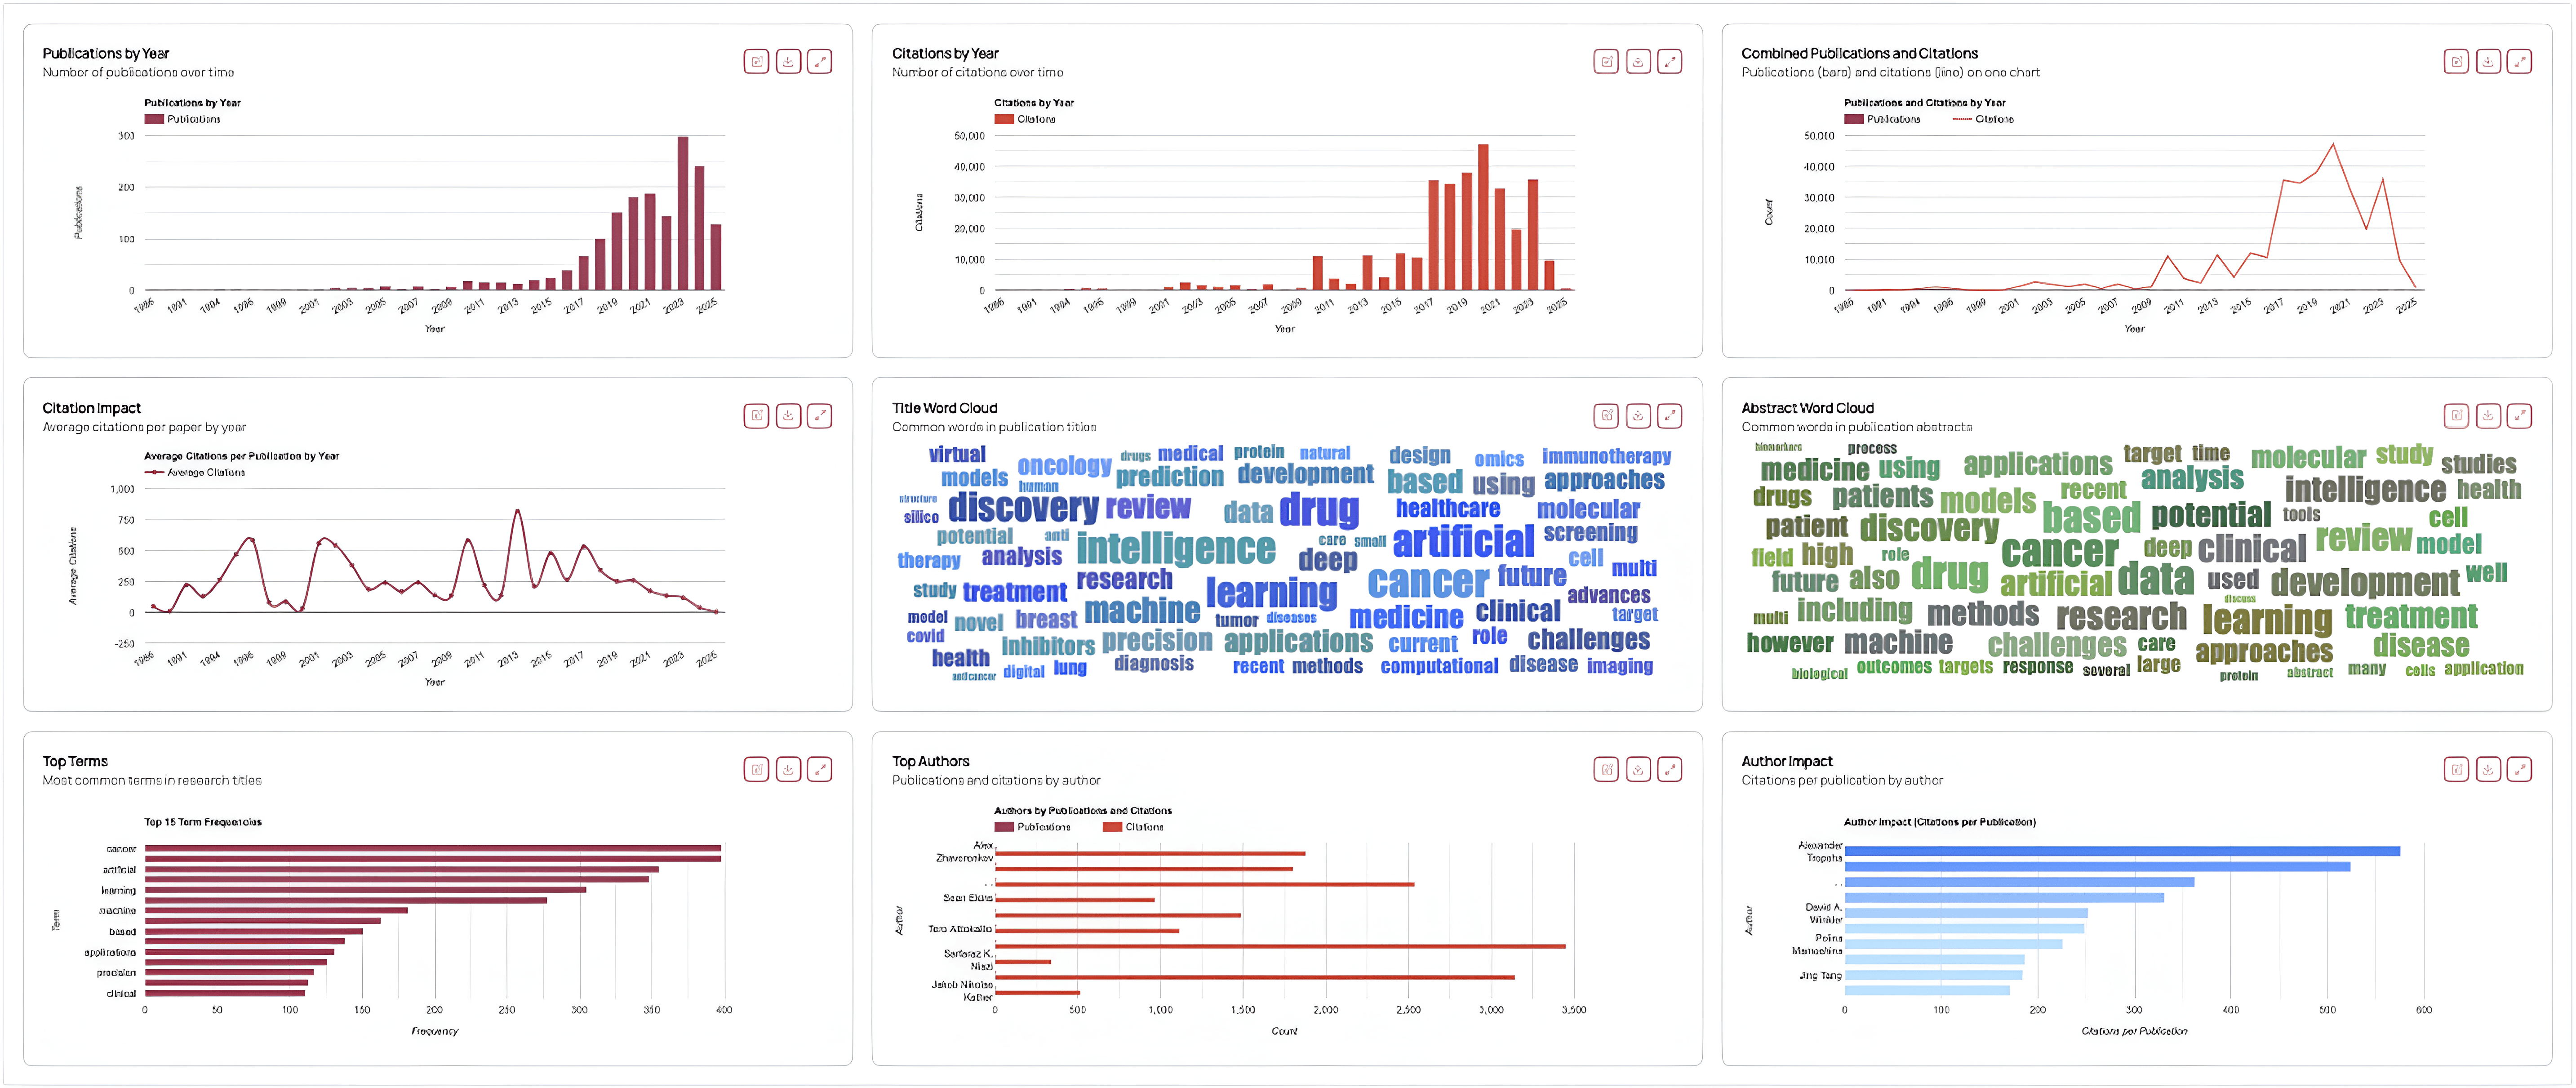
Open this to see the shape of the field you’ve curated, or all the papers that came with your comprehensive AnswerThis result. After selecting your papers, clicking Next Step, and choosing Bibliometric Analysis, here’s what you’ll find:
Publication by Year: Shows whether research output is accelerating or plateauing. It’s a great way to identify trends or locate seed papers in your field.
Citation Trends: Indicates whether recent work is gaining traction or if influence is anchored in older studies.
Combined Trend: Similar to the previous two metrics, but combines output × impact, a handy sanity check.
Citation Impact: Want to find seed papers? This helps you spot the years when papers are cited the most. Use the Search Papers tool with filters to locate these high-impact works.
Keyword Usage: Displays the actual language used across your set, helping surface dominant topics, tasks, or datasets.
Top Authors and Author Impact: Highlights recurring authors and their influence in the field.
Search New Papers
Run a targeted expansion without leaving your canvas. For example, if your bibliometric analysis shows that average citations per publication were highest in 2002, you might filter to find those papers.
Simply select Next Step, then click Search Papers. Enter a keyword or prompt as you would in the regular AnswerThis AI bar. Then, select More Filters. Here, you can filter papers by minimum citation count,z database source (library, web, or patents), or journal quality (with Q1 being the highest tier but containing fewer papers). You can also filter by publication date.
From there, you’ll see a table where you can use various tools to extract as much useful information as possible. Click here to quickly learn how to do that.
Citation Map
When you want to see the research around a specific paper rather than just the paper itself, open Next Step → Citation Map.
You’ll see a search box for a DOI or exact title. Either find the DOI of a desired paper and paste it, or search the papers title, then click Set as Origin on your paper. AnswerThis will build a directed map around that paper.
Just under the citation map, you will also have a table containing all the included sources connected to the paper you set as a source. Click here to read on how to navigate and make the most out of the table.
In the citation map itself, you'll find a central node (your origin paper), incoming and outgoing arrows showing who cites whom, and a metric button on the right side just above the table of papers. Click this to rearrange the papers included in your citation map to sort them by:
Most Cited (panel): these are the anchor papers in the cluster. Scroll down to the Table under the graph, add the desired, most cited papers to your library, or send them to your working table.
Most Connected: these are your bridge papers. They sit between subfields and are perfect for related work paragraphs where you need to explain how two lines of work meet.
Top Contributing Authors: this is your following list. Use Search New Papers on these names to pull their recent output into a fresh table without leaving your canvas.
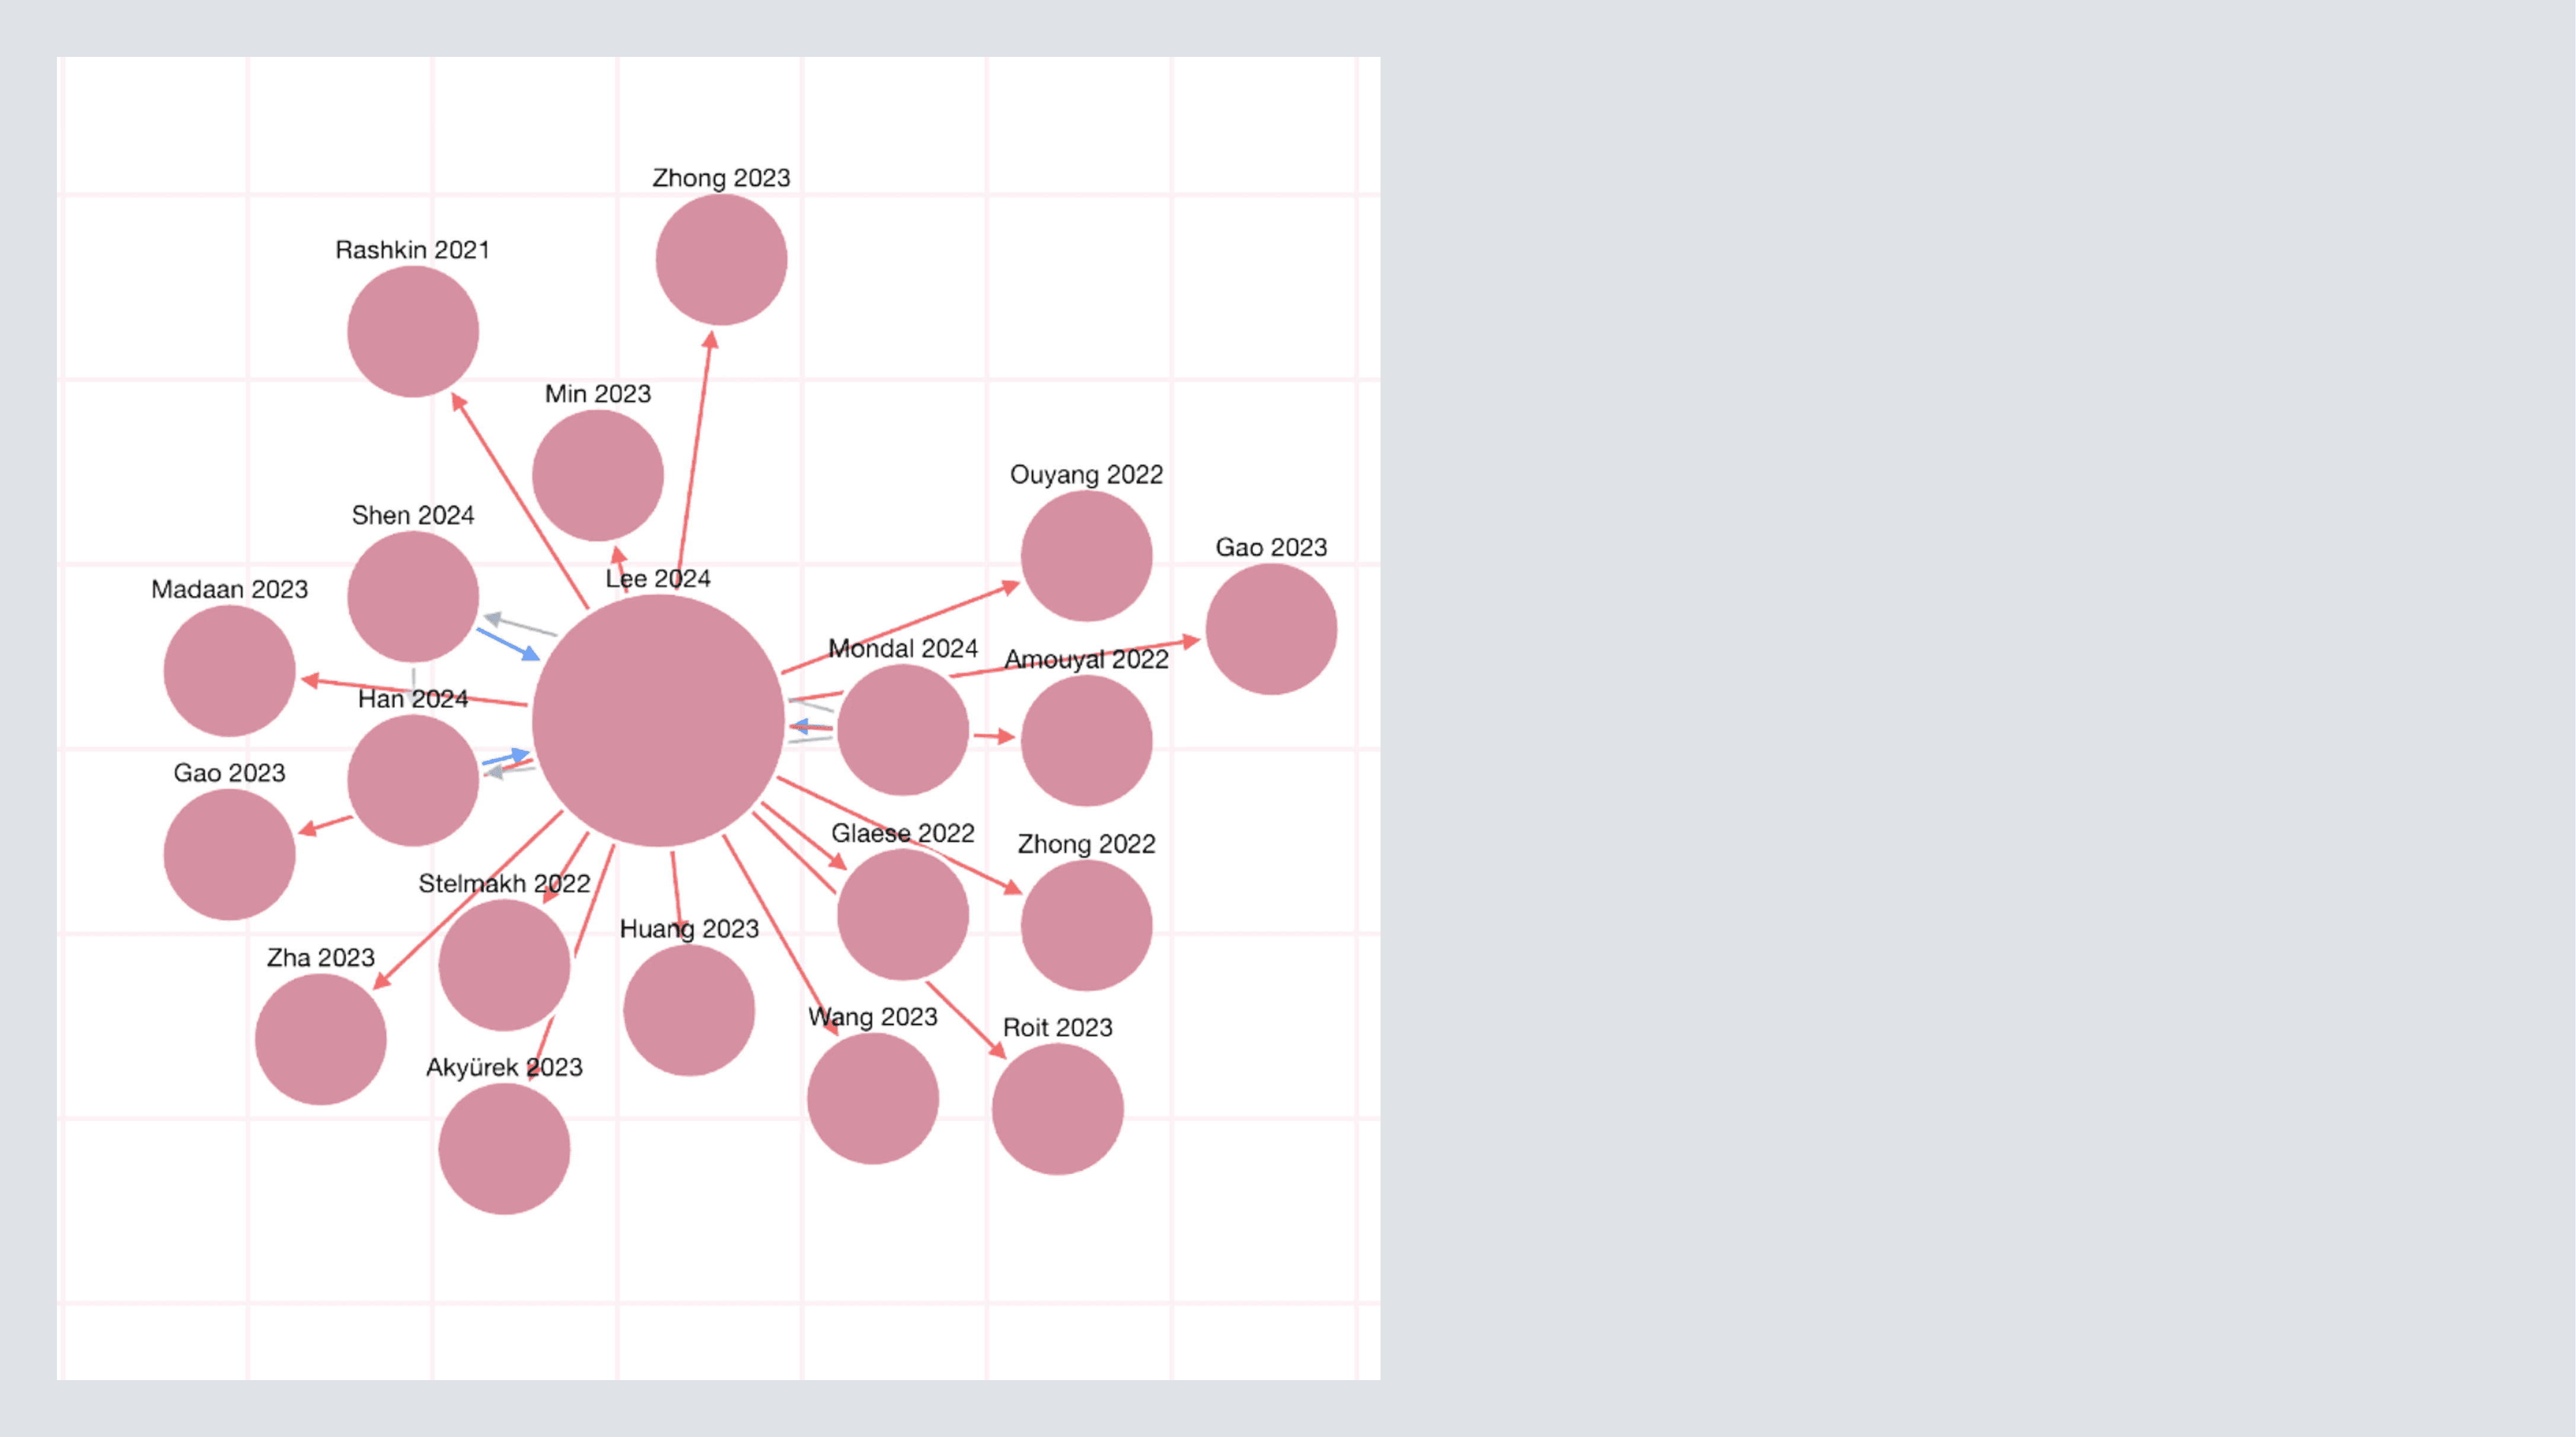
Assistant Tip: If your map looks thin, your origin may be too niche or too new. Switch to a foundational paper you trust, set it as the new origin, and rebuild. You’ll immediately see the canon.
Follow-Up questions (go deeper without losing your place)
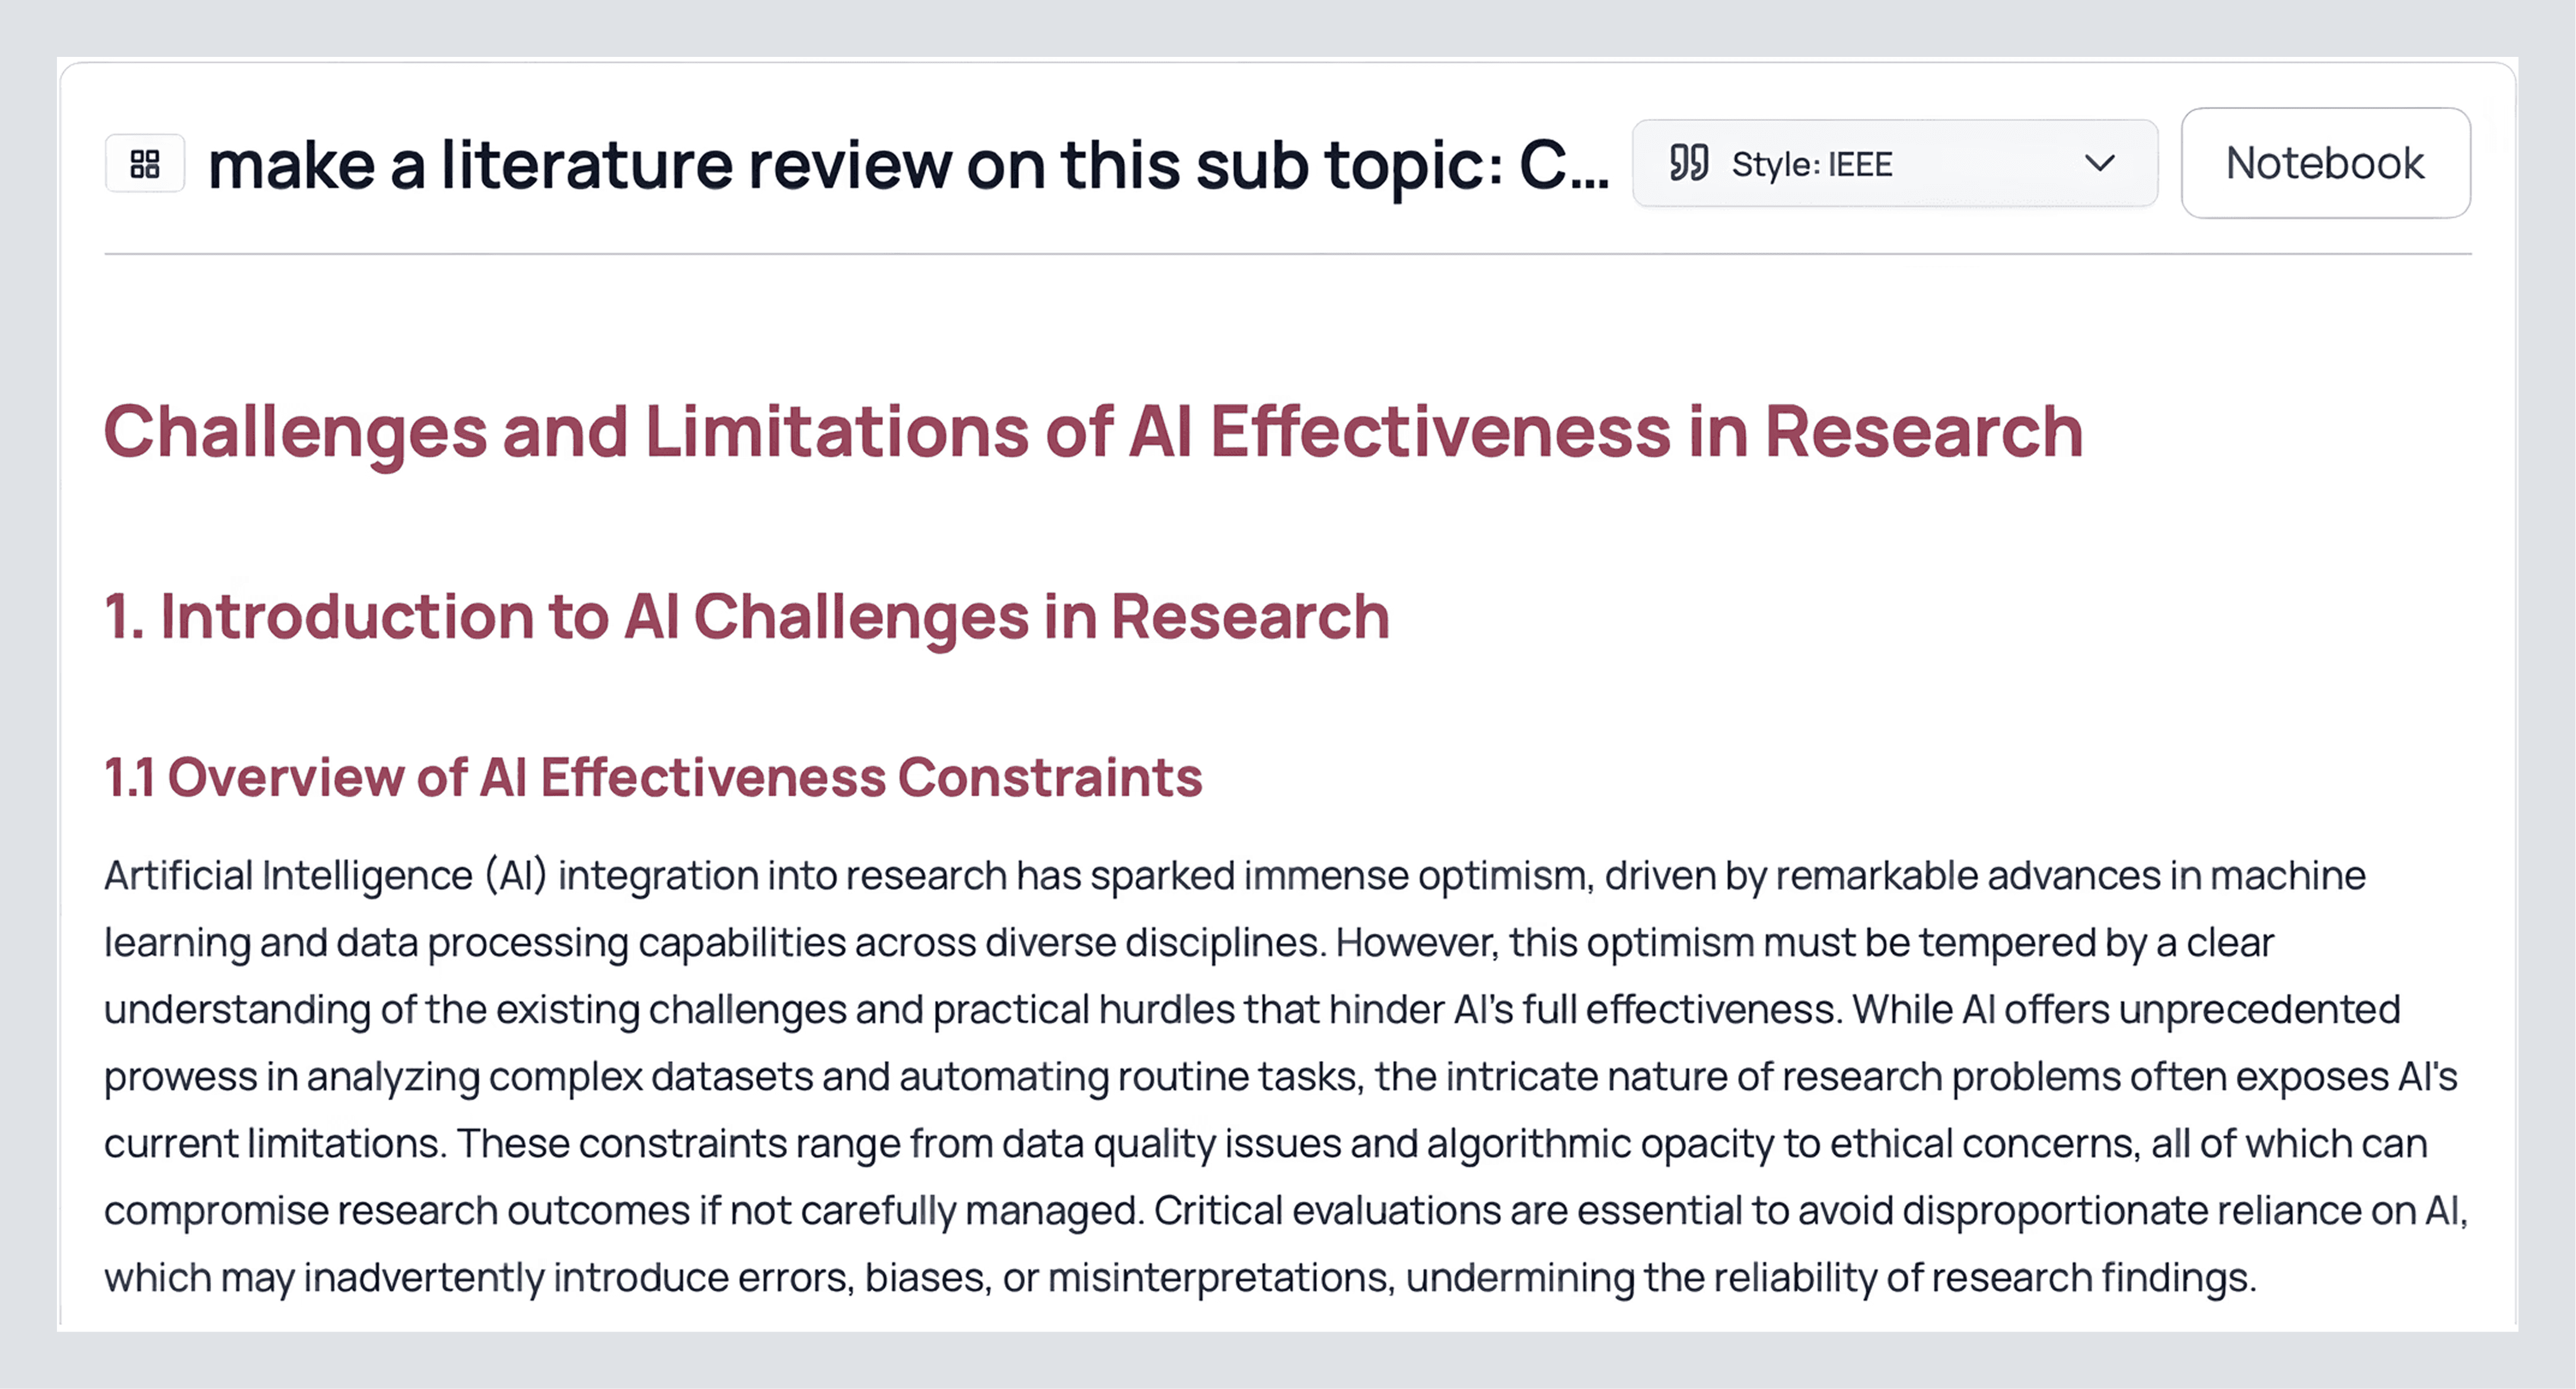
When a subsection deserves its own literature review or you have a research question based on something you saw, simply click and write a prompt in the box below.

Paste the subheading straight from your review or write a question, you can find research gaps, write proposals, do anything! If you want to control scope, open Filters (the button to the left of the send prompt button) and set your databases (Semantic Scholar and OpenAlex by default, PubMed if you’re clinical, arXiv for preprints), journal quality (Q1/Q2 when rigor matters), date window (narrow for recency, widen for foundational work), and whether to include your Library and web results. Then run it.
What you get back is a compact, fully cited synthesis on that topic. Click Sources under that follow-up, and you’ll see its own table, same structure as your main one. If two or three papers carry the argument, save them to your Library right away. If the writing is on target, press Send to Notebook, and it’ll slot into your draft with the citations already attached.
Here’s a follow up I made:
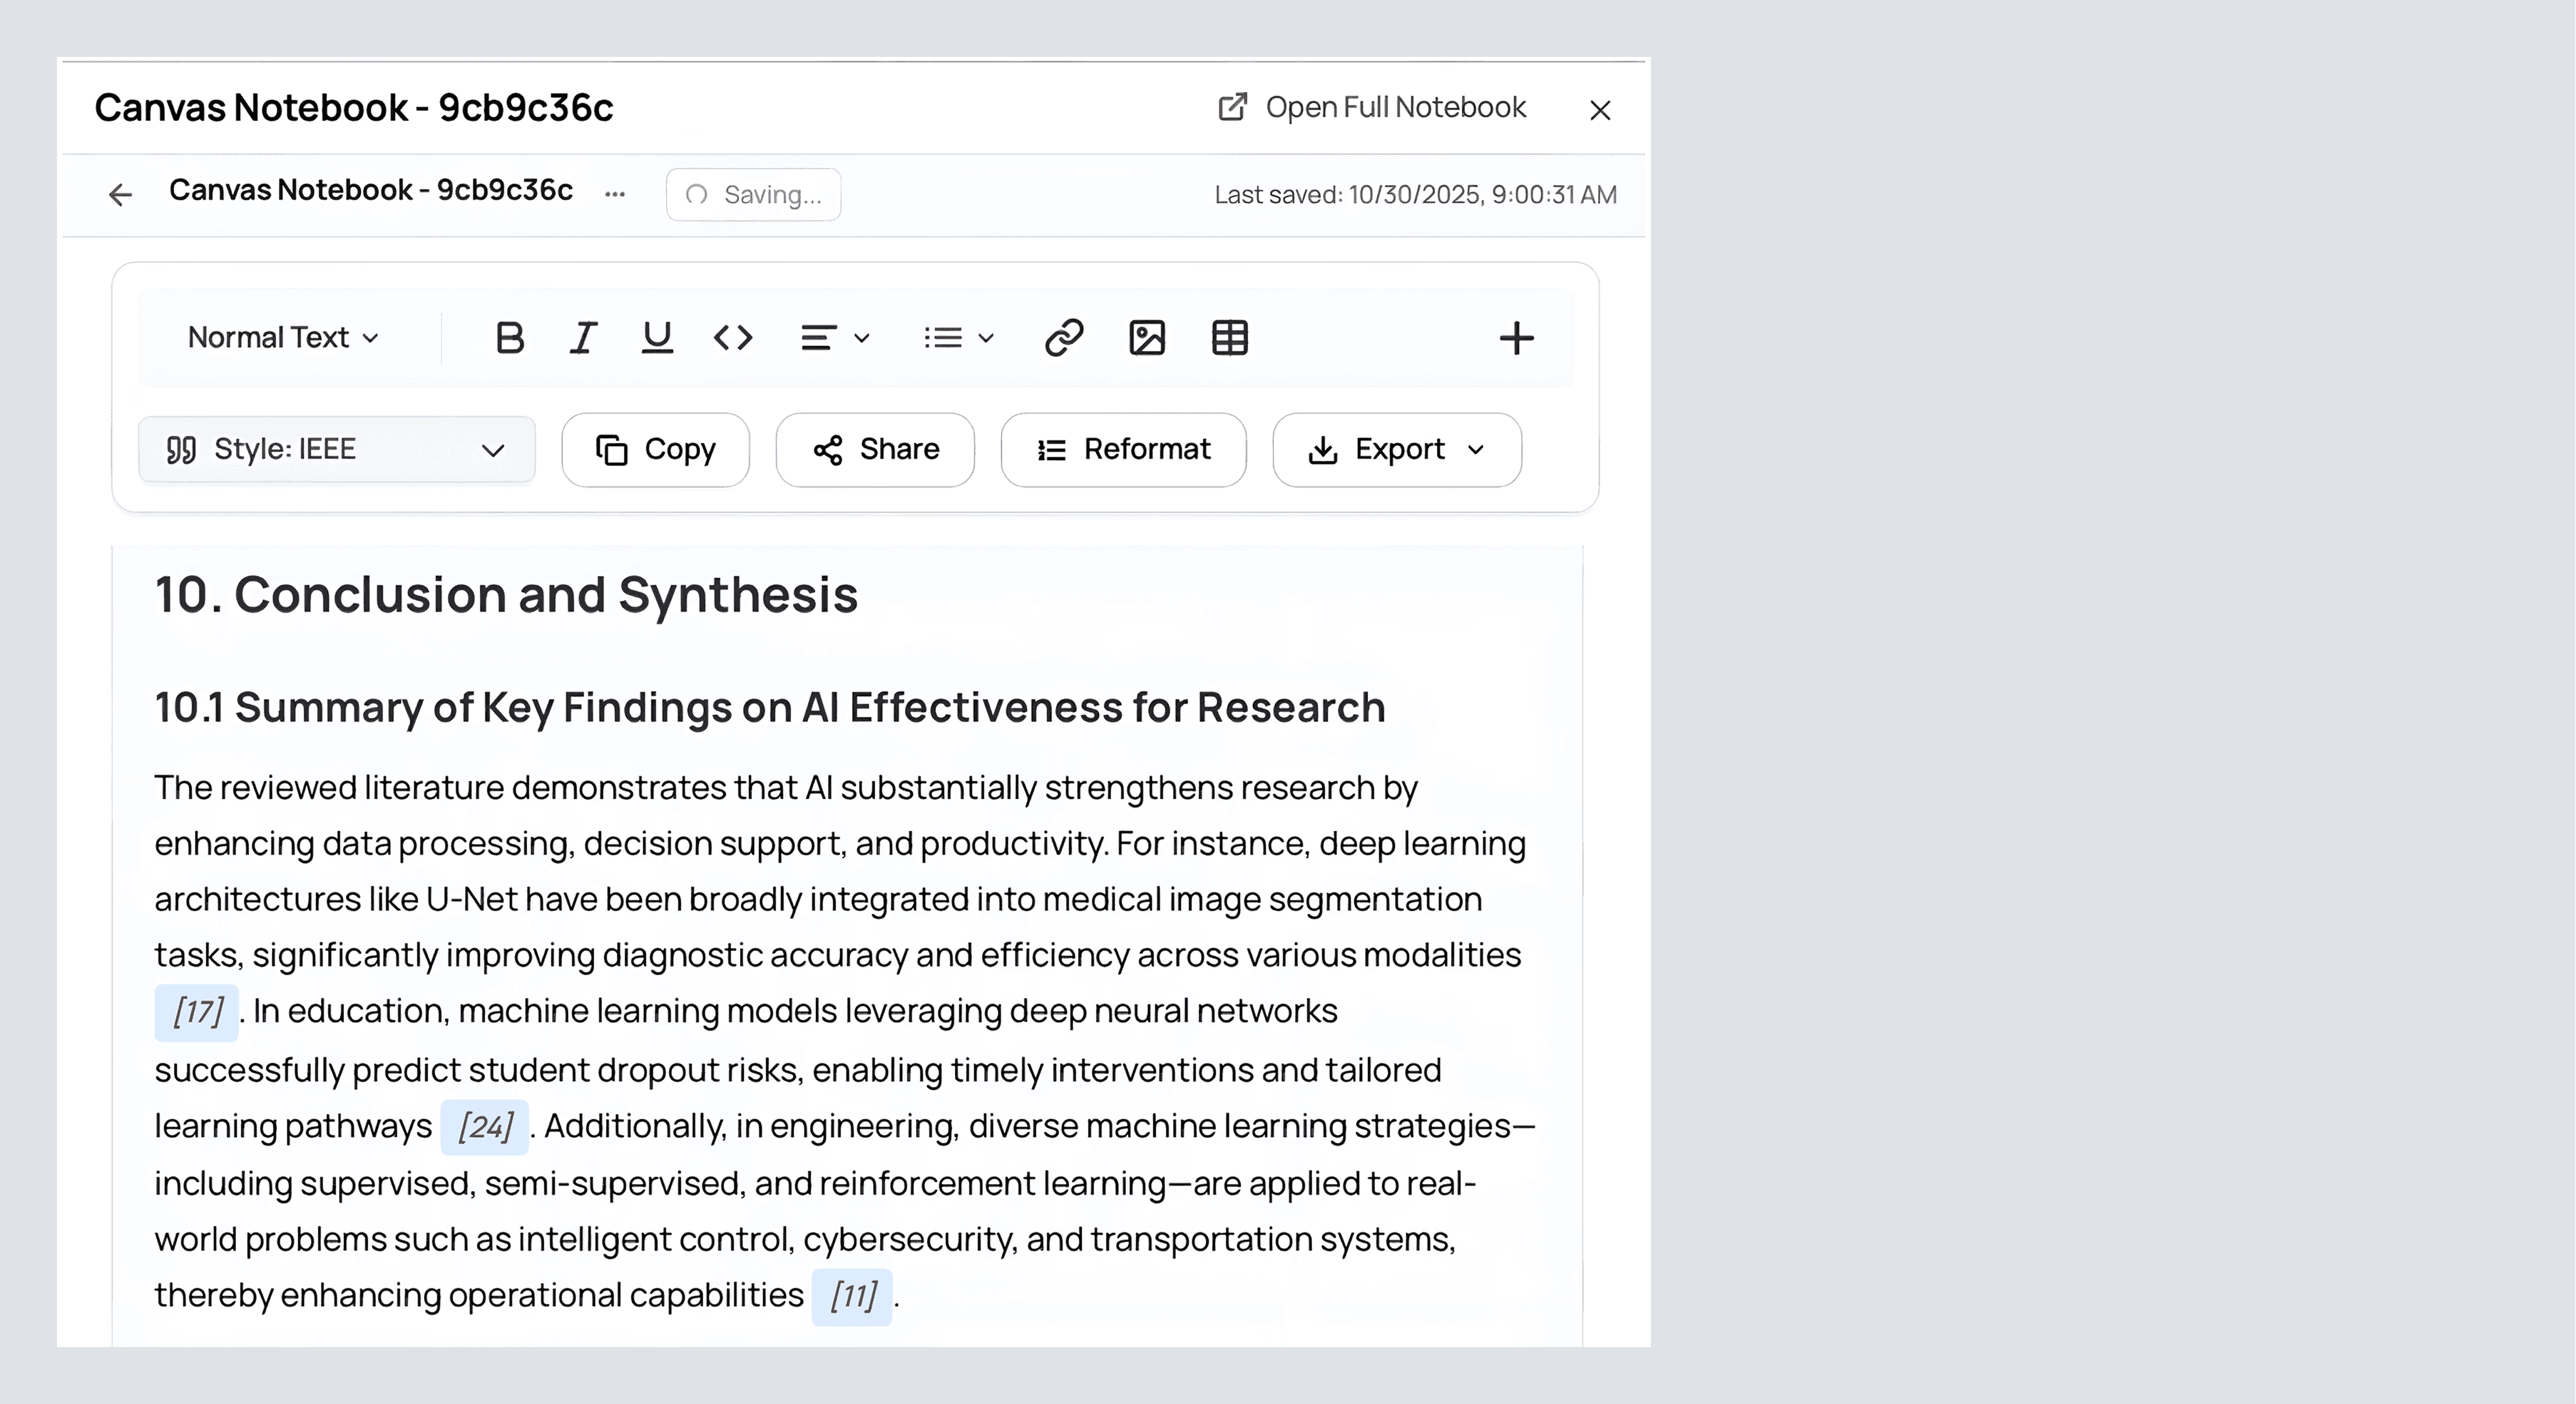
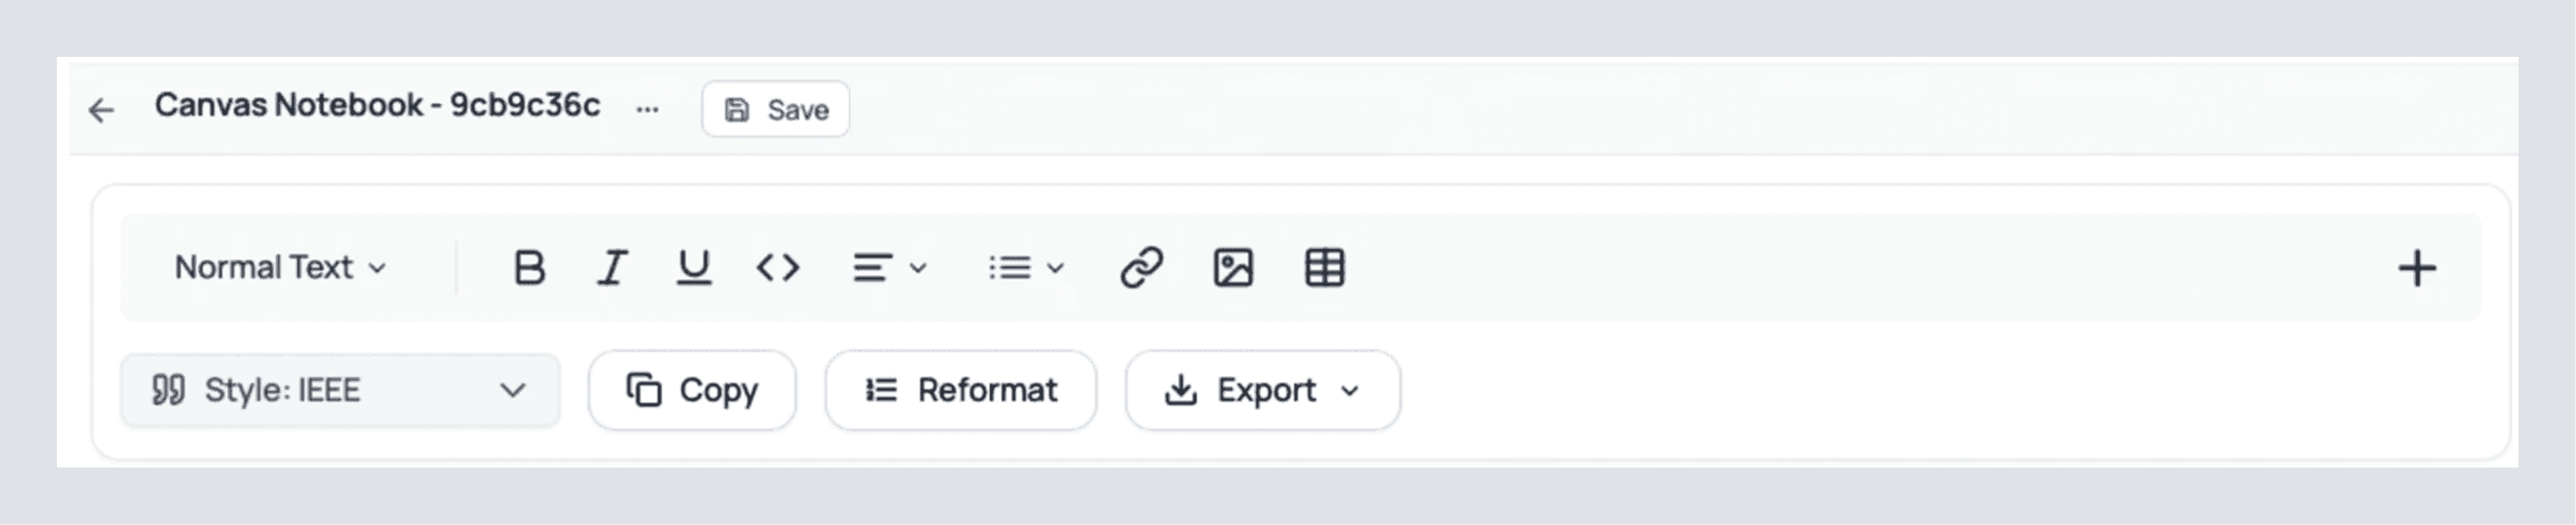
Notebook (this is where you actually write)
Click Notebook at the top of your review. This is your writing surface, wired to your sources and follow-ups. The way to win here is to save what matters as you go and draft right beside it.
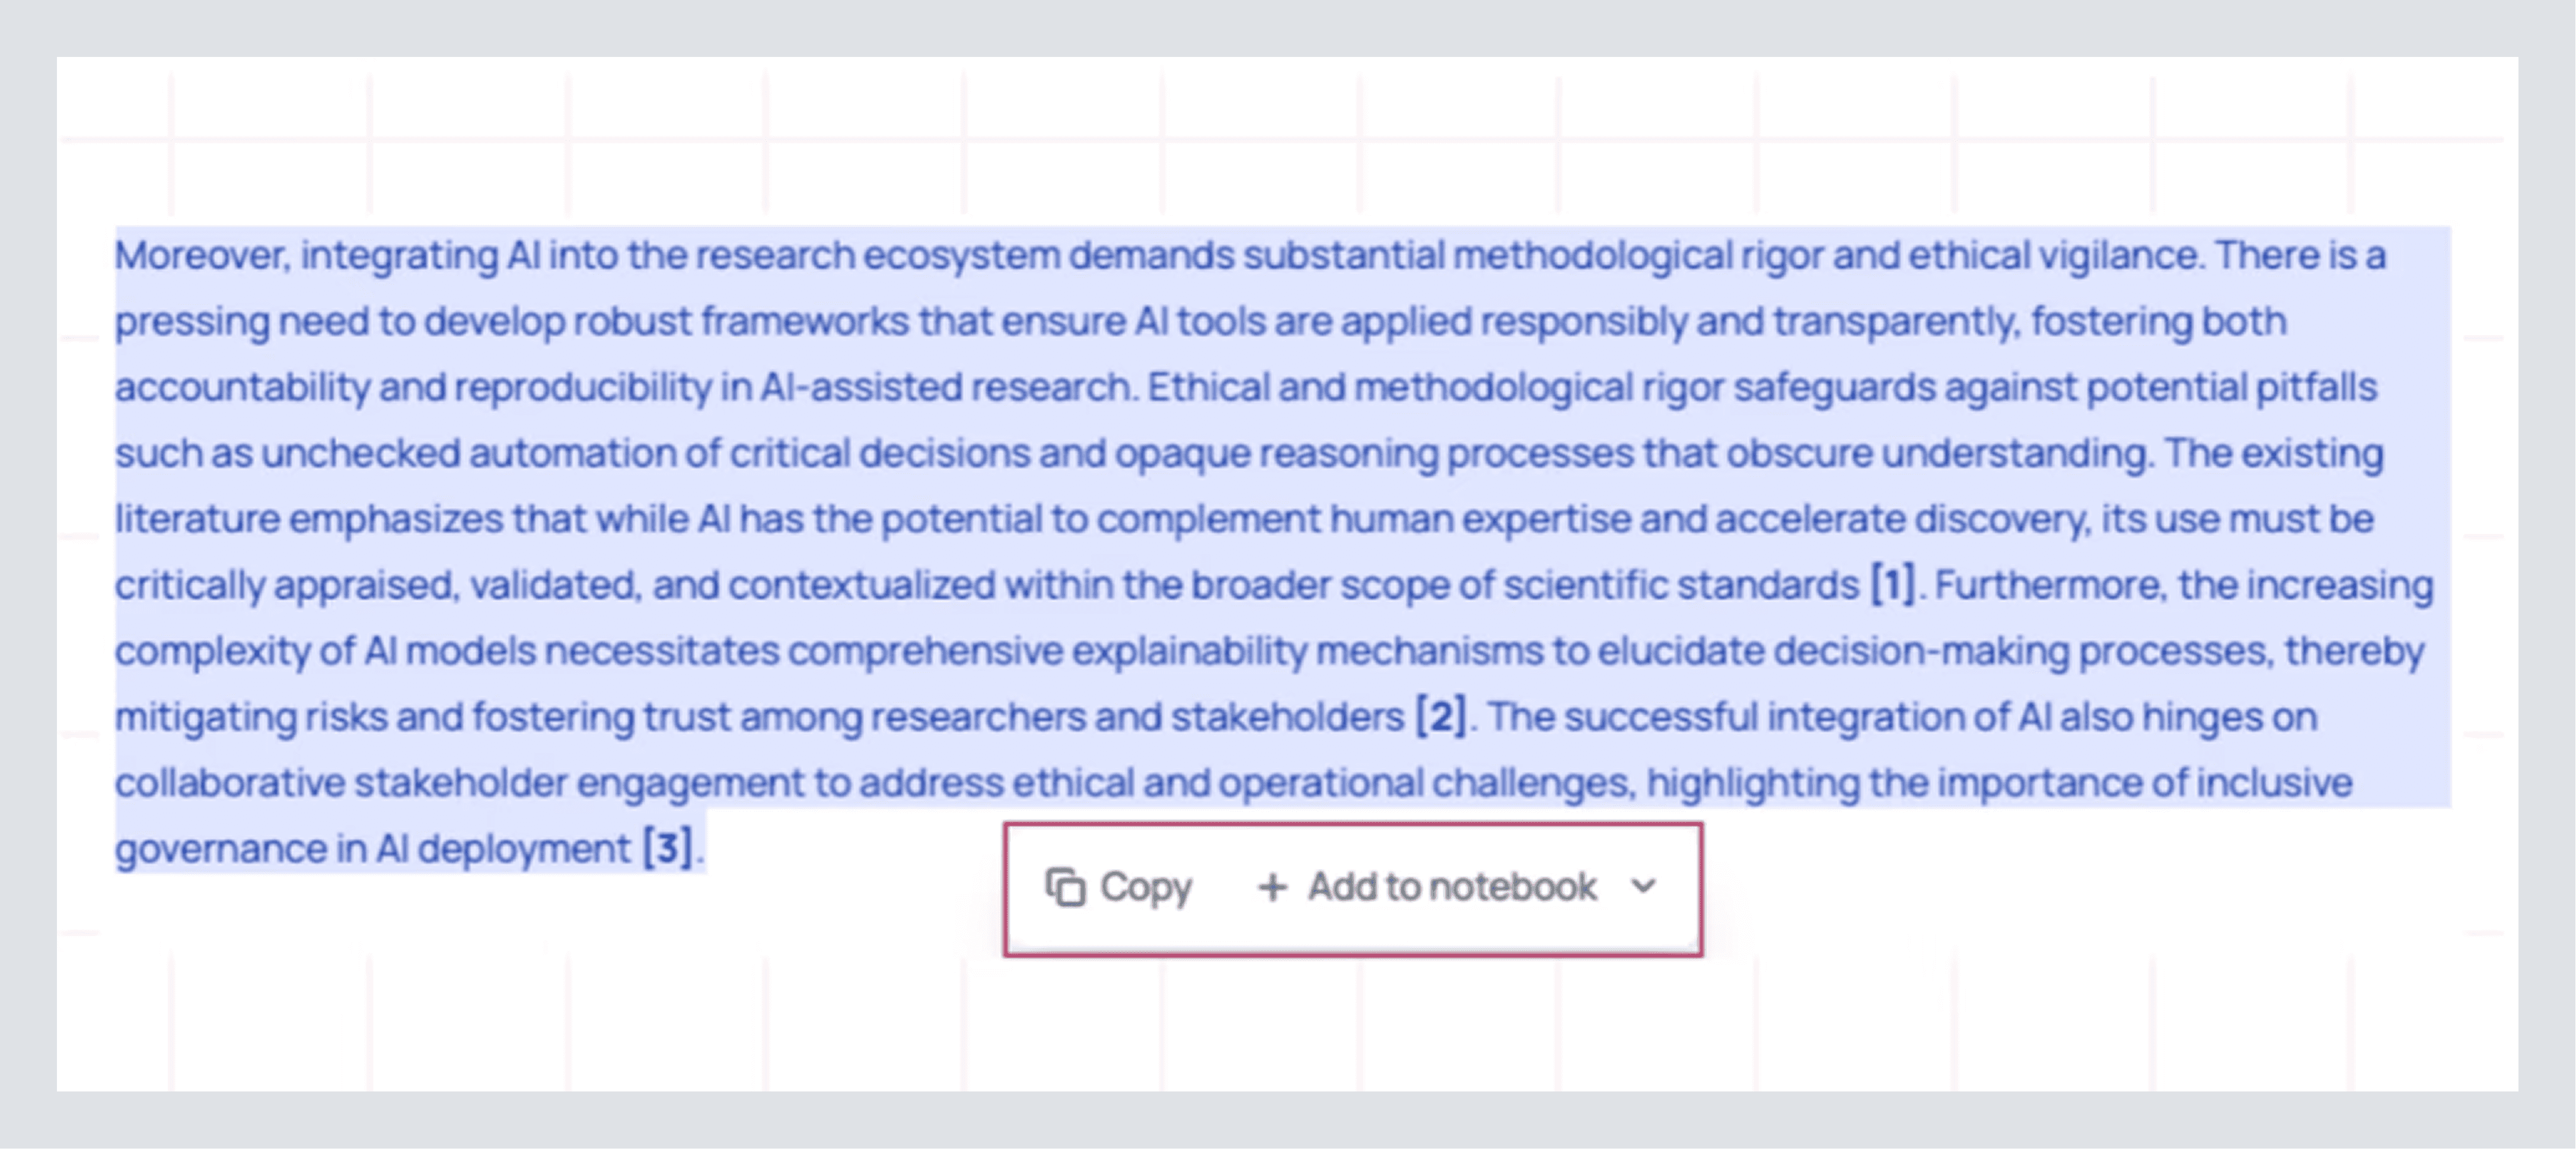
First, save text from your literature review. When a paragraph explains a concept you’ll reuse, highlight it and click Add to Notebook. What lands in the left pane isn’t a dumb paste; it comes with the source (title, authors, year, DOI) attached, so you can always jump back to the exact paper row.
Second, save tables of research papers you found useful. Choose the papers you want and click add to notebook. The table drops into your doc as a clean block you can refer to and re-order. Because it’s connected, if you click a citation inside that table, you’ll still be able to open the paper row, read the abstract highlight, or add another custom extract without leaving the draft.
Third, save from any text in the canvas. You can highlight parts of the generated literature review, a follow-up section, or even a note you wrote to yourself in the canvas and add them to the Notebook as bookmarks. This stops the “where did I see that line?” hunt later and lets you assemble your draft by moving blocks you already vetted.
Drafting here is straightforward. Create a short outline with H2/H3 headings that match the way you’ll present the work. Drag your saved blocks beneath the right headings. Write in your own voice around those blocks. Highlight pieces of text to use AnswerThis's AI editor to change your text.
If a paragraph needs a bridge you don’t want to write from scratch, open Full Notebook.
Full Notebook (write with your sources docked)
Click Open Full Notebook in the top right. The right side of the screen now shows your Review, Sources, Analysis, and Library, everything you’ve curated, stacked, and searchable.
We will see all the notes, or we can import our entire literature review into the editor by clicking edit with AI on the right hand side. We can also ask follow-up questions here to create even more literature to use. Just above this, we can also click on the source. Here, we can find the table of all the papers that AnswerThis found.
After you're happy with your draft, we can finally dive into editing and writing up to the standard you want. On the left, where you can see all your writing, you can edit it exactly as you would a Word doc: bold text, italic text, underline text, etc. More exciting, we can also insert an image if we wish, hyperlink a piece of text, and a table to make our writing more complete.
Just below these options, we can clearly see more valuable tools. Try clicking on the citation style button to change the citations of your writing to any one of 6000+ citation styles we offer. And after you've read through this tutorial and perfected your literature exactly to how you want it, you can click export. This allows you to download the text as a PDF, DOCX, Markdown, or LaTeX file.
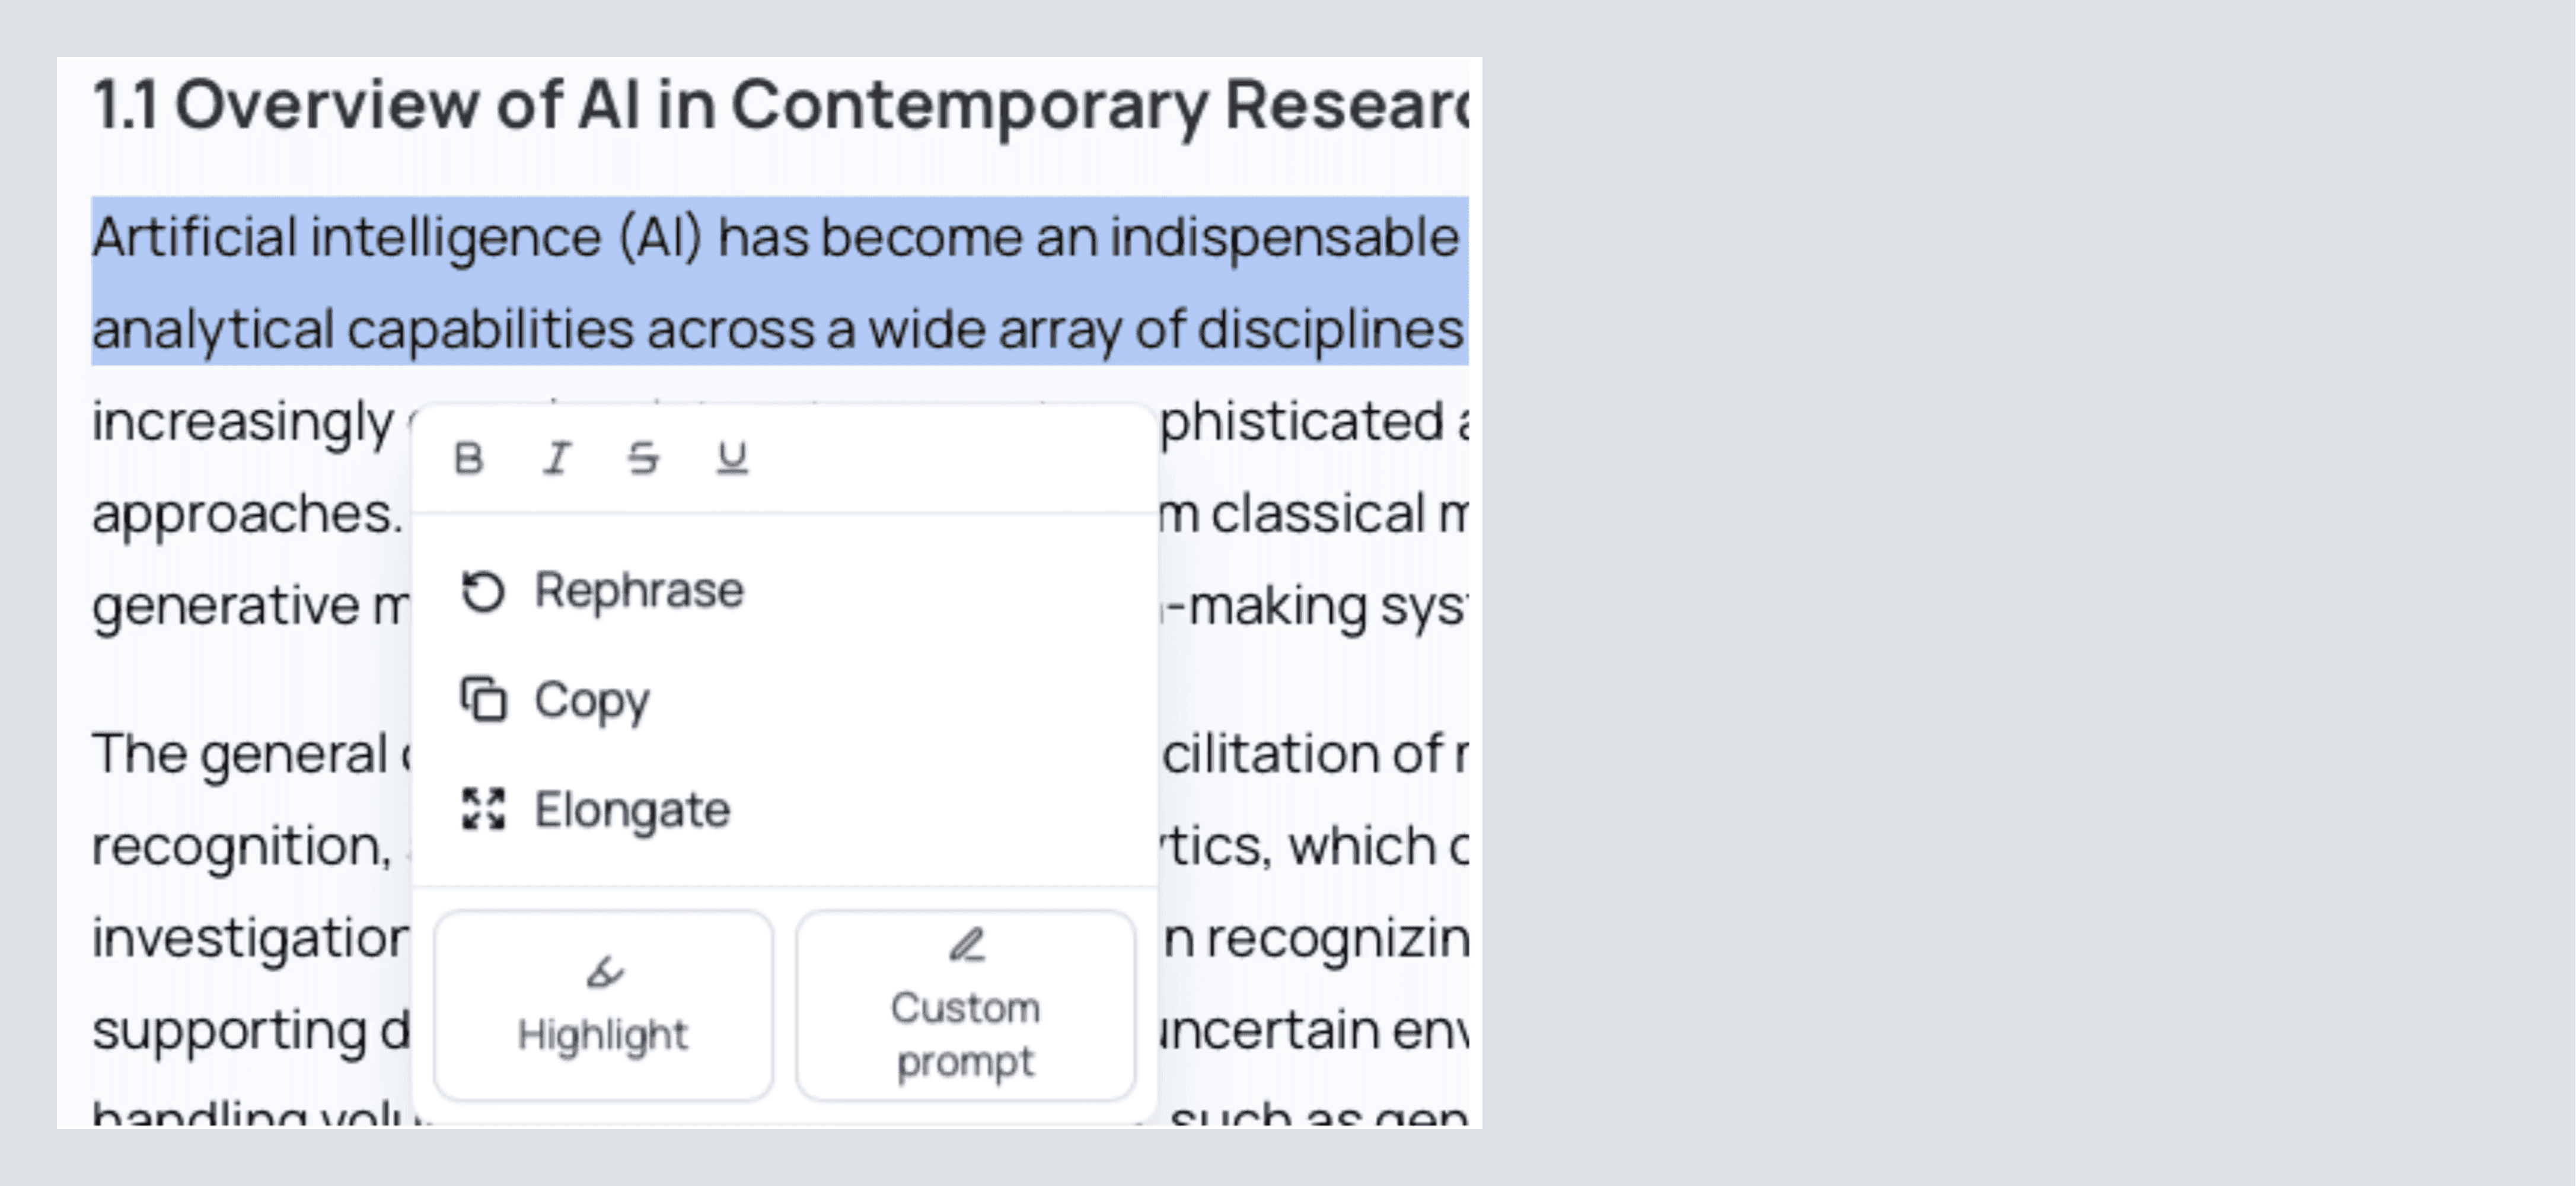
Before we explore those 4 tabs you've been looking at on the right-hand side. Try highlighting a piece of your text. You'll see a dropdown like this:
You can select rephrase for a quick and easy change of tonality and style of writing. It’s a great way to make a section clearer and create a dynamic piece of writing. Elongate is similar to this, except it will expand on your writing with the type of rigor that you’d expect in a professional piece of text.
Finally, you can click custom prompt to tell AnswerThis exactly how you would like to change the text or to continue adding to what you have written. You’ll notice that as you use all of these options, AnswerThis automatically adds sources where necessary and adds the new text in the exact formatting you had before!
If you’re not already excited about what you can do with AnswerThis to advance your research.
Check For Plagiarism and AI Detection
On the right side of your full notebook, you’ll see a tab with 4 buttons at the top. Click on analysis. Once here, we can scan our entire document for AI or for plagiarism.
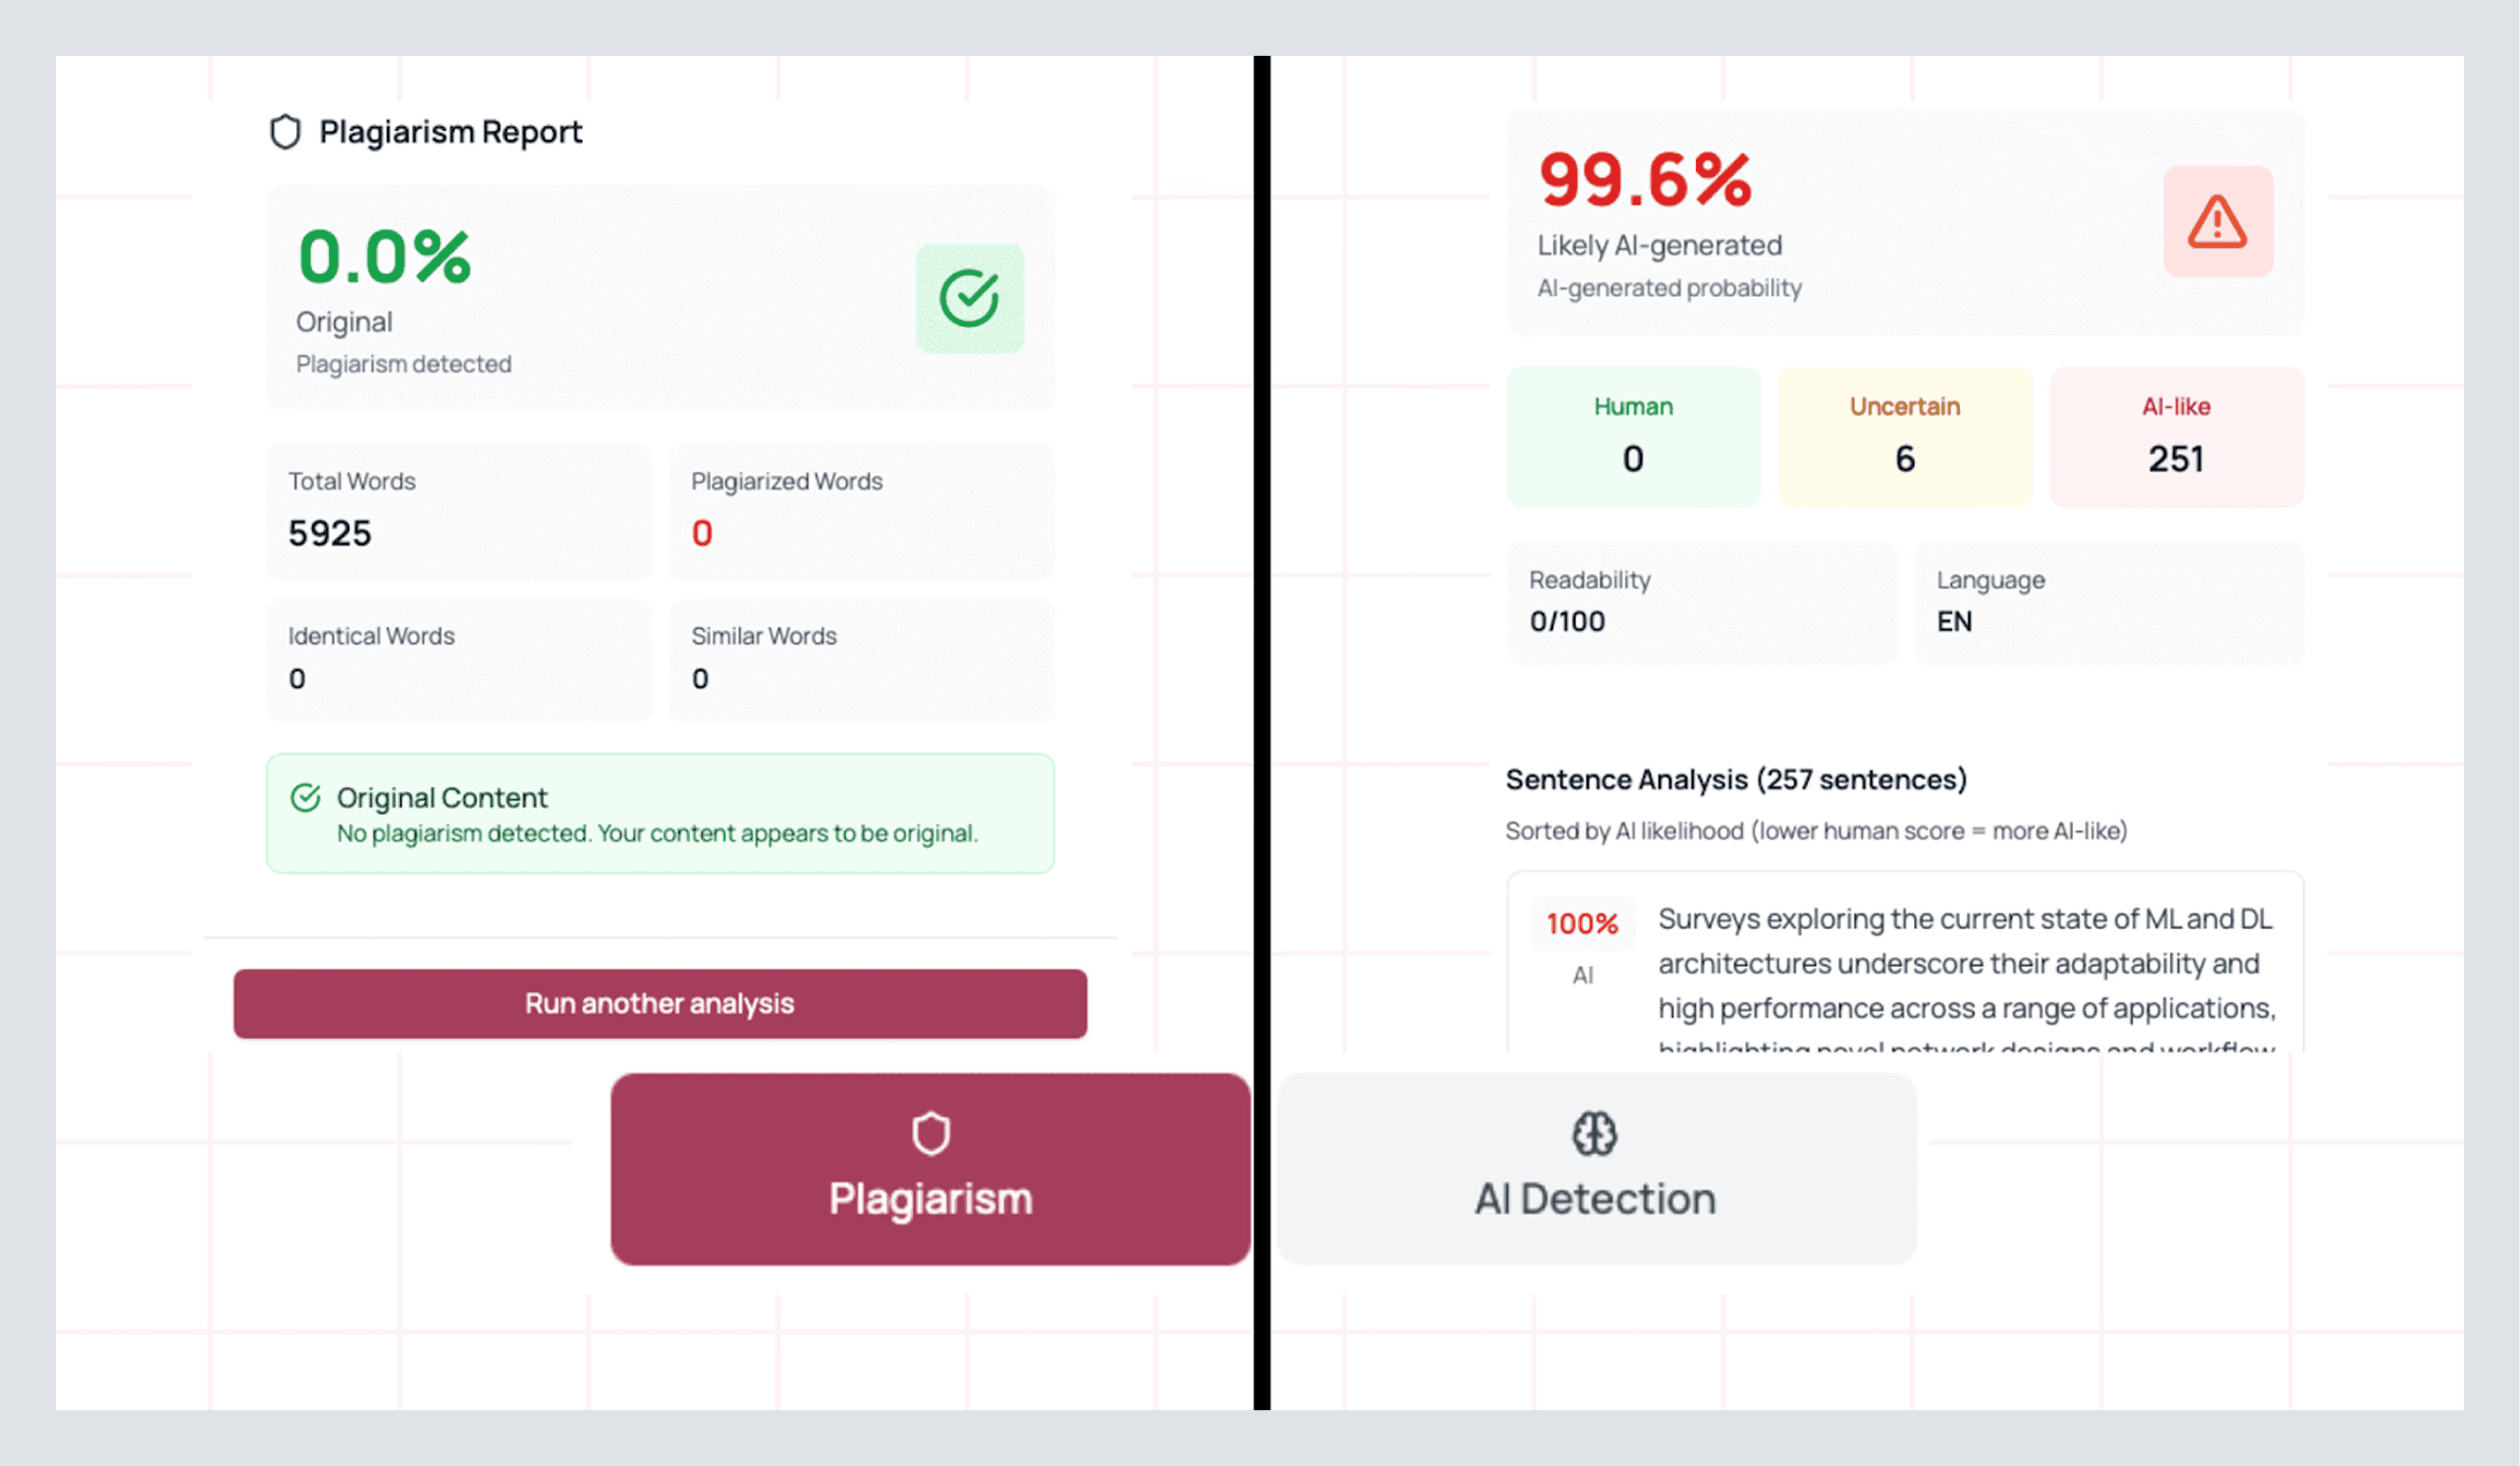
Simply click on the option that you prefer and press Analyze entire document, and you’ll be greeted with a dashboard that looks like this, breaking down your entire document:
Both options will give you a breakdown of exactly which lines were detected for AI/plagiarism. You can click on this text to be brought to the exact lines that are causing the error and fix them to make sure your writing is perfected for all tests. When you are finished, you can click on run another test at the bottom of the dashboard.
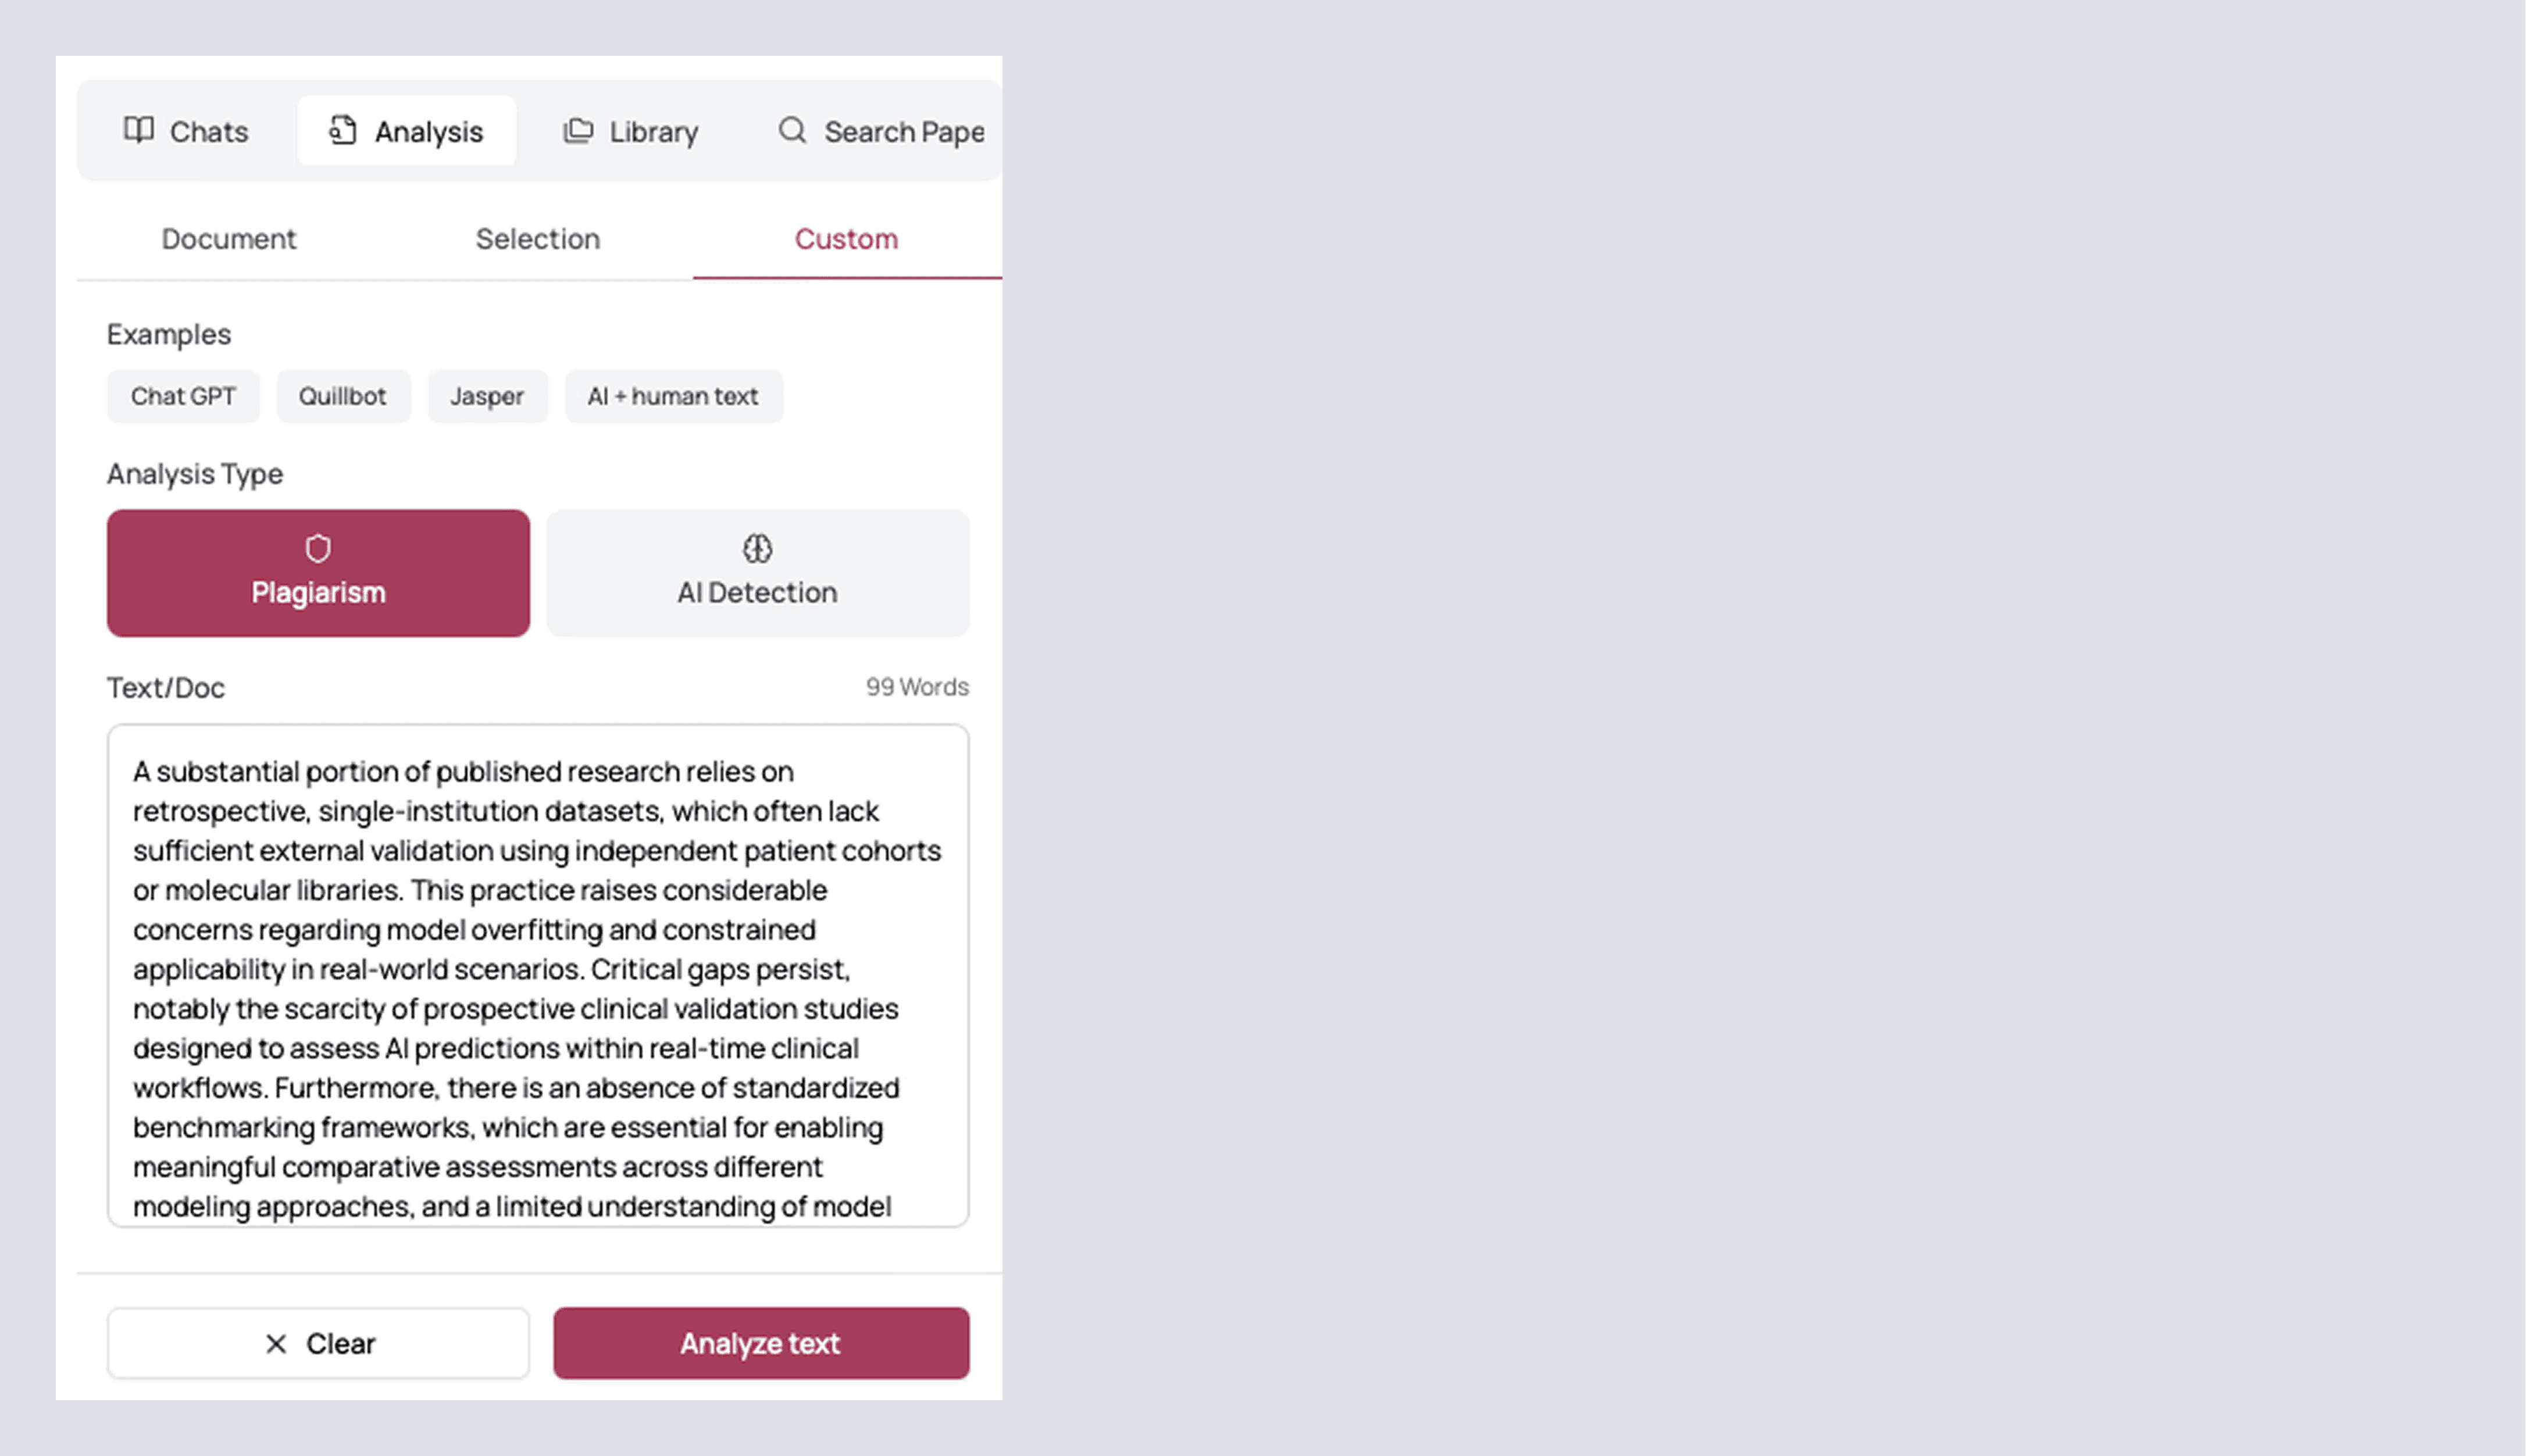
Additionally, you can run these tests on select pieces of your text but clicking on Selection at the top, then selecting the piece of text you’d like to test, and clicking Analyze text to be brought to the same dashboard.
If this wasn’t enough, you can click on Custom (the top right option). This will allow you to copy and paste text with GPT, QuillBot, and other AI examples of writing so that you can avoid AI detection amongst several models. You can also detect plagiarism here to
Insert Citations From Your Library or By Searching Papers
Your project will never be short on accurate citations after you read this! In Full Notebook, look to the right panel. Open Library if you’ve already been saving papers, or open Search Papers if you need one more precise source.
From Library: scroll or search by author, title, or/and keyword search by using the filters tab if you are looking for specific paper/s to cite. Just below the paper, you’ll see a cite button. Click it once for an in-text citation (it will be inserted where you had been editing in the document before).
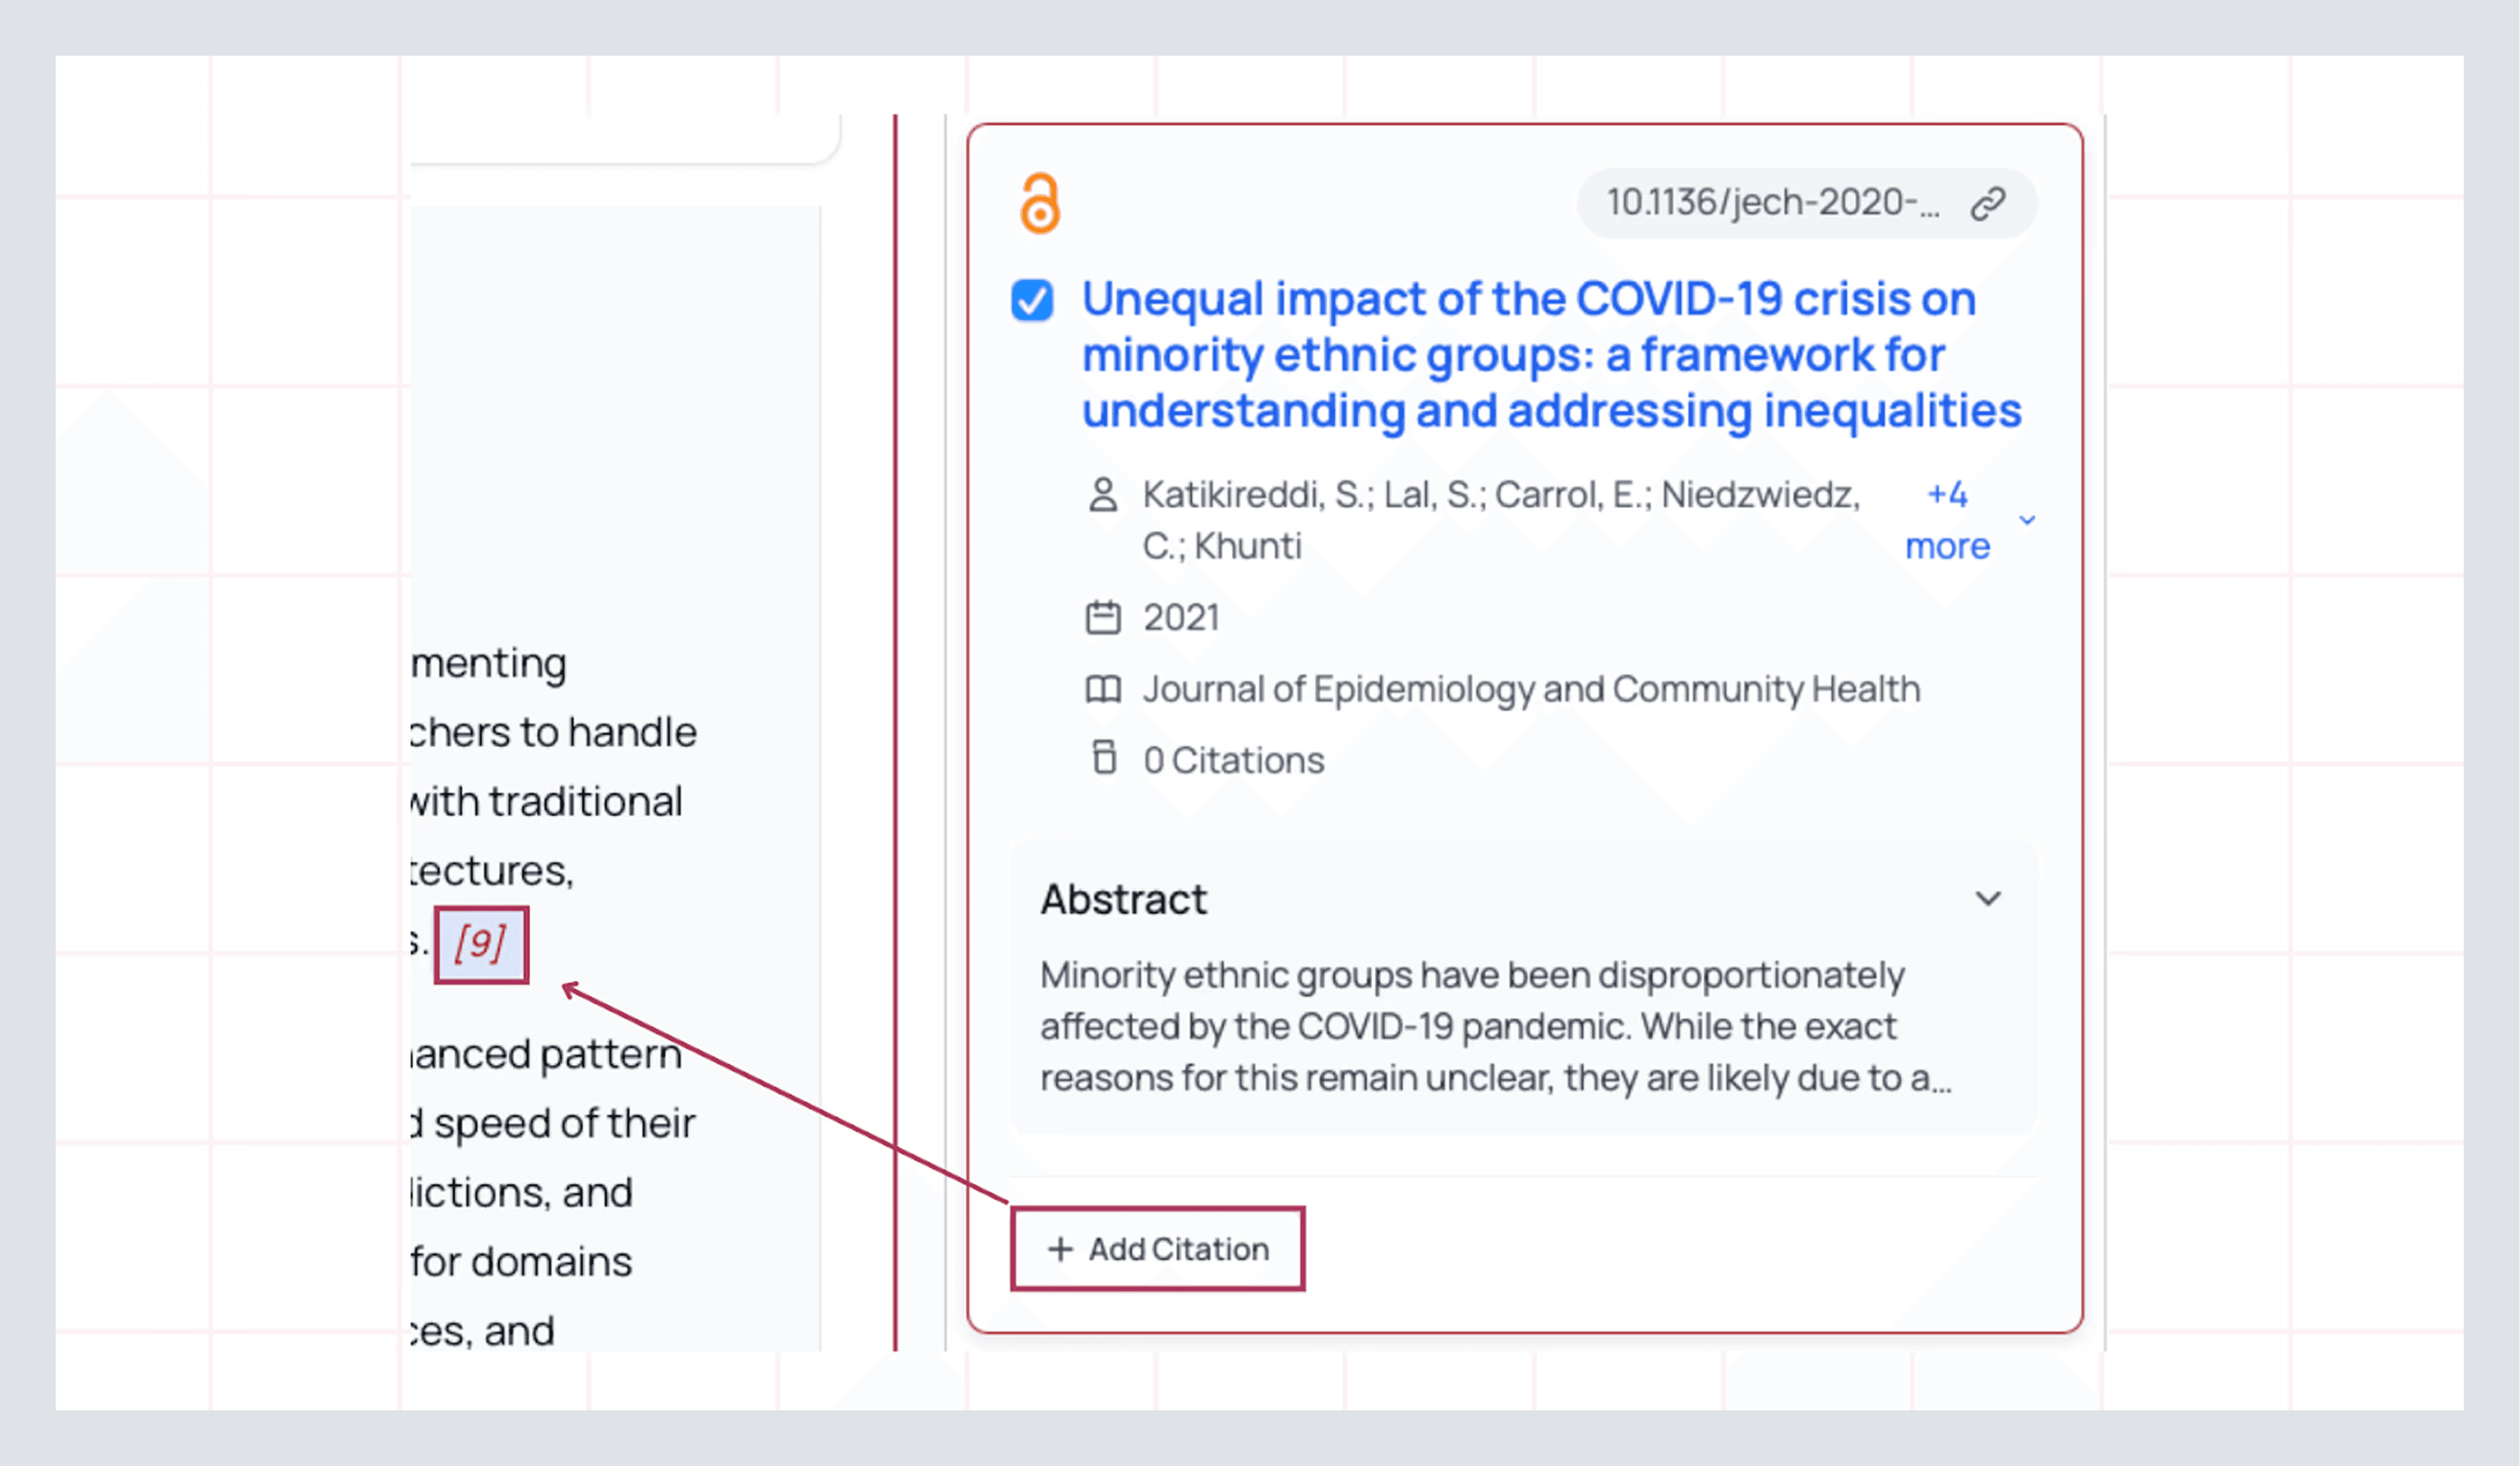
Because your Notebook already knows the style you chose earlier, the reference is formatted automatically and synced to your bibliography. If you cite the same paper twice, AnswerThis deduplicates it. There shall be no messy “double entries” later.
From Search Papers: type some keywords or a prompt as you would in a tool like ChatGPT. Use more filters to pin quality (Q1/Q2), date bounds, and add databases. Then Add to Notebook → Cite. If the paper is a keeper, hit Save to add it to your Library before you move on. That way, the source is available to the rest of your canvas (tables, follow-ups, and future reviews). If you need to cite the paper, you can also do so here as well.
And just like that, you are now equipped with all the tools you need to mold your work into something you are truly powerful.
Collaborating With Your Team
If you are doing a project or collaborating with others in your work, stay in AnswerThis. Within the editor, click Share and invite by email. Teammates will see your Notebook with the sources docked to the right, so comments land next to the paragraph they reference, and verification is one click away.
Additionally, if you want to share libraries, share canvases, and other work that you do throughout AnswerThis, click on your profile icon on the top right. Select members on the left. Insert their email into the box and invite them. Now both of you are on the exact same page when it comes to your project/work!
Congratulations! You’re now well-equipped to take on any project that comes your way. But now let’s explore the feature that you can access on the left hand side.
AI Writer (your notebook hub when you’re mid-project)
Open AI Writer from the left sidebar when you’re coming back to work you’ve already started, or if you would like to start writing a piece of work from scratch, or to simply take down notes. You’ll see every notebook you’ve built so far, reviews you converted into drafts, follow-ups you sent to the editor, and any saved text and tables from your canvas.
Click into a notebook and you’re right where you left off: your draft on the left, and the right rail ready with your Review, Sources, Analysis, and Library. If you’ve just finished a new Full Review and want that synthesis inside this same doc, use Edit with AI in the right rail and import. You’re not juggling files; you’re curating one live document that always knows about its sources.
Read how you can take advantage of the Full Notebook by having a quick read/watch here!
Library (organize once, reuse everywhere)
Open Library from the left sidebar. What you’ll see is a live, filterable table with the same power you’ve been using in Sources, but scoped to your collection.
Start by creating a library per project or domain. Give it a clear name and a domain so you can find it in filters later. You can add to it from anywhere:
From a literature review’s sources table: select the rows containing papers you actually care about and hit Save.
From Search Papers: build a targeted table first, then send the papers you like into the library in one sweep.
From your machine or reference manager: upload PDFs directly or connect Zotero/Mendeley and import.
Inside a library, work like a researcher, not an archivist. Click Manage Columns and extract the data you’ll keep having to answer for: Methods, Metrics, Gaps, Limitations, Inclusion/Exclusion criteria, Sample sizes, and any custom pull you want to standardize. Those extractions persist inside the library, which means you do the careful reading once and then reuse the structured view across your draft, a grant, a talk, and the follow-up review you’ll run next month.
Filters here are the same muscle memory: date bounds for recency vs. foundations, journal quality (Q1/Q2 when rigor matters), keyword filters in title/abstract when you’re narrowing scope. Sort by citation count to spot anchors; sort by year to see waves. When the table shows something interesting, export the CSV (for an appendix or a lab wiki), or export BibTeX if you’re moving to LaTeX. If a collaborator wants to see everything you curated, share the library directly so they’re not piecing together screenshots and guesswork.
Two practical moves make libraries pay off elsewhere:
Use a Library as the source of truth in new syntheses. In Full Review and Follow-Up, open More filters and switch on your Library. Now AnswerThis will write using your library.
Cite straight from the Library while drafting. In Full Notebook, open the Library tab on the right, search by author/title/keyword, and click Cite. Because the Notebook remembers your style, in-text and reference entries are formatted and deduped automatically. If you’ve already extracted, say, Metrics and Methods in the Library, you can copy those rows into your Notebook as a table without re-typing anything.
If you want the same high-level read you enjoyed in Sources, you can also run Bibliometric Analysis from a Library selection: publications by year, citation trends, combined impact, keyword usage, and top authors on your set. This catches blind spots before a reviewer does.
When you’re collaborating, invite teammates to the library itself (not just the draft). Agree on which columns you’ll maintain so your exports line up without cleanup. That one decision eliminates 80% of the back-and-forth that burns time at submission.
Search Papers (build the corpus before you synthesize)
Open Search Papers from the left sidebar to quickly find the exact papers you need in your field.
Use the input like you would a precise prompt or enter keywords for the research papers/sources that you are looking for. Then open More Filters to narrow down to the exact type of paper you need. Here are some options you can set:
Databases: Semantic Scholar and OpenAlex are strong defaults; add PubMed for clinical, arXiv for fast-moving preprints.
Journal quality: Q1/Q2 for rigor; relax it when the field is thin.
Date window: narrow when you need recency, widen when you’re hunting foundations or replication.
Minimum citations: raise when you want maturity, lower when you’re scouting emerging work.
Web/Patents: include when you need gray literature or market-adjacent signals; otherwise keep it off to stay academic.
Click Submit when you're ready. You’ll land on a familiar table, authors, year, venue/quality, DOI, citations, plus the abstract highlight against your query so you can triage quickly. Immediately click Manage Columns and pull what you’ll need later: Methods, Metrics, Datasets, Benchmarks, Limitations, and Inclusion/Exclusion. This is where Search Papers stops being a list and becomes a spreadsheet you can reason with.
You can read even more about what you can do with your table here.
See the network around a paper with Citation Map
When a single study is central to your argument (or a reviewer asks for the surrounding literature), open Next Step → Citation Map. Paste the DOI or exact title, Set as Origin, and inspect the directed map. Use the metrics button to find key details about how the papers are connected:
• Most Cited to find the seed papers/key papers in your field of research.
• Most Connected to find bridge papers.
• Top Contributing Authors to build a quick “who to follow” list; run Search Papers on those names and pull their latest back into your table.
The table below the graph lists every connected paper. Add the ones that matter to your Library.
Read more about citation maps here.
Agents, Automate Your Everyday Research Tasks
Click Tools on the left. You’ll land in a gallery of mini agents that you can use: a search bar at the top if you know what you want, and tags to browse by need (e.g., Productivity, Analysis). The Featured shelf is where AnswerThis surfaces high-impact helpers. Two worth opening first:
• Research Gap Finder: drop in your topic and let it propose specific, source-anchored research gaps. The output is actionable: short statements you can validate, with citations you can click. If one aligns with your argument, save those papers to a Library and send the gap summary to your Notebook as scaffolding.
• Empathy Tool: a guided, seven-stage pass over your writing that behaves like a real peer-reviewer. You paste a section, it questions clarity, evidence, scope, and reader expectations one stage at a time. Treat it like pre-submission friction: fix the issues as you go, and your real reviewers will spend their time on substance instead of preventable rough edges.
When you run a mini tool, you’ll see the same Source mechanics you already know (if you don’t quickly see what you can do here), citations you can click open, and a Save button to keep key papers in your Library so they’re available everywhere else (tables, follow-ups, Notebook).
Build your own mini tool (so your repeatable work is one click)
The point of this screen isn’t just to consume, it’s to package your own best moves. Click Create (top right). You’ll fill out a short, important form:
Name and visibility first. Use a name that telegraphs the job it does. Keep it Private for your team until you like the outputs; you can make it public later if it’s broadly useful.
Write two descriptions. A crisp one liner that tells users, or yourself, what it does, and a detailed description that describes exactly what the tool sets out to do.
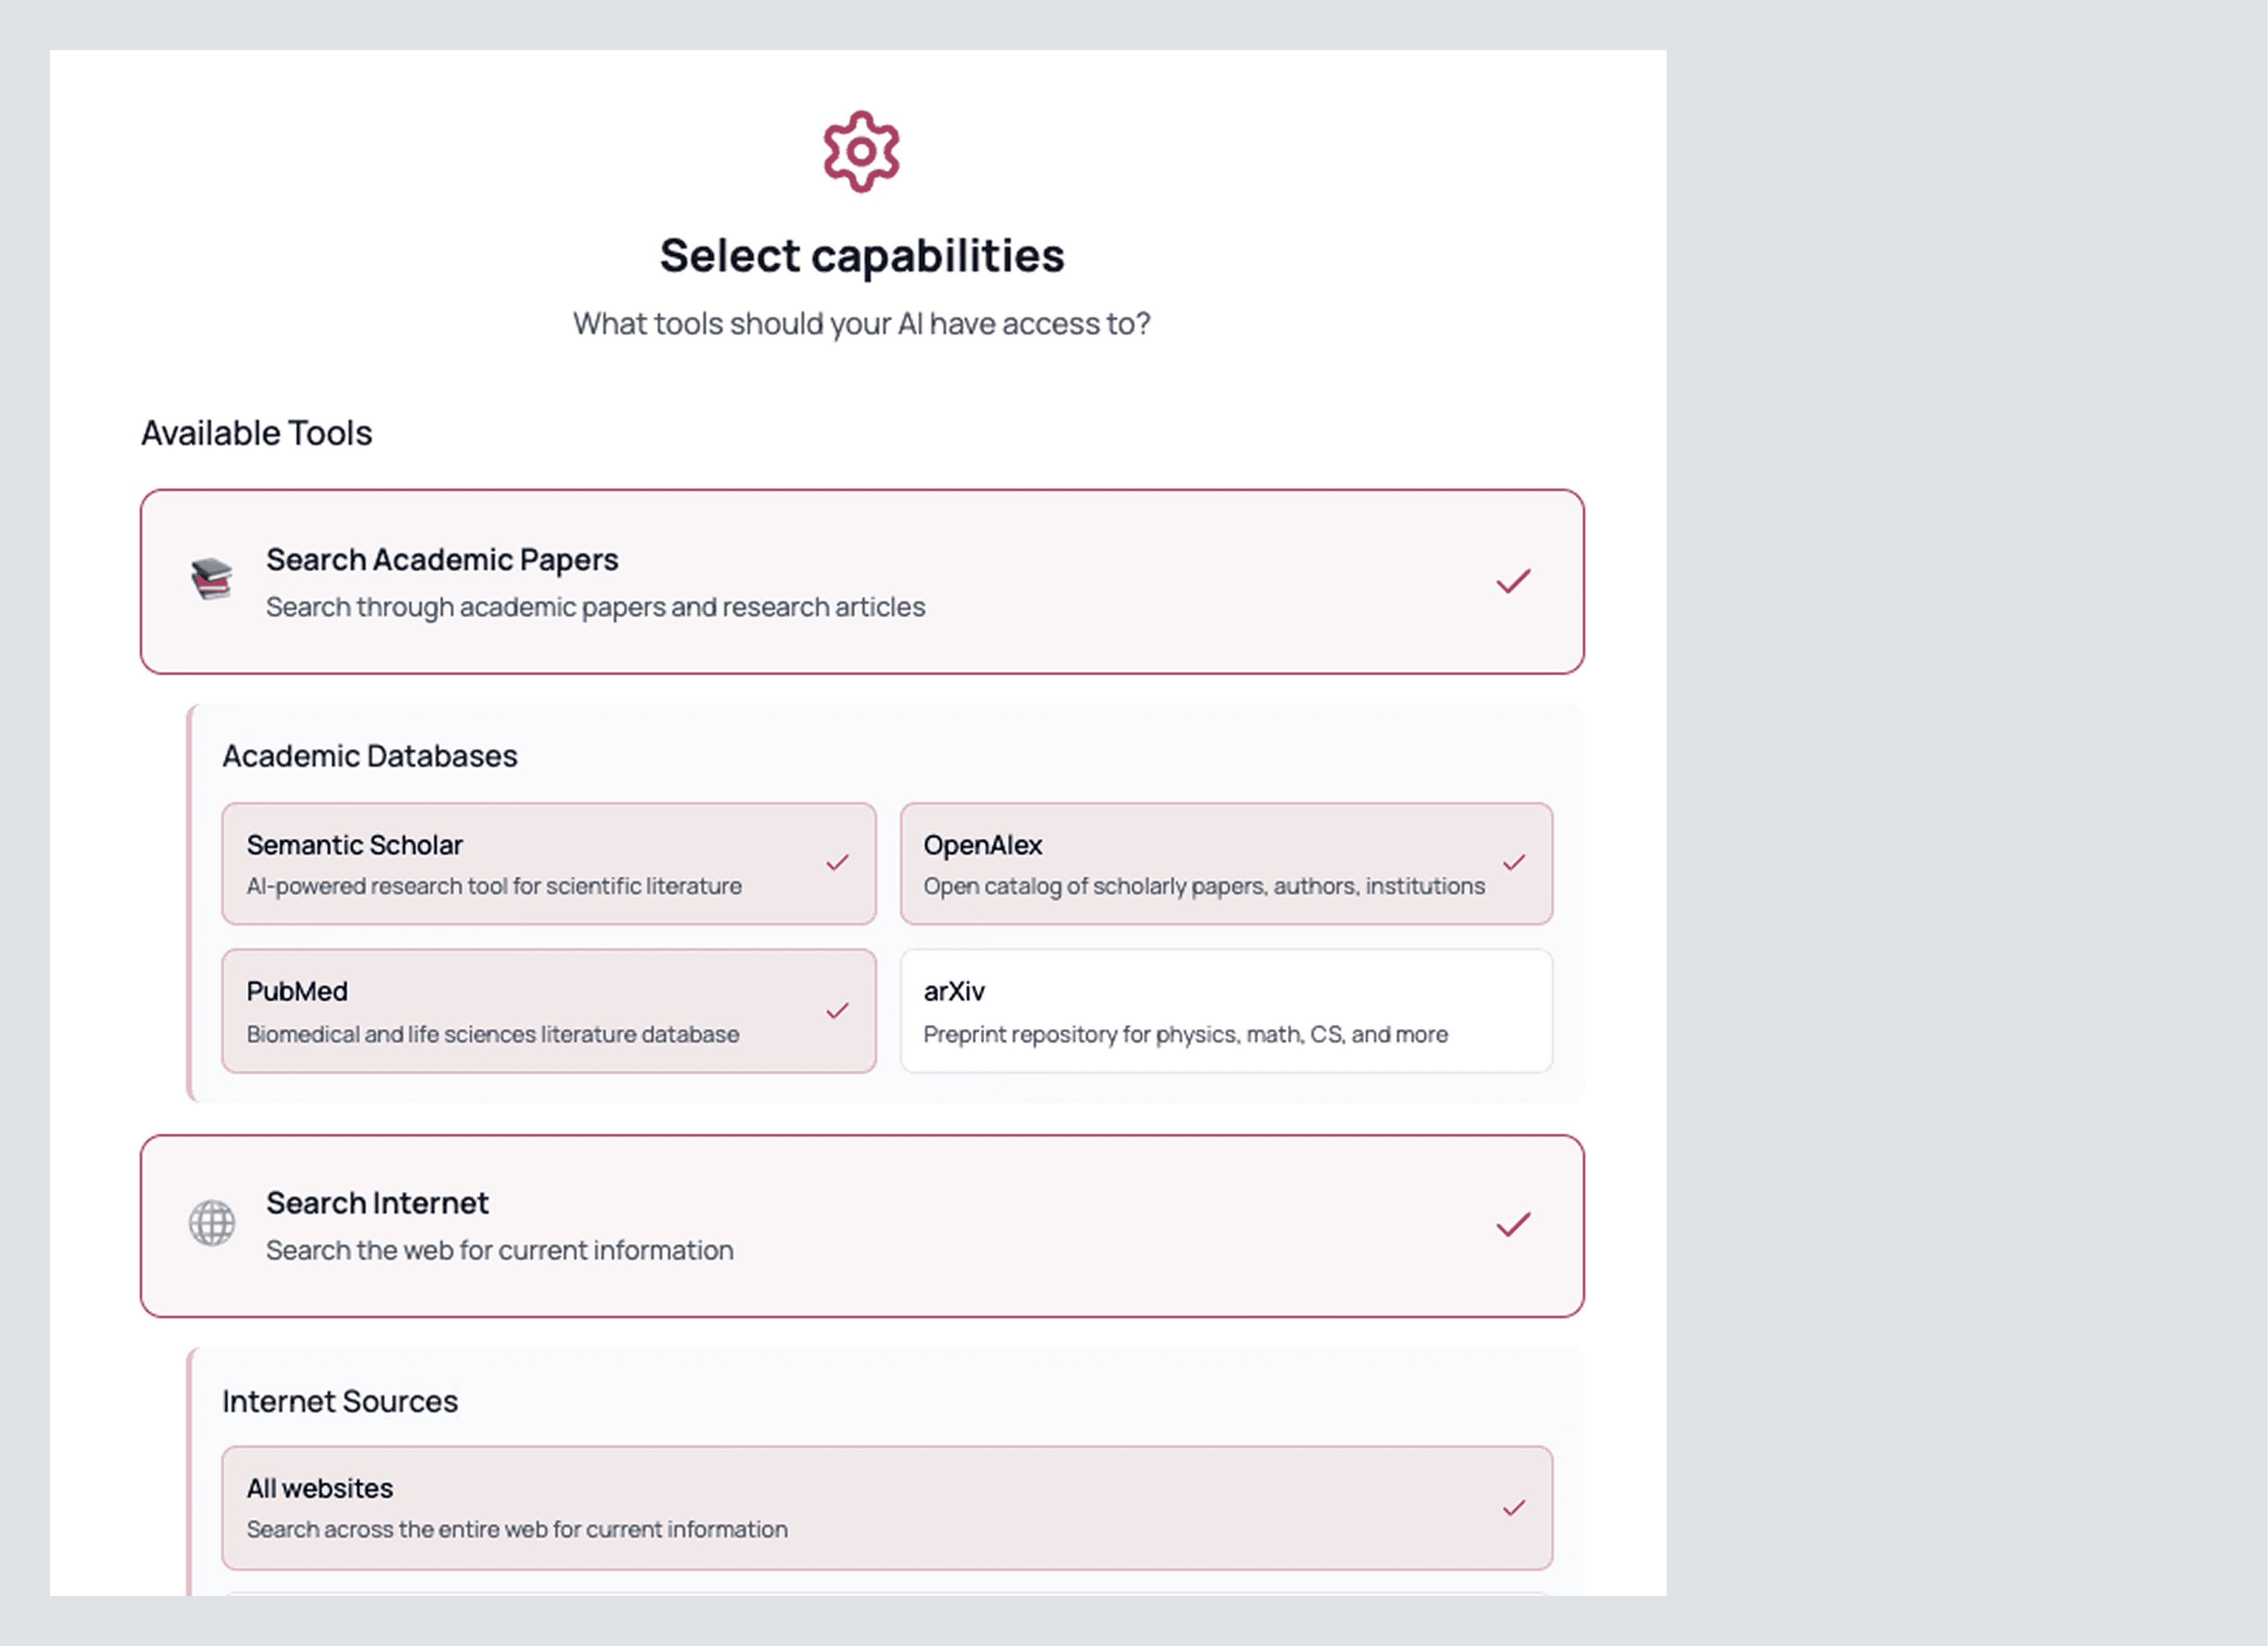
Define what it’s allowed to look at. Pick your academic databases (OpenAlex, Semantic Scholar, PubMed, arXiv) and whether the web is in-bounds (you can scope to .edu or .gov only if that’s your bar). If the tool should operate on your own corpus, upload PDFs, or connect a Library so it stays inside your set.
After you press continue, give it a system prompt that defines exactly what you want. Don’t be coy; explain tone, boundaries, and failure modes. You’ll find a template premade for you so you can brainstorm how you’d like to tweak the model.
Review once, then click Create. AnswerThis gives your tool a landing page with a simple input box and the sources it can use. Run it on a real prompt. If anything feels off, too many older papers, methods missing a column, edit the tool, tighten the description or system prompt, and run again. When you’re happy, invite teammates from the same screen so they can use it without touching your settings.
Look at the one I made!
A Final Thought From The Founders
Our tool has significantly improved the quality of researchers’ work while saving them valuable time. Although we’ve worked tirelessly to refine AnswerThis to deliver exactly what you need, it’s your feedback, comments, and suggestions that have truly shaped it into the one-stop research tool it is today.
On behalf of our team and the many researchers who benefit from AnswerThis, thank you for your incredible input. We’re constantly inspired by your workflows and the meaningful research you dedicate countless hours to. We deeply appreciate every single one of you who chooses AnswerThis and helps us make it better every day.
If there’s a section you think I’ve missed or any feedback you’d like to share, feel free to reach out at ayush@answerthis.io. Best of luck with your research!


